Quality laminate laying shouldbe made only on a perfectly flat and very strong floor surface. Even the best laminate can lose its high performance properties if it is laid on an ill-prepared substrate. The slightest roughness of the floor can cause strong creaking and deformation of the coating, as well as a significant reduction in the duration of its service.  Laminate should only fit perfectlyflat surface, so first you need to make the process of leveling the floor. Therefore, today, any work on floor repair begins with the alignment of its surface. In our time, the simplest and most affordable way to eliminate any unevenness is to level the floor with plywood. This method deservedly enjoys great popularity, since it does not require special knowledge and skills or large material investments.
Methods of alignment
Leveling the floor for laterdone in several different ways. If, for example, you are planning to lay plywood on a floor made of wooden boards, then you should simply fix the plywood on the old covering using self-tapping screws.  Arrangement of technological gaps during layingsheets of plywood. In this case, you need to use a sufficiently strong plywood, the thickness of which - at least 1 cm. But remember that before you start this method, you should carefully check how strong is the old wooden coating. Where more difficult, but at the same time and a more thorough way of leveling the surface is to install the floor from the plywood on the logs. Its main advantage is the ability to achieve a perfectly flat floor of plywood sheets, which is suitable for laying any floor covering, including laminate. Back to contents</a>
Requirements to be met
Before you start laying plywood sheetson the base made of concrete, it is necessary to properly prepare this surface. As you know, concrete is a material characterized by a rather high humidity. Therefore, before starting repair work, you should measure the humidity level in the room and make sure that it does not exceed the norm.  The technology of leveling the floor with plywood on the logs. To protect sheets of plywood from the harmful effects of humidity and low temperatures, it must be covered with a layer of a special antiseptic. This will avoid the formation of mold and fungus and thereby protect the plywood from premature failure. If you are not sure which plywood is best suited for leveling the floor, it is recommended that you purchase plywood sheets of category IV. This plywood is more affordable, besides it is treated with special compounds that will help protect the material from the harmful effects of moisture. In addition, it is absolutely harmless to humans and is ideal for leveling the sexes. Back to contents</a>
How to level the floor with plywood: step by step instructions
The technology of floor leveling with plywood is notis of particular complexity. Therefore, work can be done independently, without recourse to specialists. To make floor leveling, the following tools are required:
- hammer of medium size;
- perforator;
- Screwdriver;
- great roulette;
- level;
- electric jig saw.
 The scheme for repairing the floor with plywood. First, you need to prepare a concrete foundation, following all the recommendations that have been described above. The surface of the floor must be carefully dried and cleaned of dust and other contaminants. Now draw a line on the surface of the wall that will become a reference point for installing a new floor. This border must pass around the perimeter of the entire room and be carefully measured by the level to prevent even the slightest inaccuracy. Now you should prepare the lags. For this purpose, ready-made bars of rather strong natural wood are best suited. Today, ready-made wooden logs without special problems can be purchased in almost every store building products. When choosing a log, it is best to give preference to those that are made from carefully dried wood of coniferous trees. The size of such logs in the section should be approximately 40x100 mm. In addition, you will need to prepare special pads, which are also made of wood and installed directly under the lag. These gaskets must have a width of about 10 cm and a length of about 20 cm. As for their thickness, it should be at least 2.5 cm. When laying a log, it is important to remember that they should be located across the rays of light falling from windows of the room. Lay the logs at a distance of 50 cm from each other.
  The scheme of leveling the floor with plywood. During the lag laying between them there will be free space, which can be filled with various sound and heat insulation materials, for example, with mineral wool or basalt insulation. Thanks to this you will get in your room a very warm and absolutely noiseless floor made of laminate. It is important to remember that lags should never be placed close to the surface of the wall. Between the wall and the lag must be kept a small gap of about 2-3 cm. This will protect the floor covering from the laminate from deformation, which often occurs during the expansion of material caused by weather change. During the lag laying, make sure that the system you are installing is at the same level that was previously marked as the border of the new floor. If some of the lags were lower than you planned, then you can fix this situation by simply placing wooden wedges under them. Do not forget about the mandatory soundproof lining of soft material, which must be installed between lags, gaskets made of wood and wedges.
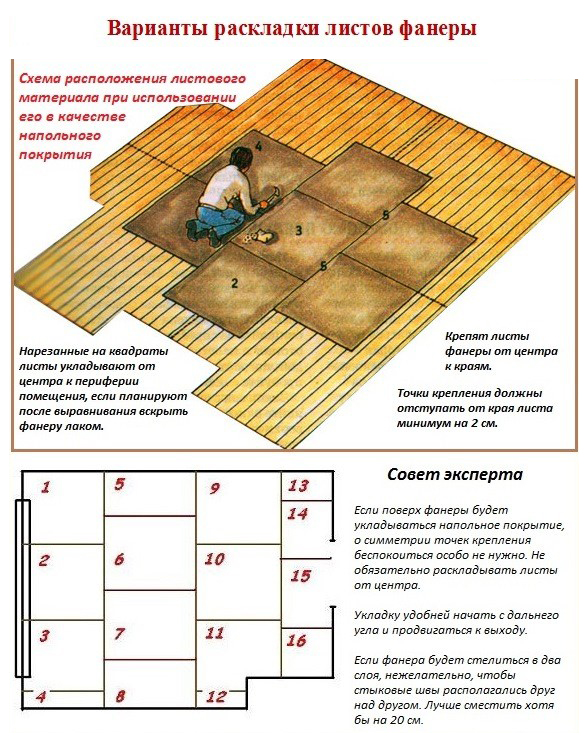
 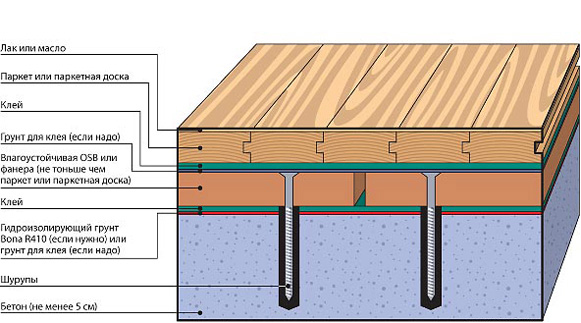 Floor leveling scheme with moisture resistant plywood.Linoleum or a layer of polyethylene foam can be used as such a lining. First, you should lay wooden logs around the perimeter of the room and only after that start laying the transverse beams. After the entire crate is ready, you can proceed with the installation of plywood. Plywood sheets should be cut with an electric jigsaw into equal parts with sides of 75x75 cm. These squares should be screwed to the joists in such a way that they are not close to each other, but at a distance of 2-3 mm. If you mount plywood to the logs without this mandatory gap, then over time the floor will begin to creak very strongly. Depending on the level of humidity or air temperature, the tree can change its original volume dramatically. And this can be the reason that the laminate will start to "walk". It is in order to compensate for such expansion or contraction of the tree that it is recommended to leave small gaps between the plywood sheets and between the logs and the surface of the walls. It is best to screw plywood to the joists using self-tapping screws, which must be placed at a distance of 50-100 mm from each other. If leveling the floor with plywood is performed in the hallway or in the corridor, then the logs should be laid in such a way that they stand perpendicular to the movement of people. Such a simple technique will help more durable and reliable. Leveling the floor under the laminate with plywood using a log is the most suitable option when there is a need to hide a large difference in height between different sections of the floor, which ranges from 5 cm or more. Such a floor made of plywood sheets will become a truly strong and reliable base for any modern floor covering. Real birch plywood is absolutely safe for both humans and the environment, which compares favorably with OSB, particleboard and fiberboard. In the case when the height differences in the surface fluctuate within a range not exceeding 1 cm, the installation of plywood sheets can be carried out directly on the concrete floor, without using wooden beams. For this type of work, the plywood must have a sufficiently large thickness of at least 18 mm. In this situation, you can use dowels or special adhesive mastic to secure the plywood to the floor. With a similar method of laying plywood, the floor surface is prepared according to the same rules as before installing wooden logs. A special notched trowel must be used to apply a layer of adhesive to the concrete surface.


