In order to make the room more attractive and unusual, you can do it yourself. In this case, you can get various options using different execution schemes, color schemes.  Framework of a two-level ceiling. You can not only save money by installing such a ceiling yourself, but also create an artistic solution that will constantly delight you and your guests.
Main structural features
 The device of two-level false ceiling fromdrywall. It's not difficult to make such a ceiling with your own hands, any home master who has elementary building skills and the desire to translate his ideas into reality will be able to do it. Installation of a two-level ceiling allows not only to transform the room, but to make it visually higher. A two-level ceiling made of plasterboard allows to realize an unusual lighting system and divide one room into different functional areas. GKL is a universal building material, it is used both for wall decoration and for ceiling finishing. To work with this material is simple, and you will be able to transform a room in a short time by creating in it a two-level ceiling made of plasterboard. Installation of a ceiling from a usual gypsum cardboard can be executed in the event that the importance of the room does not exceed 70%, if this figure is higher, then it is necessary to use moisture-resistant sheets. Before you begin to perform the installation of the ceiling, all engineering work must be completed in this room, and wet works such as screed and plaster are performed. Taking into account the developed scheme of a two-level ceiling made of plasterboard, ventilation and power supply systems must be installed in advance. In those places where the installation of lighting fixtures is envisaged, wiring must be done in advance. Back to contents</a>
Preparatory work
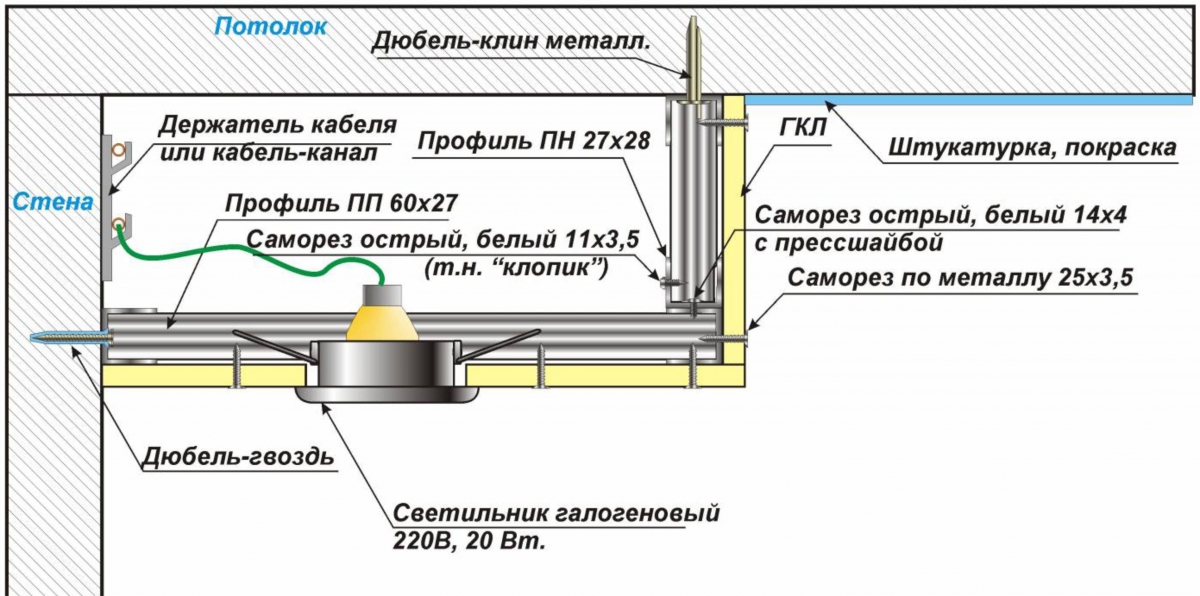
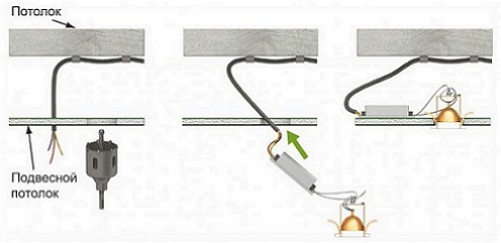
When it will be performed from drywall, it is necessary to observe safety measures:  Scheme of installation of a two-level ceiling.
- that the dust from the sheets does not get into the eyes or the respiratory tract, all work must be carried out using personal protective equipment: glasses, mask, respirator;
- in the room where the work is carried out, there should be a normal ventilation system, and it must be periodically ventilated;
- The tools used in the work should only be used for the intended purpose, otherwise the probability of injury is increased;
- During work, turn off the electricity to the room;
- since the work is carried out at altitude, make sure that the staircase or the woods are firmly and securely installed;
- The place of work should always be clean.
Before you begin to perform the installation of such a ceiling, you need to vacate the room so that it can be freely moved. 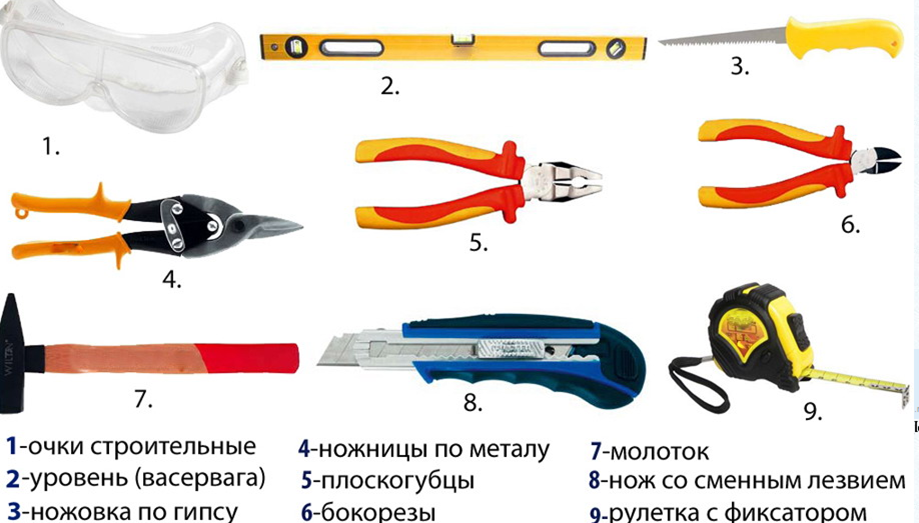 Tools for mounting a false ceiling fromdrywall. It is necessary to assess the condition of the ceiling surface, it is necessary to remove the old coating. If there are deep cracks on the surface or a deaf sound is heard during its tapping, the cover must be removed before the overlapping, after which these places are again covered with plaster. If in the room the level of the ceiling height difference is not more than 10 mm, then it is enough to putty, and after drying of the putty it is possible to proceed to the next stage of work. Before you begin to perform the installation of such a ceiling, you need to make the correct calculation. To do this, at least sketch out a sketch of the future structure, on which to identify the hidden and protruding elements, as well as the location of the lighting devices. Back to contents</a>
Calculation of necessary materials
 Projects of plasterboard ceilings.It is necessary to carry out the correct calculation of materials. First, the number of the UD-profile is determined, for which it is necessary to measure the perimeter of the room. Since we increase the resulting length by 2 times, this is necessary to create the second level. To calculate the required amount of frame CD-profile, it must be borne in mind that it is attached after 60 cm, and the length of one strip corresponds to the width of the room. The length of one profile is 3 m, having a total length, you can easily determine the required number of profiles. Direct suspensions are attached after 60 cm, the indent from the wall is 30 cm. Based on this, you can calculate how many suspensions are needed to fasten the frame profile. To increase the strength of the structure, it is necessary to install transverse jumpers. Having calculated the required amount of material for the first level, in the same way they calculate the materials that will be required to create the second level. In order for the structure to be durable and to have something to fix the vertical sections of the gypsum board, it is necessary to additionally install vertical posts. After you calculate the required number of profiles and suspensions, you can proceed to calculating the number of drywall sheets. This is easy to do, since the sheets are of standard sizes, knowing the area of the ceiling, you can determine their number. Back to the table of contents</a>
The order of performance of works
 Illumination of a two-level ceiling with the help of fixtures. To perform the work you will need these tools:
- scissors for metal;
- plane for processing edges of sheets;
- A hacksaw for working with plasterboard or a stationery knife;
- Profile prosector;
- Needle roller, it is needed when bent surfaces will be executed;
- Screwdriver;
- punch.
To cut the desired size of the sheet, you canuse a regular clerical knife. It is enough to draw a knife along one side of the sheet under the ruler, then it is easily broken in the right place, and the rest of the cardboard is cut with a knife. It is necessary to use the whole sheets to the maximum, the edge of the sheet should always be obtained on the profile or the jumper. If a hole is to be made in the sheet, it must first be secured, and then cut the hole of the desired shape along the template. First, the marking is done on the ceiling according to the pre-configured scheme. After that, around the perimeter of the room at the same height fixed UD-profile. With the use of direct suspensions, the main frame is assembled, using a CD-profile for this. In order for the main frame to be at the same height, along the edges of the UD-profile under the opposite walls secure the cord and on it expose all CD-profiles. By the same principle make and the frame of the second level. After the frame is made, it is possible to start the wiring device, the wires must be hidden in the corrugation. In order to conveniently mount the wires, and also to connect the fixtures, we need to make a reserve of the order of 10-15 cm. We attach the sheets first to the first level, so that the construction is more reliable, the GCR must be fixed at a distance, the distance between the screws is about 25 cm. If necessary, sheet on a curved surface, then you need to cut out a strip of the right size. Then it is wetted with water, and it is carried out with a needle roller, after which the sheet is easily bent. It remains to make holes for the fixtures, to prime the surface and to putty all the seams. Now finish the finish, connect and install the fixtures.


