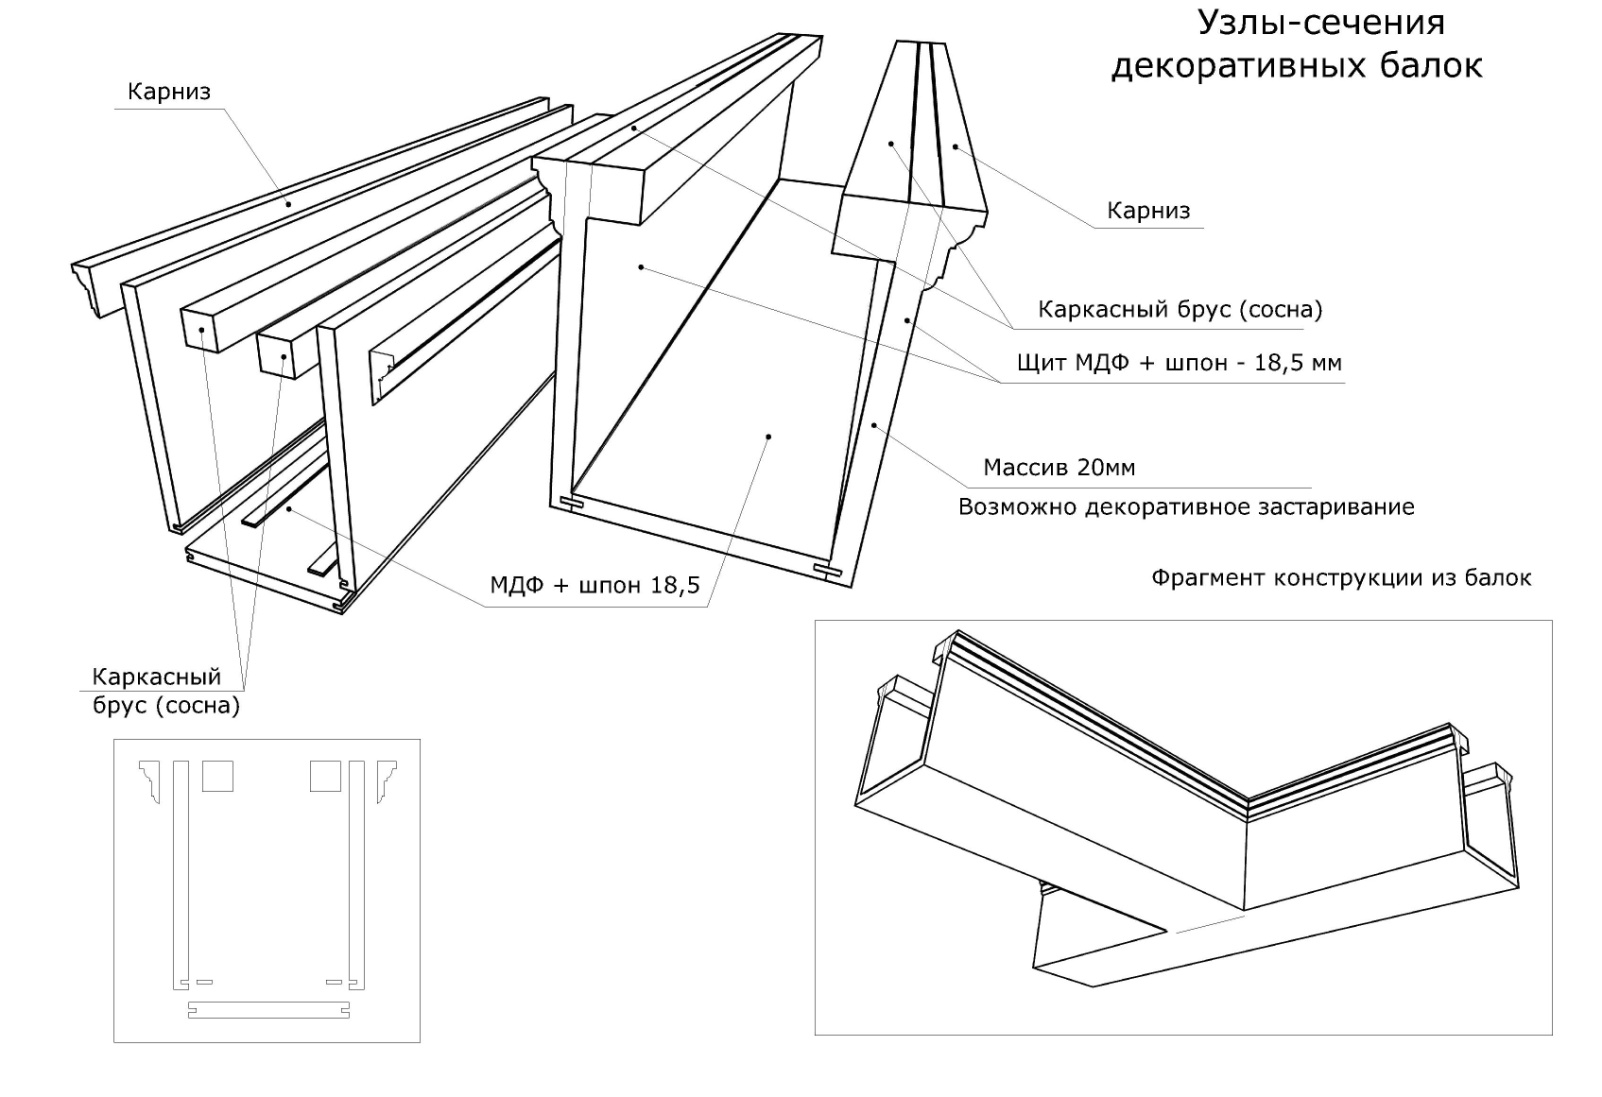
How to make beams on the ceiling with your own hands? It has now become very popular to finish the ceiling in the country style using special beams. The ceiling with false beams will give the interior of the room an original extravagant appearance.  The scheme of the beam ceiling device. Decorative beams on the ceiling can be mounted independently. The internal voids of these elements make it possible to hide various ceiling communications, electrical wiring. As a material for beams, wood is often preferred. Elements made of wood must be properly connected to each other. The material must be dry and of good quality. Docking elements can be made at an angle. But such installation is rather complicated and requires the involvement of specialists. If you decide to do the work yourself, you can choose a simpler form of decoration, but no less spectacular. It is much easier to connect individual parts of beams using bars.
Technology of work execution
Materials and tools:
- boards made of wood;
- bars;
- PVA glue;
- plane;
- drill;
- sandpaper;
- self-tapping screws.
First of all, the ceiling must be applied to the lines along which the beams will be installed. 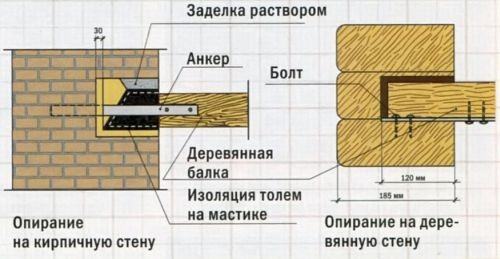 Scheme of fastening wooden beams. With the help of the plane, it is necessary to fit the side panels tightly to the base, the lower part of the false beam. Then, to the side elements, the bars are mounted using self-tapping screws. The bars should be fixed firmly. They must be screwed at a distance of 200 mm from each other. Then drill holes in the bars for fixing with screws to the base. The holes should be located 200 mm apart from each other perpendicular to the bar fastenings to the side. After this, apply glue PVA on the contacting sides of the beams. Then the elements are connected with each other and fixed with screws. Such a device will be strong and protect the joints from cracking. After such a connection is made, the seam between the elements will still be visible. Therefore, the seams between the false beams must be covered with putty on wood. Then they are treated with sandpaper, and all the beams on the ceiling are covered with paint. Back to contents</a>
Finishing of ceiling beams
 Scheme of ceiling falshalk construction. Perfectly look in the interior of the room ceiling beams, which imitate an ancient tree. How to create such beams on the ceiling? For work you need dry boards. You can use the boards that were in use. You can buy new ones. To create a country style, you need to grow old. Materials and tools:
- boards made of wood;
- ax;
- sandpaper;
- brush for metal;
- Sander;
- paint;
- varnish;
- protective glasses.
First you need to make a box. It is necessary to assemble the beams and connect them together by means of glue and screws as described above. Then, using an ax on the surface of the beams, many small chips are performed. In this case, the ax should be directed at an angle of 20 degrees to the surface. It is necessary for the chips to alternate with even areas. The depth of the chips can be about 5 mm. The more they are, the more effective the product looks. After that, the joints on the joints will become invisible. Then, using a grinding machine with coarse bristles, the surface of all the elements must be treated. This is necessary to smooth out the sharp edges of the chips. The work must be carried out in safety glasses, so that sawdust does not get into the eyes. In the process of grinding, the safety rules must be observed. If, during the work on the chips, the structure of the wood fibers appears, this will give the construction even more color. Then on the grinder you need to install a nozzle with sandpaper. Once again, you need to process the whole surface with a grinder. After this, attach the nozzle with soft bristles and once again treat the surface. At this stage, it is necessary to show special care. The entire surface must be carefully processed. There should be no rough edges and burrs. Back to contents</a>
Facing the structure
Wood must be protected from penetrationmoisture and microorganisms. To do this, the surface must be covered with a protective layer. You need to buy a special product, which is an antiseptic and at the same time gives the surface some shade. If necessary, the surface of the beams can be covered with this tool in several layers. Then you need to wait until the surface dries. After that, small roughness may appear. They must be removed manually using sandpaper. After that, the surface is removed and covered with varnish. You can use a colorless or tinted varnish. After drying, the design will acquire a unique look. The finishing of the ceiling with beams made of wood, made using this technology, will give the room a spectacular appearance, will be strong, reliable and durable.


