An updated home interior always pleases the eye. If there is a desire to improve the appearance of a dwelling and get not just a stylish design, but also to make it beautiful and modern, the owners usually long and carefully choose not only the furnishings for walls and furniture, but also pay attention to the design of the ceiling.  Scheme of the fabric ceiling "Starry sky". There are a lot of design solutions in which excellent modern materials are used for finishing the ceiling. You can choose stylish drawings and any colors, and the ceilings themselves to build in a variety of forms. Do not lose popularity and multi-level designs, equipped with lighting, as well as stretch ceilings. One of the most common methods for making changes in the interior that is familiar to the eye is the design of the ceiling space with fabric material.
Fabric stretch ceilings
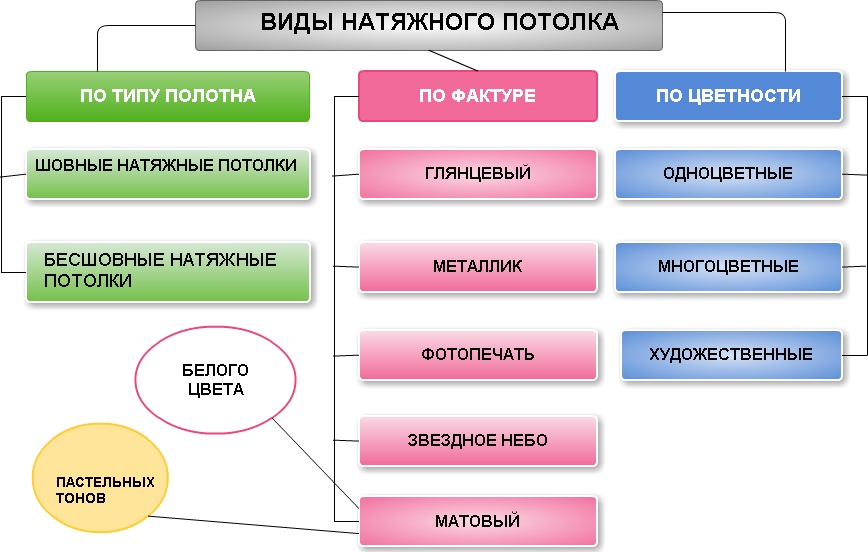 A short scheme for the classification of stretch ceilings. Cozy and stylish interior is obtained if you choose for the finish of the ceiling tension option. In this kind of finishing, the main advantage is the quite affordable price for all the work necessary for the arrangement, a simple installation. Very convenient and the process of preparation: here it does not take long and thoroughly clean the surface. During the work the room will remain relatively clean, dust and dust will not accumulate, which is a significant disadvantage when running whitewash or wallpapering. It is possible to make the ceiling of the fabric with your own hands. The market of building materials offers consumers a large selection of textures and a variety of color solutions for stretch ceilings. If in the future there will be a desire to change the design of the room, the tensioning cloth can be easily and quickly removed and replaced with another one. Advantages of stretch fabric ceilings:
- ease of care: the ceiling will not accumulate dust, and it is washed very easily;
- The ceiling is environmentally friendly and does not give off unpleasant odors;
- most materials are made in such a way that the sunlight does not spoil their shade;
- durability and practicality of the material.
Fabric ceiling, serving as a varietytension ceilings, can dramatically change the design of any room. It is a base with impregnation with a special composition of polystyrene. Treated in this way the material is very strong, the ceiling has an aesthetic appearance. Since the suspended ceilings from the fabric of the seams do not have, the upper surface of the room acquires a neat, impeccably elegant appearance. Material for the fabric ceiling can be made by natural or artificial fabric, fiberglass. In the latter case, the ceilings are more durable, their performance properties contribute to the fact that the material safely withstands both low and high temperatures. The stages of installation in the construction of a ceiling on a fabric basis are almost the same as those for a PVC construction. Back to contents</a>
How to prepare the ceiling for finishing with a cloth?
To make the surface of the ceiling perfectlysmooth, it is desirable to align with a special mixture and plaster. To achieve a good visual effect, you need to stretch the fabric as much as possible, roughly like a canvas on a stretcher to create a picturesque masterpiece. Thoroughly clean the surface of the existing contaminants, seal with a putty crack, defects. Dry all and sand with sandpaper to remove any roughness. Strictly watch that there are no stains left that could penetrate through the fabric. If it is not possible to remove them, apply a layer of nitro-enamel on the spots or cover the defective places with a thin aluminum foil. If oil paint gets on the surface, wash it with water with the addition of soda, dry the surface and do a cleaning operation with sandpaper. Back to contents</a>
How to mount ceilings from fabric?
Installation of fabric ceiling is the attachment of textile material to the frame frame.  Harpoon and wedge systems for securing tensionceilings. The principle is the same, but the baguettes can be used different. For example, a baguette with a cam profile or a wedge profile can be selected, and wood can also be ordered in woodworking workshops. Let's consider the last of these ways. When choosing baguettes factory production operations will be approximately the same, except for the preparation of the frame. Prepare wooden bars. Their section must be 40x40 mm - usually such orders are easily performed in construction workshops. It must be borne in mind that the corners of the bars in the workshop are a bit filed, so the length of the beam should be ordered a little larger. And it is better to carefully measure all sides and show in the workshop the results of measurements, explaining that you need details for the stretch fabric ceiling. Also stock up with Velcro tape - it can be found in shops for sewing.
 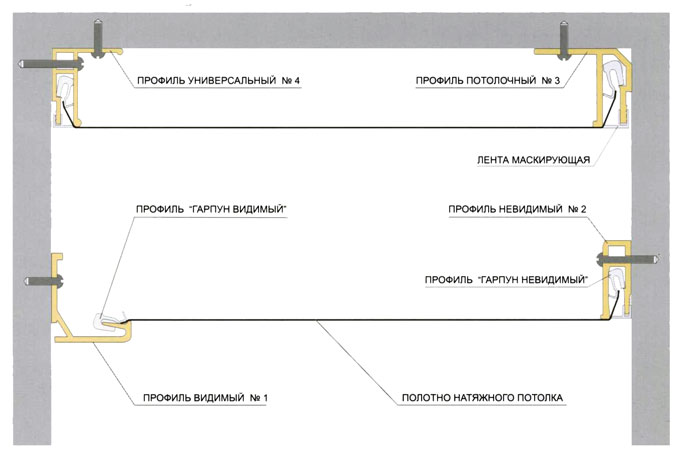 The scheme of a two-level stretch ceiling. From the bars collect the frame, which will have to be attached to the ceiling or to the wall. Attach the hard side of the tape to the protruding part of the bar: first glue on liquid nails, then fix with a construction stapler. The back of the tape along the perimeter is sewn to the fabric web. Run the perimeter control line: for this, mark the level on the wall with the level at which you are going to install the construction, and transfer the point to each corner. Accuracy check with roulette, building level. Beat the line between the dots with a paint line. For fastening the baguette to the surface, use screws and dowels. Installation can be done in several ways. For example, the resulting structure can be attached to the ceiling by using for this chain: on them the frame is simply suspended, making fastening with the help of pipe holders. When the hooks are screwed into the frame and finally suspended, the stretch ceiling looks unusual and very impressive. To perform this design, you must carefully measure the frame and adjust it on all sides in such a way that the details of each side will be parallel to the walls. The design is not only reliable, but practical. It can be easily removed from the ceiling if desired, to clean the stained canvas or change it to another. The fabric is simply removed from the tape. Lighting devices try to fix on the mounting brackets - this will allow creating additional fixation points for the canvas. For example, it is possible to make brackets for fastening from plywood square pieces attached to the base ceiling on tape suspensions made of metal. In another variant, the frame is attached to the wall, and the canvas is already fixed to it. To attach the cloth, stretch it and tuck it in the baguette on the side where the wall is longer. Step back from the angle of 15-20 cm and strengthen the site with a length of 30 cm. Pull the fabric and do the same with the other side. Pulling, gently fill the material in the profile. If you use a spatula, you should choose not particularly sharp, so as not to damage the tissue. Go to the opposite edge and perform the same operation. Pulling the canvas along the long sides, do the same with the short ones. If you accidentally made wrinkles on the fabric during fixing, it's not difficult to remove them using a construction hair dryer. Problem areas warm up in smooth circular motions, put the temperature 120 degrees. The tool should be kept at a distance of 20 cm from the canvas. At the end of the work, remove the pieces of material that protruded from the edges.


