In recent years, have become especially populartwo-level plasterboard ceilings. They give the room a special, festive look and serve to mask light sources. They hide all the flaws in the base, for example, cracks that may eventually appear on the original overlap. Can you do it yourself? What do you need to know for this? What materials and tools will you need? Below you will find recommendations and describe the technology, according to which, if it is accurately performed, it will be possible to do it yourself from drywall.  The two-level ceiling will hide even the large flaws of the ceiling slabs and will give the interior of the living room a festive look.
How to choose the right structure and materials
If a person does not do this kind of work, thenit is better to start with a simple option. You can consider different schemes of a two-level ceiling, using the appropriate literature. But most often it is difficult to make a choice. Therefore, it is better to start with a fairly simple design: it is performed with a reduction in the form of a semicircle, which is done on one of the walls. The difference in levels is chosen in the range of 8-12 cm. The device of such a ceiling can be used by any person who has used the tool at least once in his life.  The lower level in a semicircle is the mosta common and easy-to-use version of a two-level ceiling. The next step is to determine the required number of drywall sheets. This is relatively easy to do as they are 2.5 m long and 1200 mm wide. Knowing the area of the room, it is easy to calculate the required amount of material. In order not to be mistaken, it is better to purchase 10% more than the figure obtained by calculation. When carrying out work to lift the sheets, the help of 1-2 people may be needed, since the sheets of material are quite heavy. Cutting is done with a construction knife with replaceable blades. Everything you need for work is purchased on the construction market. For yourself, you will need sheets of gypsum board with appropriate fittings and fasteners. You will need a simple tool. Of this set, the electric drill and screwdriver are the most expensive and complex items. If a person has the right arsenal at home, then the task is simplified. An approximate list of everything you need is attached below. Back to the table of contents</a>
The ceiling of plasterboard with their own hands: the initial stage
The work begins with the marking and assembly of the first-level frame. This is done using the following technology:
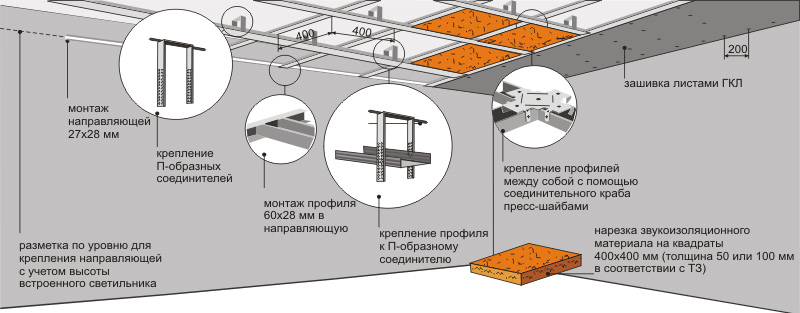 The technology of ceiling installation from gypsum board. On the perimeter of the walls, mark a line 8-12 cm from the ceiling with a pencil or a colored felt-tip pen.
This concludes the first stage. When carrying out these works, it is necessary to conduct and strengthen the electrical wiring on the profiles. For individual light sources, additional fasteners must be made (this applies to halogen lamps). There must be holes in the right places. If this is not done, then with ceiling ceilings the main material will not be possible to install lighting, so after installing the first tier, you need to strengthen all the electrical fixtures and check it in action. Back to contents</a>
Installation of the second level of the ceiling, its putty
The technological process of doing this work is as follows:
 Installation scheme for the second level of the ceiling andlighting devices. Begin reinforcing the frame for the second tier, 8-12 cm below the sheets of the first layer along the wall along the perimeter of the entire room, mark the horizontal line with a colored felt-tip pen.
After that, you need to fill in the resultingconstruction, close the special bookmarks of the screw heads. After applying the putty, wait a few hours for it to dry completely. On the heads of screws put on special pads and also cover with putty. Then proceed to coloring in the selected colors in advance. Initially, the entire surface is primed. After this, apply the first coat of paint. After it is completely dry, make the finish coat. On this work on the installation of a two-level design is almost complete. Back to contents</a>
What materials and tools need to be purchased in the construction market?
- sheets of plasterboard (standard);
- profiles of UD and CD;
- Metal and plastic dowels;
- suspension (wire or perforated);
- screws and special plugs for them;
- putty;
- paint;
- electric drill with drills;
- Screwdriver;
- fixtures, electric wires, sockets and switches;
- building level and roulette;
- putty knife;
- brush or paint roller;
- scissors for metal;
- a construction knife with a stock of blades;
- screwdrivers;
- pencil and colored pen.
The manufacture of multilevel structures consists offrom the stages of the creation and docking of single-tier ceiling systems. With the precise implementation of the above recommendations and operations of the technological process, it is possible to create ceilings of the desired configuration. For this, you need finance and a desire to do something with your own hands.


