It's no secret that the final stagerenovation in the room is the installation of interior doors. The new doors are meant to replace the old ones, giving the entire space a fresh look. They should match the look of the room and be in harmony with its furnishings. Moreover, modern interior doors not only separate the living areas of the house and decorate the interior, but are also able to provide good sound insulation and maintain a comfortable indoor temperature. They are made from solid wood, which can be additionally covered with wood veneer, or from modern artificial MDF material. Doors can be blind or have glass inserts. The color of such a door can be any, so choosing the right one is not so difficult. Moreover, without resorting to the help of hired specialists.  Installation of interior doors.
Necessary tools, supplies and preparatory work
Before installing a new door, you need torelease the doorway from the old one. The door leaf is simply removed from the hinges and removed from the room, and the door frame is removed very carefully, so as not to damage the adjacent internal partition. To do this, it must be cut by a Bulgarian and taken out in parts. Then you need to clean the opening from the remnants of the solution and old fasteners. It remains to adjust it to the size of the new box. This size is determined by adding the width of the door leaf, the thickness of the pillars of the box and gaps for free opening the door and for placing the mounting foam. 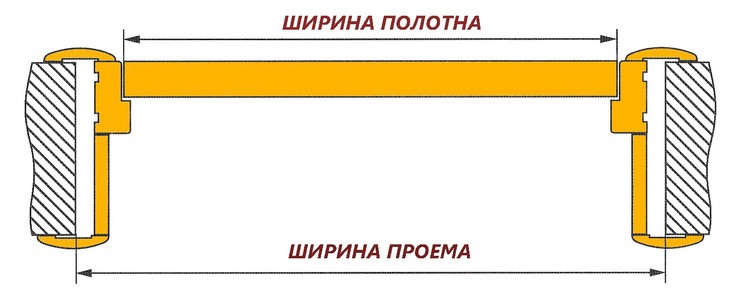 Scheme of the dimensions of the interior door leaf fromwidth of the doorway. In particular, interior doors often have a standard width of 60 cm at a height of 2 m and a transverse and side racks have a thickness of 2.5 cm. For unobstructed movement of the door between it and the side pillar should remain 2 mm on each side and as much from above, between the cloth and the crossbeam of the box. To leave room for mounting foam, between the outer edge of the pillars and the adjacent wall, leave 2 cm on each side. If space is lacking, the opening can be easily expanded with a perforator. If it is too wide, it can be narrowed by installing inserts from a wooden beam. Usually the details for the door frame come complete with the canvas, but it is necessary to adjust them to the size already in place. In order to install the interior doors went smoothly and without any delays, you must first purchase consumables and prepare the necessary tools. Materials will require anchor bolts, wooden or plastic wedges, mounting metal plates for the profile, screws, assembly foam and gypsum plaster. From tools - a hacksaw for wood, a chisel and chisel, a cordless screwdriver, an electric drill, a tape measure, a building level and a plumb. Only having all this at hand, you can proceed with installation. Back to contents</a>
Mounting the door frame
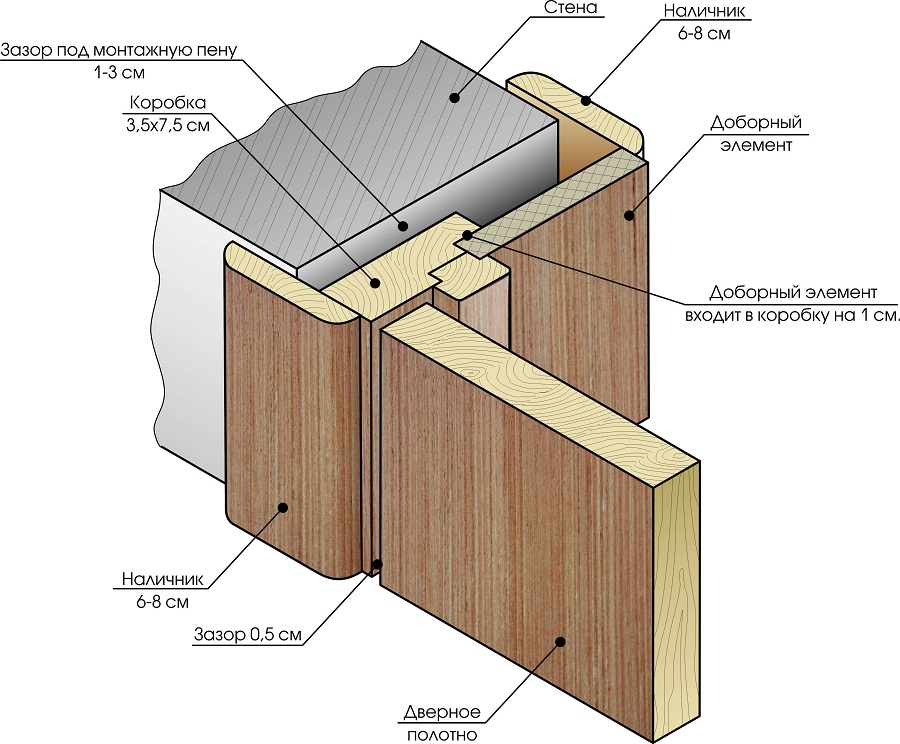 The scheme of the installation of the door frame. To begin with, measure the required length of the side racks and the crossbeam. After this, the hacksaw is cut with such a calculation that both ends of the crossbar and the upper ends of the side rails have bevels at an angle of 45 °. The bevels of the side racks must be directed towards each other. Then the side posts and the crossbar are fixed together with self-tapping screws, for which it is necessary to pre-drill the holes so that the wood does not crack. The hinges are attached to the door leaf itself, having retracted from the lower and upper edges by 20 cm. For their installation in the canvas, grooves are made by chisel and chisel. If the sidewall is pasted with veneer, it is cut out with a knife before it. Each of the loops is attached to 4 screws. After installing them, the door is inserted into the assembled box, and the same grooves for the loops are marked and hollowed out on one of the side racks. Do not forget to observe the necessary clearances. At this stage, you must first decide which way the door will open. Back to contents</a>
Installation of the assembled box in the opening
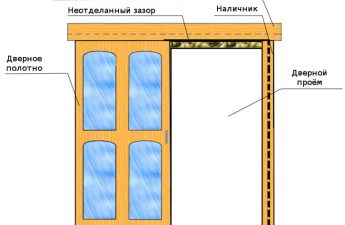
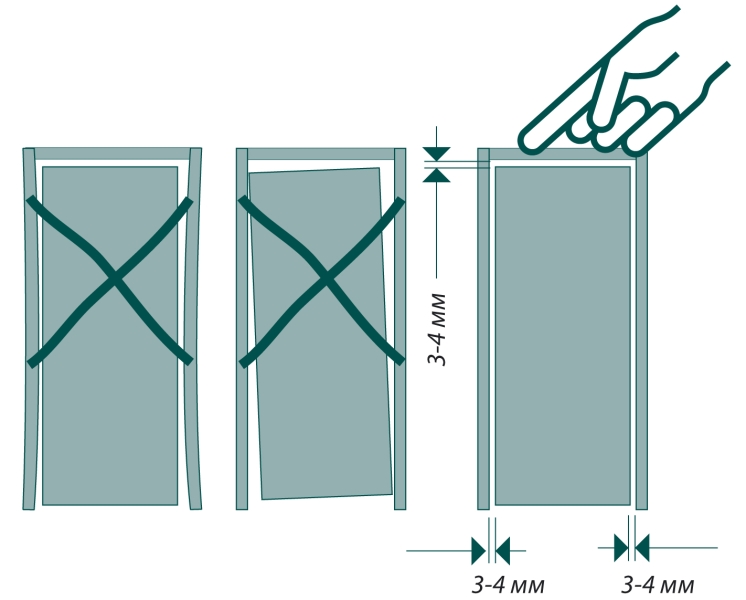 The gap between the doors and the frame.It is worth mentioning that there are two ways in which one can enter a wall opening. This can be done in a single block, when the door is already fixed in the box, and separately, when the box is first fixed, the platbands are mounted on it, and only at the end the door is hung. The first method saves a lot of time, but it is much more complicated and requires a lot of effort, therefore, for installation on your own, it is better to choose the second method. The assembled box is gently lifted into the opening and secured with wedges, which are driven in between its outer edge and the adjacent wall edge every 20 cm. In this case, the position of the crossbar is leveled using a level, and the side posts - using a plumb line. After that, through holes are drilled in the racks and the crossbar at a distance of 25 cm from each other, into which the anchor bolts are inserted. They enter the wall by 10-15 cm, securely fixing the box in a given position. At the same time, the bolt heads are hidden in secret recesses, which, after the door is installed, are sealed with putty. After that, they are sanded with sandpaper and the racks are painted. If the interior doors are covered with veneer or made of MDF, the use of anchor bolts is very difficult. It is very difficult to hide the traces of installation on the surface of the racks of such a door, since it does not need staining. The only place where you can make holes for the bolts is in the grooves for securing the door hinges, as they will be covered at the top. On the opposite side, this is where the door lock back plate is installed. Meanwhile, MDF struts are prone to bending much more than those made from solid wood, due to the very properties of the material. If the post begins to bend outward of the doorway, it is leveled by hammering in a spacer wedge at this point. If it bends inward, it is first leveled and then fixed with a metal profile mounting plate. Back to the table of contents</a>
Final work
After installing the box in the doorwaysuccessfully completed, hang the door itself and check how freely it opens and closes. If there is no mashing anywhere, the gaps between the outer edge of the door frame and the wall are filled with mounting foam. Before that, the door is covered with plastic wrap, and the box with tape, as the foam can leave spots on their surface. After it finally stiffens, excess streaks are cut with a knife. Then you can attach the clypeus to the door. It, as well as the side racks and the crossbar of the box, is measured by a tape measure and cut off with a hacksaw, leaving the butt at an angle of 45 °, and is fixed on top of the box on both sides of the door. It remains only to install the door handles and lock. The interior doors in this respect are practically the same as the entrance doors. The lock can be both embedded and overhead and for its installation you will need a drill, a chisel, a chisel, a hammer and a screwdriver. Installation of interior doors usually involves a combined lock with a handle on the latch. In general, it can be noted that the installation of interior doors is an operation, although quite complex, but quite feasible for doing it yourself. You just need to do everything carefully and follow all the above recommendations.