It is possible to make a laminate floor covering indoors and quickly enough. This work is possible even for an unprepared person.  With the help of laminate it is possible to create a strong,beautiful and reliable flooring. The cutting of the material is very simple. Thanks to this, even in a room with a complex configuration, the laminate can be laid easily and quickly. The main thing in this work is to take into account all the features of laying the laminate and the recommendations of the producers of this coating.
Substrate preparation for laminate flooring
Do-it-yourself features require careful preparation and leveling of the base for it. They can be served by:
- cement-sand screed;
- linoleum;
- tree;
- ceramic tile.
 Scheme of a concrete floor screed.It is possible to lay the laminated flooring on the cement-sand screed only after it is completely dry, and this takes 25-30 days after it has been poured. The condition of the old cement-sand screed must be checked, and if there are minor cracks or irregularities, then fill them up with a self-leveling mixture. If it is significantly damaged, the screed must be removed and a new one made. Next, a vapor barrier layer of polyethylene film is laid on the screed with an overlap of 20-25 cm and an overlap of 10-15 cm on the walls, while the joints are fixed with tape. If the base is a "dry screed", then it is not necessary to lay the vapor barrier film on top, since such a screed already provides for a vapor barrier layer. The wooden base must be of good quality, not damaged by mold and pests. Loose floorboards are fixed to the logs with self-tapping screws. Irregularities and differences can be eliminated by scraping. Severely damaged elements of the wooden floor are completely disassembled and replaced with new ones.
 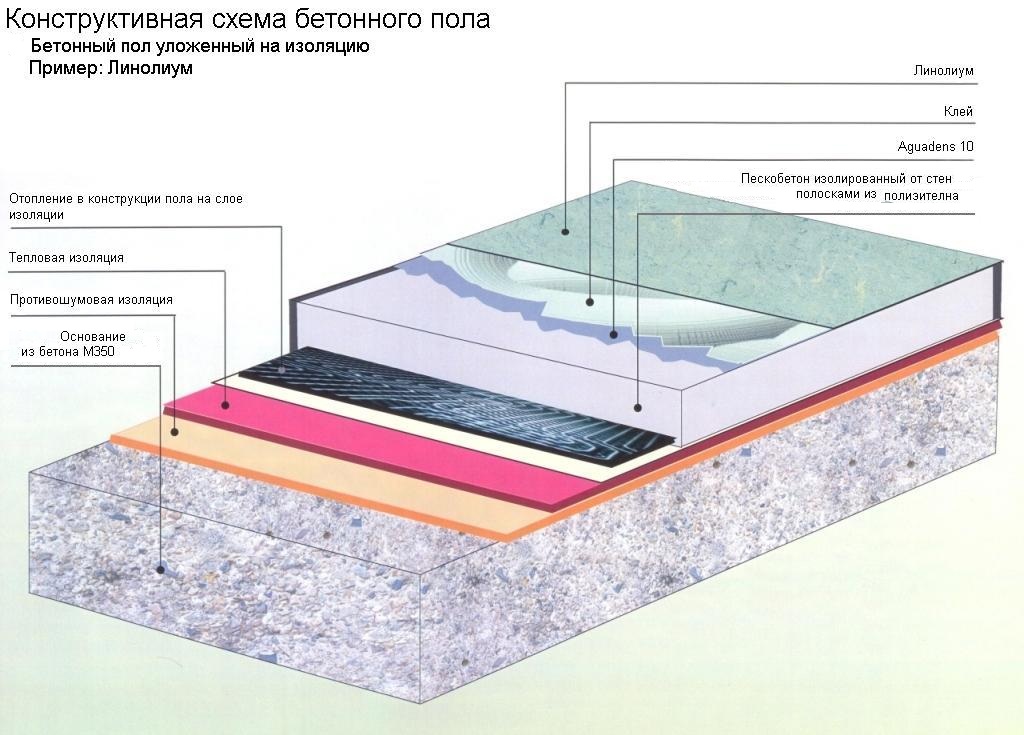 Plywood laying scheme.Wood and concrete bases can be leveled with chipboard or staggered plywood. It is not necessary to lay a vapor barrier substrate on a wooden base, but it is necessary to make a soundproof one. If ceramic tiles or linoleum are laid in compliance with all the rules, then they are quite suitable as a base for laminated flooring. These bases also do not need vapor barrier, and by laying the substrate down, you can immediately. Back to the table of contents</a>
When can not laminate be laid?
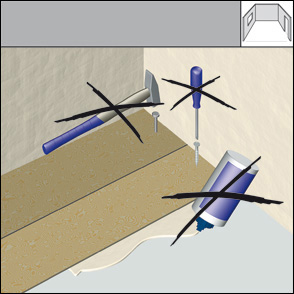 Wrong way of laying the laminate. Laminated floors are not a universal coating, and there are a number of features when laying a laminate, when it can not be laid:
- they can not be laid on the carpet;
- Do not laminate the floor in rooms with high humidity (bathrooms, sauna);
- in no case it can not be laid on an electric "warm floor";
- Do not glue the laminate to the base.
For the corridor and kitchen, select the appropriate wear class. Back to contents</a>
Materials and tools for laying laminate
Tools for laying laminate: 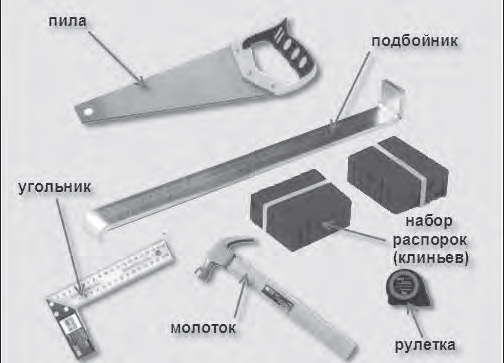 Tools for laying laminate.
- electric jigsaw;
- construction knife;
- roulette;
- a building corner;
- pencil;
- a hammer;
- staple for laying laminate;
- wooden bar.
For laying a laminate, you need materials such as:
- laminate;
- primer;
- substrate for laminate;
- polyethylene film 200 microns (for laying on concrete);
- wedges for the device of technological backlashes between a laminate and walls;
- plinth and fastening for it;
- joiner glue.
Buy laminate should be with some margin. Despite the fact that its assembly is simple, mistakes are allowed quite often and several elements can be spoiled. Basically, such troubles occur when the slats need to cut out the parts for communication or the bends of the wall.  To ensure clearances between the wall and the laminateit is necessary to use wedges. Finished wedges for providing gaps between the wall and the floor covering can be bought in the building shop or use pieces of boards, plasterboard or trimming laminate. The technological gap should be approximately 10-15 mm. Adhesive is used to secure the adhesion of the elements of the laminated flooring in the locks. Do not glue the laminate directly to the surface of the substrate. But you can lay this floor covering and without the use of glue. After purchasing the material, he should be allowed to lie down in the room where the floor covering will be laid, for 1-2 days to adjust its temperature and humidity. Back to contents</a>
Stages of laying laminate flooring
 Layout of laminate flooring.
Back to contents</a>
Diagonal laying of laminate
There are various, among which there is a largediagonal styling is popular. So you can visually increase the space of the room, make it wider. The diagonal laying of the laminate entails an increase in its consumption by about 7-8% of the usual laying.  Variants of laying laminate.
Back to contents</a>
Bypassing the protrusions of walls and pipes
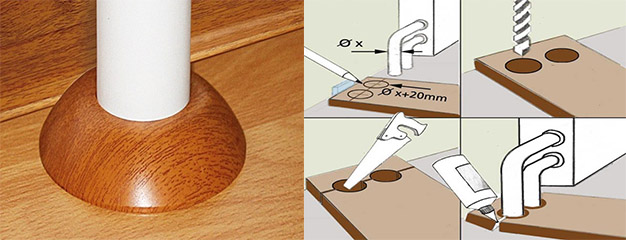 Scheme laying the laminate near the projections of pipes. If the lamella rests against a turn or protrusion of the wall, then it must be cut with an electric jigsaw of the corresponding shape of the projection. If the ledge is a plastic or plasterboard casing, it is better to trim the bottom of the lining and insert the lamellae under it, bringing it to the wall and leaving the technological gap. For this, you can make a change in the lamella lock. Cut the protruding edge on the bottom of its end. So do not need to lift the entire element to lock the lock. Although the strength of the connection will be reduced. Therefore, the joints of the lamellas, before they join, glue with glue. To trim the lamellae under the heating pipes on it, you need to mark the location of the pipes along the width. After this, attach the lamella on the side to the pipe and put it against the wall, inserting the peg. So it is possible to mark on the lamella the distance from the pipe to the wall. The intersection of these marks determines the location for the hole for the pipe. Use drill-ballerinas to drill this hole. Their diameter should exceed the diameter of the pipe. Back to contents</a>
Completion of laying the laminate with your own hands and installation of skirting boards
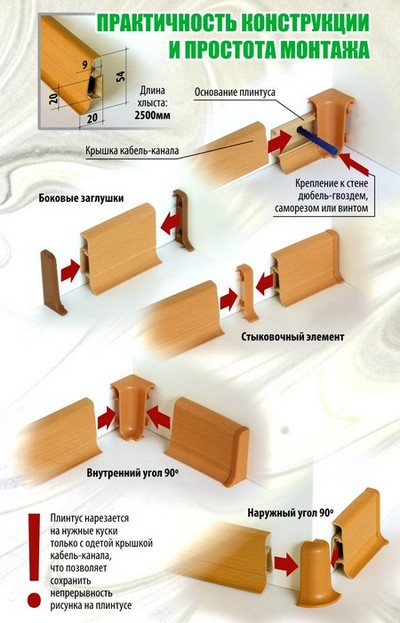 Scheme of installation of plastic skirting boards on a laminate. When the laminate flooring is finished, remove all the pegs and trim the edges of the substrate if they protrude strongly. The amortization belt of the substrate should be 1-2 cm. Now you can proceed with the installation of skirting boards. This is the final stage of floor covering. The skirting board is not fixed to the laminate. Mount it should be to the wall. There are different types of skirting, so they have different mountings. It is important to follow the instructions of the manufacturer of skirting boards. If the walls are not perfectly even, then it is better to use a plastic skirting board, since it is able to repeat the contour of the wall and not form a gap that spoils the whole appearance. Wooden skirting boards should be used only if the walls are perfectly level. If you are laying wires in the plinth, they need to be fixed in special grooves so that they do not get into the gap between the laminate and the wall. Cut-outs in lamellas for pipes can be covered with special decorative contours.


