To make a fluorescent lamp yourhands in leisure hours will be able to almost any master who has an idea of the basics of electrical engineering. Lamps are produced with a different spectrum, which makes it possible to install lighting of the most comfortable type.  In the event that the factory lamp is not suitable for your aquarium, then do not rush to order it from the master, you can collect it yourself.
Fixture for the aquarium with their own hands
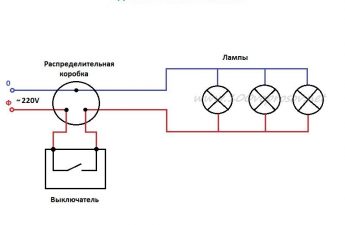
To provide start-up and further work forfluorescent lamps, requires a cumbersome, but simple system of electronics. You can use in the work and the helix diagram, it takes much less space, but it is not very reliable in its reviews. The resulting lighting device should be sized to cover the entire upper part of the aquarium. This will help reduce the evaporation of water from it, and much less garbage will fall into the covered aquarium. It will be difficult to jump out onto the floor.  Scheme of connecting a fluorescent lamp. The lighting of such a device will not be unpleasant to beat in the eyes, remaining locally over the aquarium. For the same purposes, you can use a conventional lamp screwed into the reflector, but this design can spoil the interior. To make a lamp specially for an aquarium you will need:
- fluorescent lamps;
- plexiglas;
- sealant;
- glue;
- wire with timer and plug;
- insulation tape;
- plastic for the frame.
Plastic, in comparison with metal or wood,has a number of advantages. It is not susceptible to corrosion and does not swell from moisture, does not rot in time, and its electrical safety is beyond doubt. Processing and then cleaning this material is easy enough. Back to contents</a>
Tips for making
The design of the lamp can be thought throughindependently, but you can take as a model earlier somebody invented things. It is not very convenient to use a monolithic construction, which is completely removed. It is more convenient to make a frame with removable top covers. The frame around the perimeter is more reliable to make a two-layer, making the inner frame a supporting element and setting on it one more, upper, decorative. The outer layer should be wider than the inner one, since the top cover will be inserted into it, and from below it will cover the stiffeners, reaching to the water. The electrician must be reliably isolated from water and accumulating condensate. This will save the owners not only from frequent electric shocks, but also from system repairs. At the ends of each lamp, sealed lugs should be put on to save their surface from contact with moisture. They are made from improvised means, such as cuffs or anthers from an old car. In this case, you need to ensure that the rubber retains its properties, does not crack, and periodically change them. To the frame in the lower part is mounted on a glue of the appropriate size a rectangle made of plexiglass, and from above is mounted a plastic cover with fluorescent lamps and a trigger mounted on it. This lid should easily be lifted for repair and maintenance of the luminaire. If the plastic on the cover is black, on the inside it is pasted with a white or reflective film, no manipulation is required with a white surface. The edge of the hull, even with a very careful fit, will most likely extend beyond the edge of the aquarium at least 1-2 mm. These places need to be sealed, as there will accumulate a lot of condensate, which will need to be wiped, so that it does not drain down. On the edges of the aquarium, it is sufficient to apply a layer of silicone sealant, first degreasing the glass. </ ul>