Many designers use in their studiesInterior of the apartments is a semicircular wall made of plasterboard. Figure 1. To do it yourself, you have to work a little. To facilitate the process of creating such a partition with your own hands, you need to familiarize yourself with the recommendations and the production process, which will be given below, before starting work.  The semicircular wall looks unusual and interesting, it can be made from plasterboard.
What you need to know to make a semi-circular wall of gypsum board
The main difficulty in creating and installing such a design is as follows: 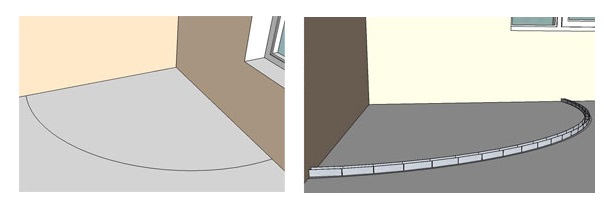 The line of the wall is drawn with a pencil, using a cord like a pair of compasses.
For the strength of the structure, only the steel profile should be used.
Drywall has a fairly low limit of strength, so to bend it, you need to use special templates.
If the wall being constructed has a small bend radius, then before installation, the drywall should be wetted - this will enable it to bend at any angle.
It is desirable that the wall height is up to the ceiling, so it is easier to mount it.
If it does not reach it, then to increase the stability it will be necessary to apply metal profiles to fix the semicircle from above. Back to contents</a>
Work technology
It consists of the following: 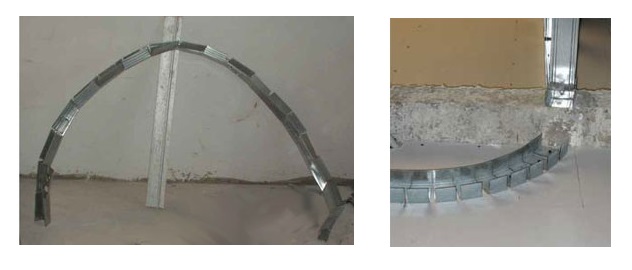 The base of the frame is made of a U-profile, notching it and bending the desired diameter.
On the floor draw a line on which to be madewall. To do this, you need a rope and a marker (pencil). One end of the cord (the starting point) is pressed to the floor, and the other is stretched for a length equal to the radius of the future design. At this point, fix the marker and, holding the rope in a tightened state, hold a semicircle on the floor.
For the next operation you need a metal U -profile from the set for installation of plasterboard. It cuts with metal scissors. Many types of these profiles have cutouts made by the manufacturer, so they can be continued to the desired level.
The finished element must be fixed on the floor with long screws or metal dowels.
Now we need to make a projection of the initial point onceiling. To do this, use a plumb line or a long flat rail. Mark the marker with the received coordinate, spend on the ceiling with a rope and a pencil (as in the first paragraph) a semicircle.
For the installation of vertical supports, moreone kind of metal profile for gypsum board, namely its C-modification, which must be connected with the U-rail mounted on the floor with screws. To verify the correct position of the vertical stand, use a plumb or a metal square in 90 degrees.
Prepare the U-profile for the ceiling, notchingit in the right places. It is attached with screws to the vertical rack, but the ceiling is not fixed, connecting its second end with a wedge. In such a scheme, you need to fix one more U-rail in the middle of the vertical rack.
Drill a hole in the semicircular profile on the ceiling and screw it to it with a metal dowel.
Using C-profiles, it is necessary to mount vertical racks in a semicircle. The step is selected within 18-25 cm. They are connected with screws to all U-shaped slats on the floor, ceiling and in the middle of the structure.
The resulting frame is used as a base for fixing the sheets of material. Work should be conducted from the convex side of the semicircle. The step of screwing the screws must be within 12-16 cm.
After that, the sheets can be attached to the wall withinner side. If it is necessary that it does not make noise, then between the layers of material, mineral wool or any other sound absorber can be fixed on the profiles. When installing the inner part of the work begin from the center of the semicircle to its edges.
All protruding parts are cut off and ground.
The end part of the construction is sealed with GKL strips.
Joints on the skin should be glued with a special net-tape.
All angular parts of the structure are madeputty and installed perforated corner. After that, everything is leveled with an angled trowel. The same work is done under the ceiling, at the junction. Apply putty on the wall, and after it dries, everything is sanded with a zero number of sandpaper.
The last step is priming the surface of the structure and painting it in the desired color.
Back to contents</a>
Used materials and tools
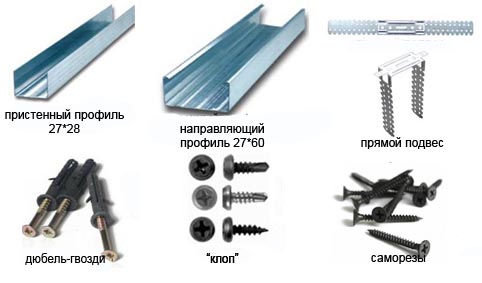 Types of profile required for the installation of the frame of the wall.
GKL sheets.
Metal profiles.
Screws and dowels.
Putty.
Primer.
Paint.
Electric drill.
Shears for metal.
Spatulas - normal and angular.
Roller or brush.
Construction knife.
A hammer.
The plumb line, the building level.
Screwdriver.
Roulette, ruler, pencil.
Rope and marker.
Self-made semicircularconstructions from sheets GKL - a problem quite solvable if to apply correctly all above mentioned recommendations and councils and not to deviate from technology of assemblage of similar products. The made design will serve many years.
Comments
Comments


