The ceiling is the most visible part of the interiorpremises. Many people do not want to have just plain white ceilings, I want something original. A two-level ceiling made of gypsum plasterboard makes it possible to translate the desired into reality.  Two-level ceilings allow you to dividespace on the necessary zones, make the room more spacious, visually increase its height. Drywall is an excellent material for experiments. With it, you can create a real work of art on the ceiling. A two-level ceiling made of plasterboard is one of the variants of a modern and beautiful interior. But how to make it yourself?
Material selection
When choosing the material for creating a multi-level ceiling, the main conditions are the ductility (manufacturability) of the material and the ability to ensure a smooth, durable surface.  Drawing of a skeleton of a two-level ceiling. Drywall is just such a building material. It consists of two layers of cardboard, between which a solidified gypsum mass is distributed with a filler and some additives to improve properties. Drywall is realized in the form of sheets with standard dimensions: width - 120 cm; length 2.5 and 3 m; thickness - 6, 9 and 12.5 mm. For suspended ceilings, mainly Gypsum plasterboard is used. Such material has a smooth even surface, high enough heat-insulating and sound-absorbing properties. It is easily cut, drilled and covered with any materials for final finishing. For rooms where the humidity is elevated (bathroom), the use of moisture-resistant gypsum plasterboard of GKLV grade is recommended. Back to contents</a>
Features of gypsum board construction
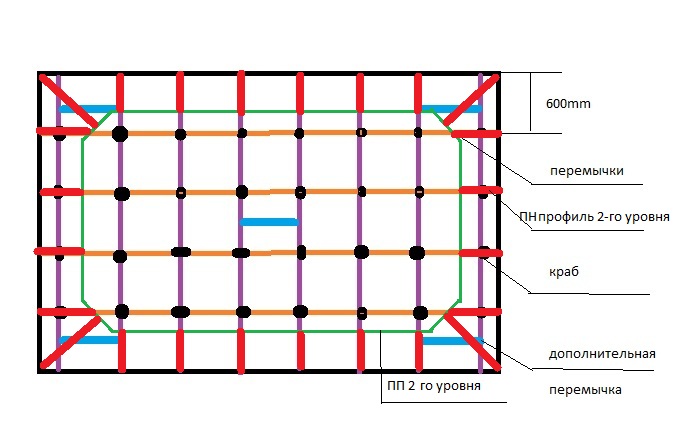
Due to the fact that sheets of drywall havelow bending strength and tend to sag under the influence of their own weight, the ceiling of gypsum board should be fixed to a sufficiently strong hanging frame. The frame is made of two types of profiles: guiding and ceiling. The rails have a U-shaped profile and the grades ПН28х27 are produced. width 28 mm and height 27 mm. The task of these profiles is fixing the suspension structure to the wall and setting the direction of the ceiling profiles.  Layout of a two-level ceiling. To create a wire mesh and fix the drywall throughout the entire area, C-shaped ceiling profiles are used. They produce grades PP60x27, i.e. a width of 60 mm and a height of 27 mm. Metal profiles of both brands are realized in lengths of 275, 300, 400 and 450 cm, which makes it possible to choose the optimal length, taking into account the dimensions of the room. To strengthen the frame, special fasteners are used. The main are the suspensions, which ensure the fastening of the frame to the ceiling ceiling. The most common suspensions have the form of a metal bar, in the center of which there is a platform with a hole for fixing on the ceiling, and on the sides has perforated sections. Ceiling grids are fastened at the crosshair with a crab-type fastener, and with each other, with a length extension, a 30-40 mm long U-shaped fastening. Back to contents</a>
Features of two-level structures
Two-level ceilings differ in shape and height of the arrangement. The form is largely determined by its purpose. You can recommend some of the main types of such ceilings. 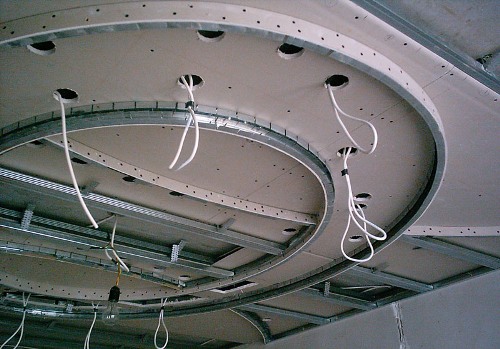 If the installation of a two-level ceiling made of plasterboardprovides one of the levels in the form of a circle, then you should make the layout of the ceiling in advance. The simplest form of installation for a two-level ceiling is the second level in the form of a step at the edge of the ceiling along its entire perimeter. This design is usually used to create a backlight with built-in luminaires around the perimeter of the structure. Zoning of the room with the help of the ceiling can be done by using the angular structure of a two-level ceiling made of plasterboard. In this case, the main surface is single-level, and the second level of the desired size is made in the extracted corner. Usually the shape of such a site is chosen semi-circular, oval or rectangular. In rooms of a large area for redistribution of lighting or for decorative purposes, division of the levels in the center of the room can be performed. The second level is made in the form of a circle, an oval, etc. Back to contents</a>
Step-by-step instruction: marking of the ceiling installation
In order to, it is necessary first of allmake the correct marking of the walls and ceiling for the installation of the frame. First, the walls are marked for attaching the guide profile of the first level frame (closest to the surface of the main ceiling). First of all, it should be taken into account that the suspended structure must be parallel to the floor, therefore, it is necessary to take into account the real deviation of the height of the walls at different points in the room. The first mark is made in the corner where the wall has the lowest height. The mark is placed at a distance of 7-8 cm from the ceiling. Then such a mark is placed in another corner of the wall, taking into account its real height. A straight line is struck between the marks using a pigment-dyed construction cord. The opposite wall is marked in the same way, and then the lines are connected by drawing lines on the adjacent walls. This line indicates the bottom edge of the track profile when it is attached to the wall. Similarly, the walls are marked for the second level of the ceiling. 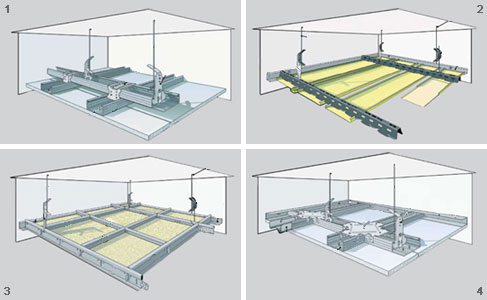 Scheme of installation of the first level two-levelthe ceiling. Further on the ceiling, the layout and layout of the second level of the suspended ceiling is marked out. In this case, straight lines are beaten by a colored cord. To mark the circle, its center is marked; the end of the cord is fixed in it, and with its help a circle of the desired radius is drawn. It should be remembered that the marking indicates the location of the suspension, therefore, the line (circle) should be shifted relative to the real size of the second level of the ceiling by half the width of the suspension bar deep into this level. Layout of installation of ceiling profiles is made by conducting on the ceiling of parallel lines in the longitudinal and transverse direction. The first line is drawn at a distance of 25-30 cm from the wall, and the rest with a step of 50-60 cm. On the lines on the ceiling, it is necessary to make marks for drilling holes for suspensions. The first mark is made at a distance of 10-15 cm from the wall, then in increments of 25-30 cm. On the marking circles of the second level, the distance between the marks is 15-20 cm. Back to the table of contents</a>
Installation of guide profiles
 Scheme of installation of the second level two-levelthe ceiling. Initially, the installation of the profiles of the FR of the first level of the ceiling is performed. The holes are drilled at the base of the profiles: the first at a distance of 10-15 cm from the edge, then after 60-70 cm. Through these holes, the holes for drilling in the wall are marked. Using a puncher or an electric drill, holes are made in a wall 8 mm in diameter, and dowels are inserted in them. The dowels are fastened with screws using the profiles. So the profiles are fixed around the perimeter of the room. Before attaching the profile to the outer surface of its base, a sealing tape with an adhesive layer is glued. Profiles of the second level are attached to the corresponding markings similar to the first level. With the angular arrangement of the second level, the PN profile is set only for the length and width of the platform. With the central location of the second level of the ceiling, the guide profiles are not installed. Back to contents</a>
Installation of ceiling profiles and installation of electrical wiring
Initially, suspended ceilings on the ceiling. To do this, holes are made in the marked places and dowels are inserted. Suspensions of carcasses of both levels are fixed with screws in dowels. Then the ceiling profiles of the first level are mounted. Strictly parallel are set one length of the PS profiles in one direction (parallel to the smaller wall). The ends of the profiles are set in the profile of the PN on the wall and fixed in them with self-tapping screws. The location of the central line of the PS profiles should coincide with the marking on the ceiling. Between the fixed elements perpendicularly installed segments from the profile PS. They are fixed in the cross joint with the help of the "crab" attachment. All ceiling profiles are attached to the appropriate suspension. 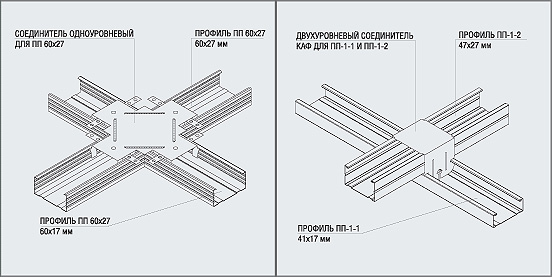 The correct use of connectors fordrywall. Ceiling profiles of the second level of rectilinear shape are fixed similarly. To set the second level of a circular or oval shape, the PS profile curves along the desired path. In order to bend it in an arc, in its side walls triangular notches are made by a hacksaw 10-15 cm apart. The curved element is fixed to the corresponding suspensions with the help of self-tapping screws. Before installing the drywall it is necessary to mount the entire electrical circuit for the built-in and other fixtures. Wires must be assembled into a bundle and placed in a corrugated hose. To the fixing points of the built-in luminaires, the appropriate wiring is made. Back to contents</a>
Installation of drywall
from plasterboard it is possible only at the correctraskroe sheets GKL. The cutting of sheets is done on the floor in a horizontal position. Initially, the material for the first level is marked and scraped. It is cut according to the marked dimensions. Rounded cutouts are produced with a jig saw. Gypsum cardboard is fixed on the frame with the help of self-tapping screws. The cutting of drywall sheets of the second level of the ceiling is performed. Marked and cut openings for installing fixtures. All curly shapes are cut with a jig saw. The second level of the ceiling is mounted on suspensions. The gap between the levels of the ceiling is covered with stripes of plasterboard. Bending it around the circumference is done by wetting the material and slowly bending it along the template. In this condition, the material must dry. Back to contents</a>
Required Tools
If there is a need for drywall, then the following tool is needed:
- electric drill;
- perforator;
- jig saw electric;
- Grinder;
- Bulgarian;
- hacksaw for metal;
- vise;
- Screwdriver;
- a hammer;
- pliers;
- screwdriver;
- knife;
- scissors for metal;
- putty knife;
- bit;
- level;
- plumb bob;
- twine building;
- roulette;
- line meter.
A two-level ceiling made of plasterboard will decorate any room. It looks modern and elegant. You can install this design yourself, with a little patience and accuracy.


