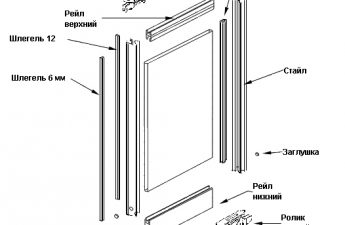
Casing is made of different materials -wood, plastic, MDF. They can be laminated, covered with veneer or varnish. But they have one function - to hide the gap between the wall and the door frame. Cases are installed at the final stage of repair, when not only the door frame is installed, but the walls are wallpapered, tiled or painted.  The scheme of the device is a device with clypees.
Than to strengthen the platbands
The most common method of attachmentClypeus are the final nails. The optimal length is 3-4 cm, since they should enter the canvas of the box by 1.5-2 cm. It is better to give preference to thin nails with a miniature flat hat. If these were not found, then the bonnet can be removed with the help of side cutters. The procedure is carried out when the nail is hammered in three quarters. This method of installation is simple and reliable, and the platbands can be easily removed and installed if necessary.  The scheme of installing a metal door for a flatClypeus flush with the wall. Glue in tubes (liquid nails) can be used for fixing provided that the surfaces are absolutely flat. Working with it is very simple: a thin strip covers the back of the clypeus, and it tightens against the wall. After holding for a few seconds, everything is ready. The main thing is that the glue is not too much, since it can get on the wall, and it will be difficult to remove it. Liquid nails, unlike the usual, do not leave traces on the front side, allow you to perform work quickly, but the reliability of such fastening is not the highest. Their disadvantage is the complexity of the dismantling of structural elements. In addition, if you plan to install wooden platbands, the adhesive is not recommended. They can be fixed with self-tapping screws 2-3 cm in length and 5-6 mm in diameter. When working with wood, the following must be taken into account: in order to avoid splits on the material after fixation, it is necessary to drill a hole with a smaller diameter than the screw in the places where the fastenings are. To make the hat less noticeable, it must be drowned. To do this, a minor groove is drilled from the front side. It is quite easy to install with special fasteners - "beaks". In this case, the trim is wedged into the grooves made in the box. As a result, all the "fringing" of the door looks aesthetically pleasing. Undesirable this method of fixing only for platbands from MDF, as in case of dismantling, the "beak" can become delaminated. Back to contents</a>
Variants of installation of platbands
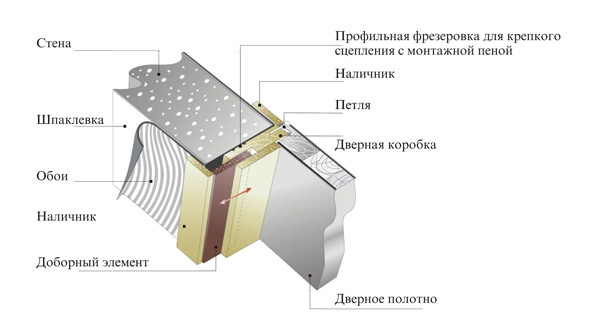 The scheme of finishing the slopes with platbands from MDF. To install the clypeus, you will need the following tools:
- fasteners (nails, glue, screws);
- protractor or stool;
- a hacksaw on wood;
- roulette.
There are several options for installing clysters:
- butt joint;
- using a decorative insert;
- cut at an angle of 45 °.
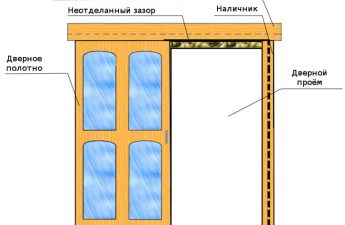
If you want to frame the interior door, thenthe location of the "butt joint" is used quite rarely. In general, it is used in cases where there is a need for the use of telescopic clypees. They have protrusions that allow you to attach them to the dock or door frame. As a rule, it is advisable to mount them if the wall is thicker than the box. Image 1, 2 Decorative insert - it's the capital - it's more like the decor of the door, although it is also considered a clypeus and is mounted with it. When it is used, the trim pieces, as a rule, have a "joint at the butt", and not at an angle. The capital is used only in certain styles. It can be standard and included in the complete set of doors or custom-made for a specific interior. Picture 3 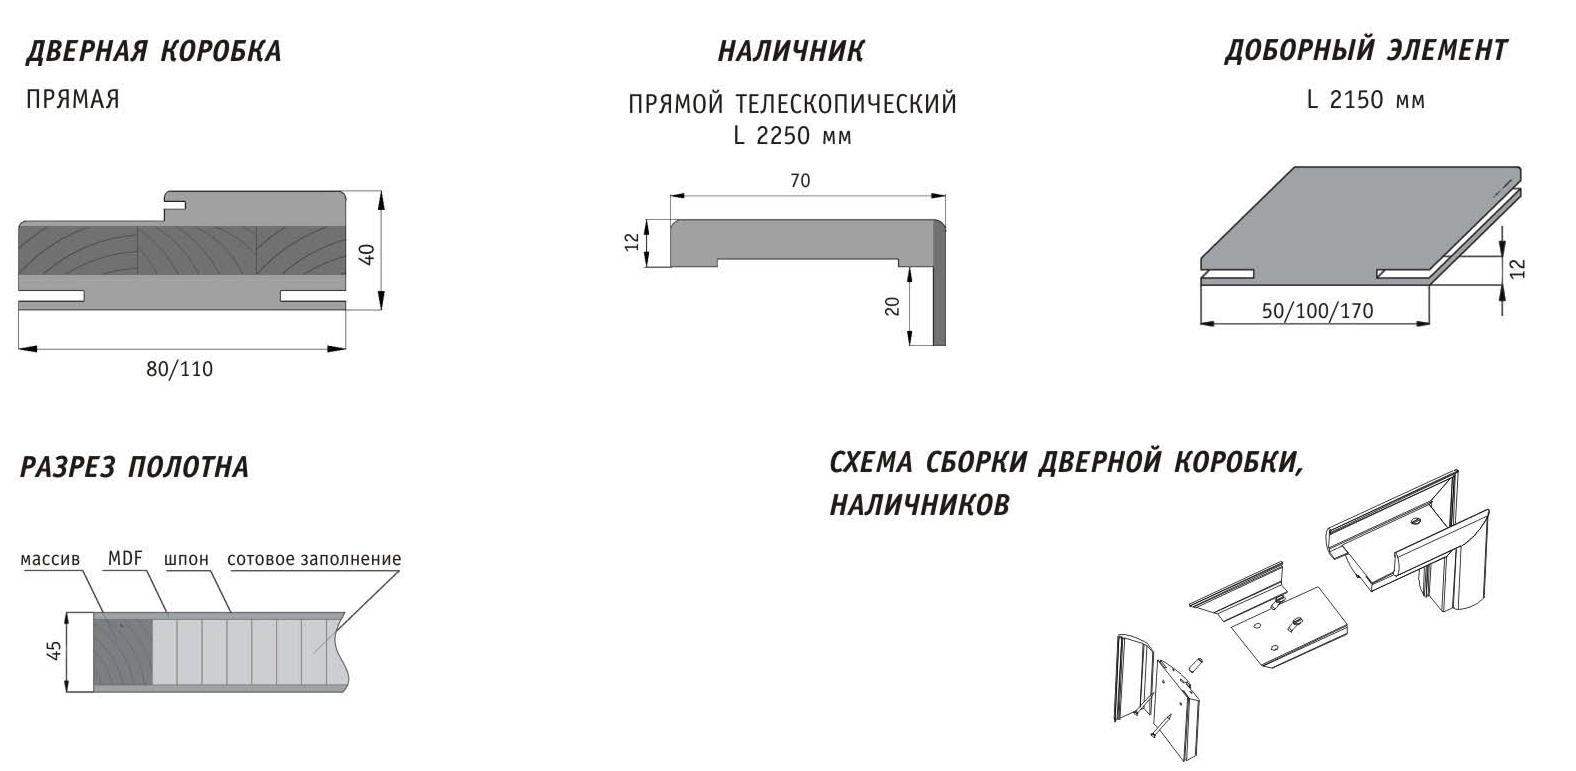 Parameters of doorways. The most popular way to frame the door is to install the clypees at an angle of 45 °. The first thing that needs to be done during the installation is to cut off the required length from the material purchased in the store. To do this, the bar can be attached to the door frame and make a mark. Note that the height should not be equal to the inside of the box, this amount needs to be added to the width of the clypeus. Then the bar is placed on a flat surface, with a square, the right angle is determined, the rest is cut off. If you work with a platband covered with PVC film, then, so that there are no chips when cutting, turn it face-up from yourself. In the case of mounting the "joint-to-splice" slats, the work with the vertical ends. If not, then the clypeus is applied to the door frame, aligned, and the internal corner is marked. Further, starting from it, with the help of a protractor or a chair lay an angle of 45 ° C and cut off. Figure 4 After this, the first side casing is ready. The same actions should be taken with the second. It is extremely undesirable to "take measurements" from the first - there may be errors in height, and the material will be spoiled. After both side strips are ready, experts do not advise moving to the upper trim, it is better to first fix the vertical ones. Back to contents</a>
Installation of platbands
The platens are alternately applied to the doorbox, and in them nails are hammered. As a rule, they are located at a distance of 50 cm from each other, that is, one at the bottom and the top, and the other two - at an equal distance. There is another option. Carnations are hammered directly into the box, while on the surface there are about 5 mm, which are necessary for "nasazhivaniya" on them clypeus. Then the hats are removed using side cutters or wire cutters. Beat directly on the bar during installation is not recommended. It is better to use a wooden bar wrapped in cloth. After the vertical platbands are installed, an upper one is applied to them, and the cutting site (on both sides) is marked. Then the excess is removed, and the upper bar is set in the same way as the side bar. If the marking of the upper casing is carried out according to the principle of vertical, then slight errors are possible, and the gap even in millimeters will spoil the entire appearance of the door. When the appearance of the cracks they are recommended to be masked with acrylic sealant or wax corrector of the desired shade. Since it is quite easy to install the platbands, it is up to the master to complete the work, that is, to complete the installation of the door. But you will have to be patient. Otherwise, you can get a lot of spoiled material. If you are going to upgrade the interior doors yourself for the first time, then first of all, choose the most dimensioned opening, since in case of a miss, these slats can be used for others, those that are smaller.