To add sophistication to the interior andoriginality, stretch ceilings are installed in the room. This work is not easy and requires increased responsibility. But if you follow all the recommendations and have a partner, then everyone can do it himself. 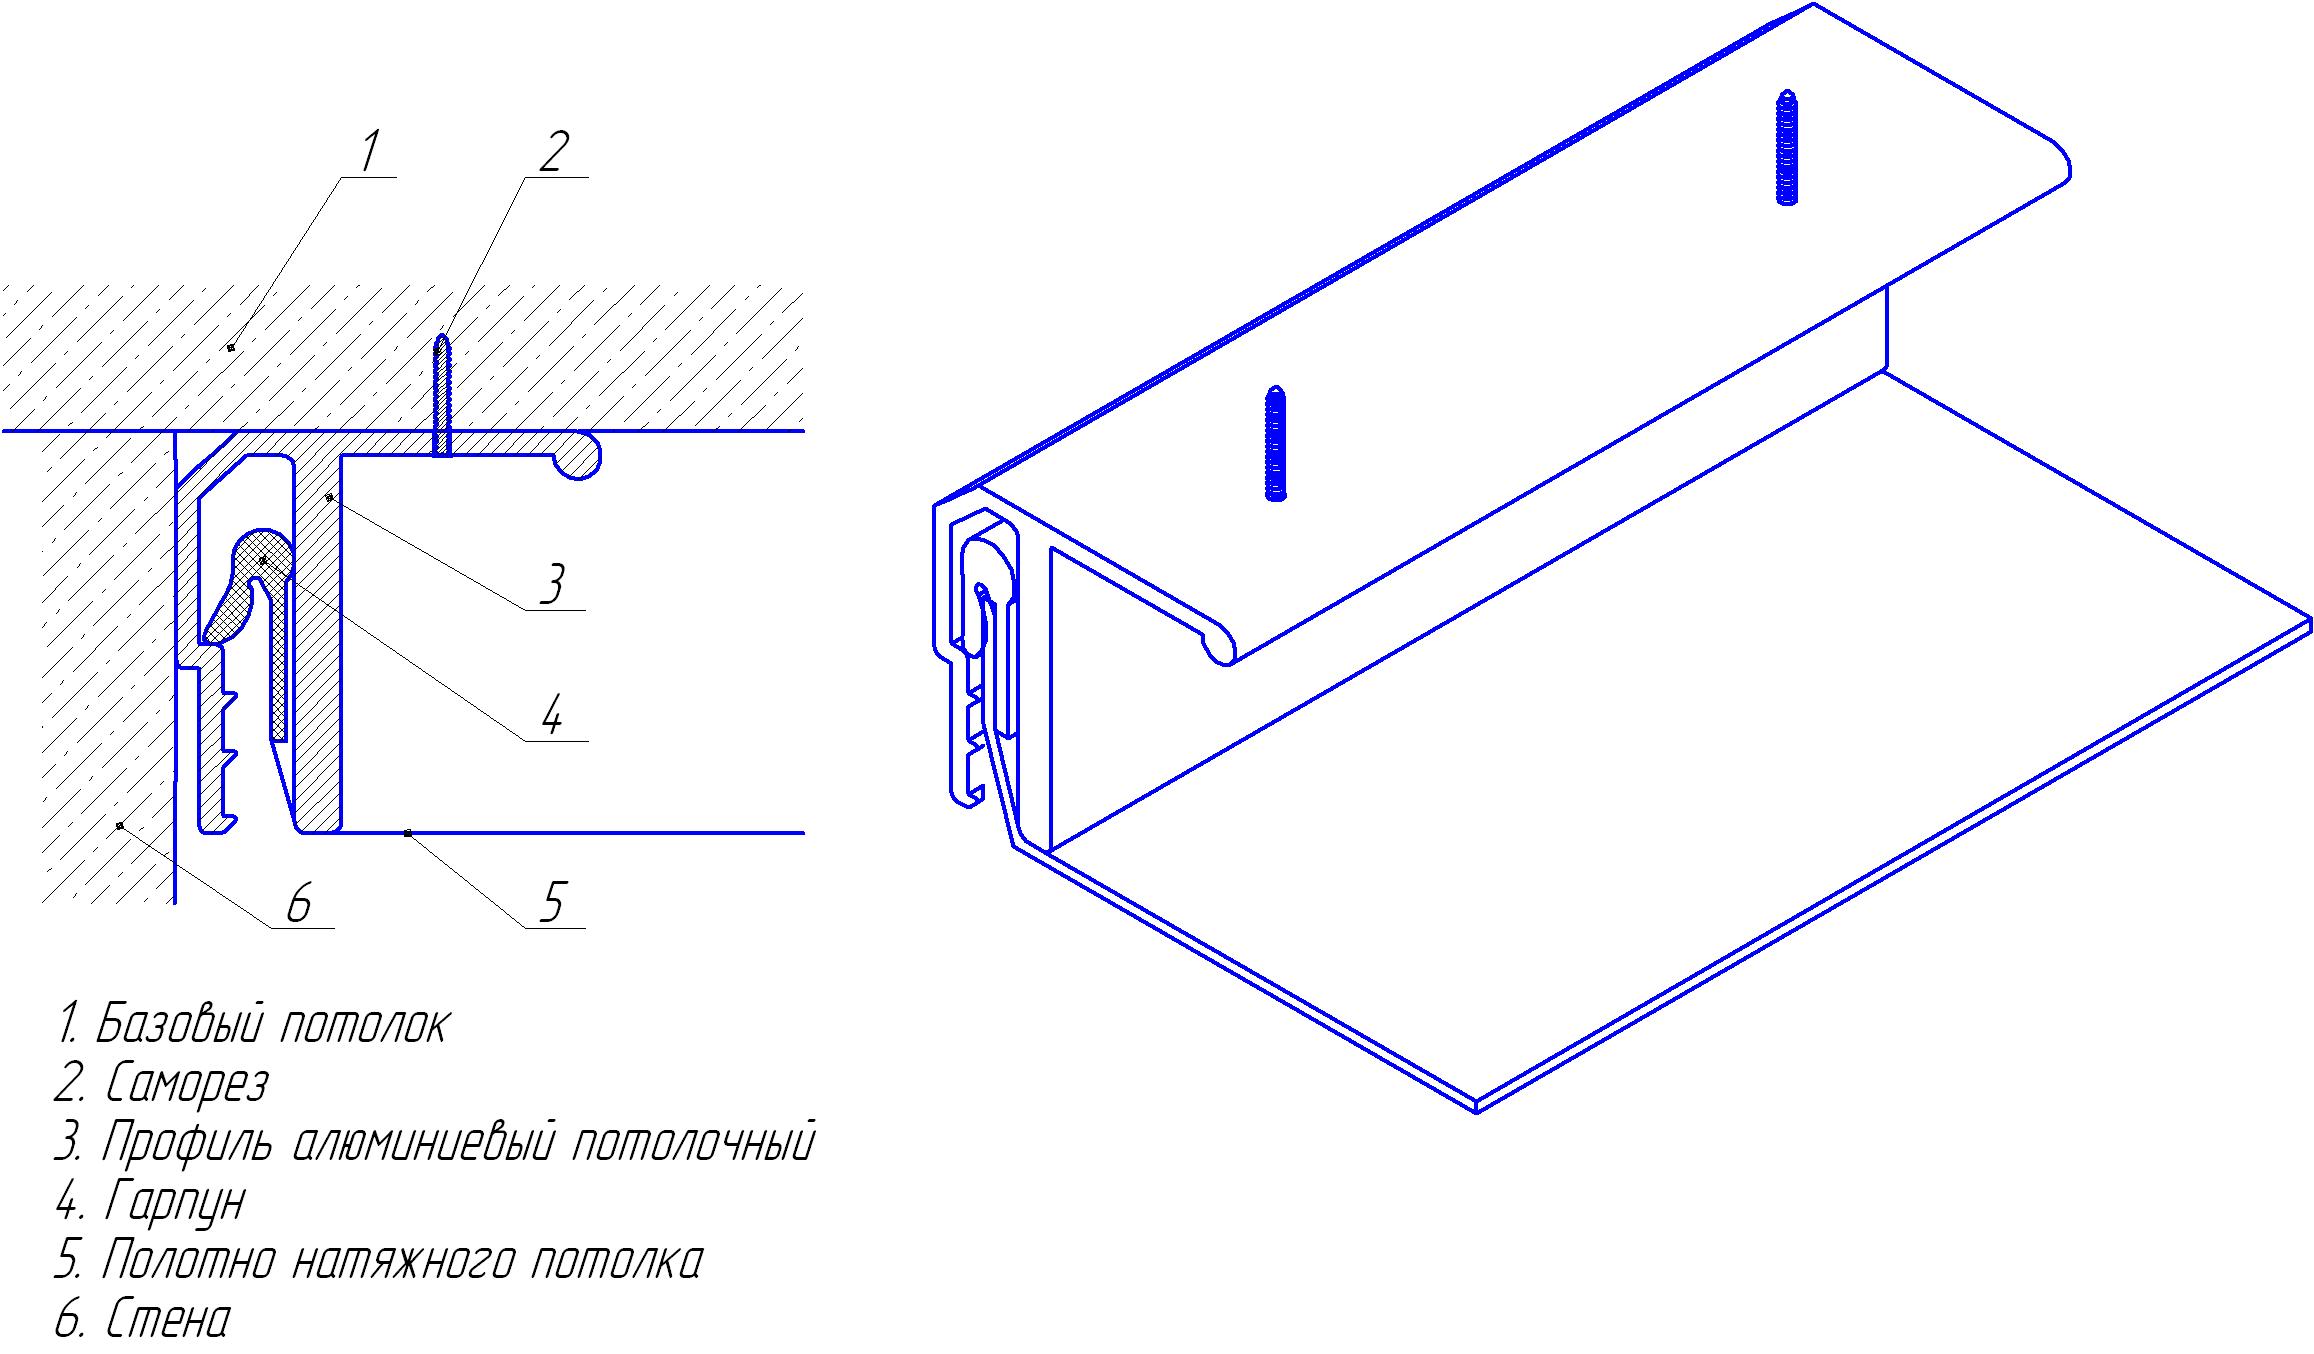 Scheme of tension ceiling installation.
Features of stretch ceiling
Stretch ceilings are mounted either from PVC linen,or from a fabric based on polyester, which are fixed in the profile. To their disadvantages can be attributed to the fact that the canvas is easily cut through a sharp object. But the installation of such ceilings has many advantages. Thanks to this ceiling, you can hide any defects on the draft ceiling and get a perfectly flat surface. When you install it, you do not need to spend any effort to take the furniture out of the room. Stretch ceilings are guaranteed to last at least 10 years. They are multifunctional, because behind them you can hide heat and sound insulation, all the wires and mount any lights in them. 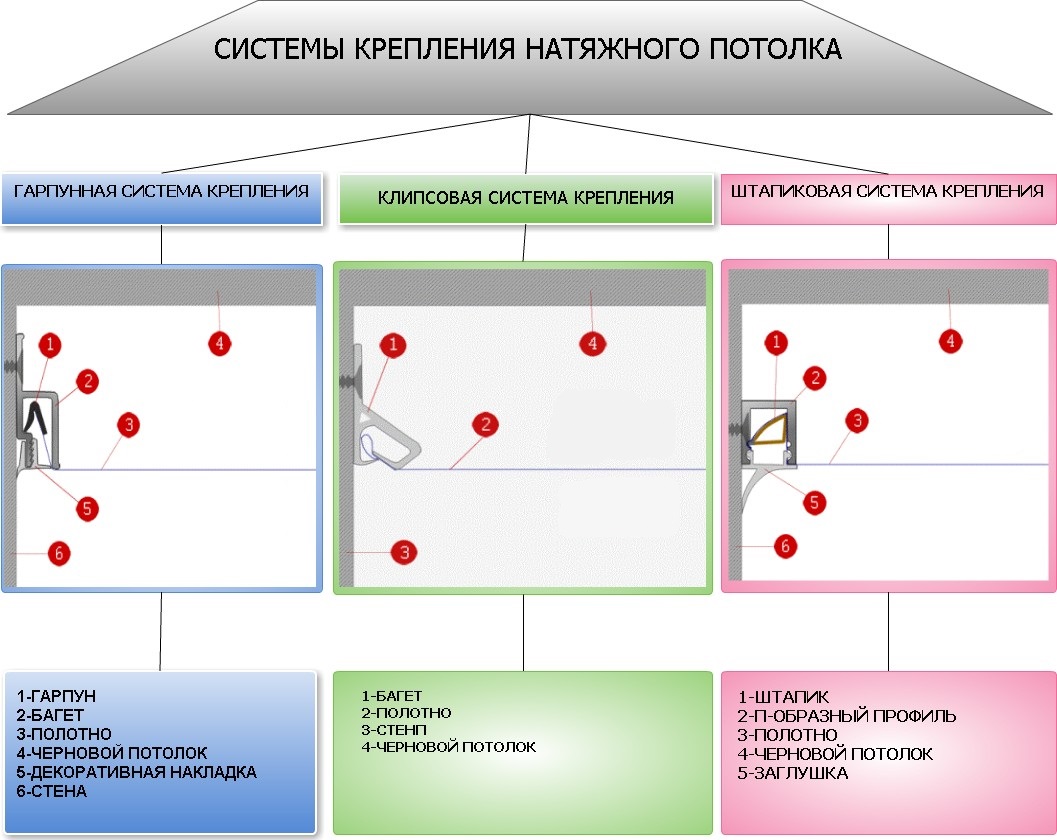 Types of fastening tension ceilings. PVC liners are not afraid of fire, so they can be installed in the kitchen and in rooms with fire communications. They are not afraid of moisture, they can withstand a lot of water, bending at the same time to the floor, and not tear. And after its pumping out the ceiling with ease takes the original position. PVC ceilings have a strength that is 100 kg per 1 m2. Since they do not collect condensate, they can be installed in rooms with high humidity. Due to the fact that when they are mounted, the height of the room is reduced only by 50 mm, stretch ceilings are suitable for rooms with low ceilings. Caring for them is very simple, for this they need to simply wipe with a damp rag. Back to contents</a>
Ways of fastening
There are 3 ways to fix the stretch ceiling. The harpoon method of fastening is used for the ceiling based on the PFC. In this case, the film must be checked, measured and correctly scraped, i.e. its size should be 7% less than the area of the ceiling itself. Next, along the edges of the canvas, a hook in the form of a harpoon is welded, made of the same film on a special machine. During installation, the tension of the ceiling fabric is due to the fact that this hook-harpoon clings to the installed profile. If necessary, the canvas is easily removed and installed back.  Types of stretch ceiling. The wedge or clip mode is the opposite of the harpoon method. In this case, the canvas is not measured and the pattern is not made. Its size should exceed the size of the ceiling area. Cloth stretches, and excess remains are cut off. Since this method of fastening uses a plastic baguette, it is suitable only for fabric ceilings. The staple or cam method resembles the wedge method, since the canvas is not measured, the pattern is not made, its size should be larger than the ceiling area. The difference is that the film is fixed in the profile with a special tape, which provides tension. In this method of fastening, an aluminum profile of the U-shape and a bead of wood are used, due to which the ceiling sheet is clamped. This method has drawbacks. First, a glazing bead can jump out of the groove. Secondly, it is very difficult without sufficient experience to securely fix the film. Back to contents</a>
Mounting the frame
Required:
- laser level;
- cord;
- glue;
- drill;
- self-tapping screws;
- carcass material.
Before you start making the ceiling with your own hands,carry out preparatory work, i.e. change the electrical wiring, prepare the base for the fixtures. It must be remembered that the power of the bulbs should not exceed 50 W, so as not to damage the ceiling cloth.  The scheme of a two-level stretch ceiling. The installation of the frame begins with the marking. For this purpose, the height of all corners of the room is measured and the lowest of them is noted. It is from him that all subsequent measurements are carried out. Then, from this angle downward retreat approximately 2 cm, so that it would be more convenient to fix the profile. And with the help of laser or building level, a mark is placed along the perimeter of all the walls. After this, the correctness of the markup is checked, at which the beginning of the line must coincide with its end. Next, connect the opposite corners of the room with cords, they should converge in the center. For a chandelier in place of their connection a bar is attached. It fixes a hook, the bend of which by 20 mm should be below the level of the future ceiling. After all the preparatory work, the profile is mounted. First, it prepares the rake. If it is longer than the width of the room, then its edges are filed at an angle, which is equal to half the corner of the room. The corners of the room are measured by a folding protractor. In the event that the rake is smaller than the width of the room, one of its edges is also filed at an angle, and the second is made exactly under 90 °. This is necessary so that it closely adjoins the next profile rail, which has a bevel for the corner from the opposite side. Then all the prepared elements for the profile are glued with glue and pressed against the wall along the marked line. After that they are fixed by screws or screws with a step of approximately 80 mm along the entire length of the profile with an indentation from its edge by 10 mm. Back to contents</a>
Installation of the cloth
 A short scheme for installing a stretch ceiling. Required:
- a cloth from PVC or a fabric;
- heat gun;
- building hair dryer;
- glue;
- putty knife.
After all along the perimeter of the roomthe frame is installed, the tension web is assembled. To do this, the room is heated with a heat gun or a fan heater to a temperature of 40 ° and above, preventing it from descending during all work. Further, without placing the PVC film close to the heat device, it is necessary to unwind it. To increase the elasticity it needs to be heated with a construction hair dryer up to 60 °. After that, the canvas is fixed in one of the corners of the room, and then in the opposite one along the diagonal. With the remaining two corners, the operation is performed by analogy. The fixation of the sides is from the corners to the center in steps of 80 mm. Throughout the perimeter of the profile, the film is stretched evenly and fixed with a spatula. If the stretch ceiling is made on a fabric basis, then its fixation starts from the sides, and ends at the corners of the room.  Stretch ceiling fastening schemes. When using a glazing or wedge fastening method, the remaining part of the blade is cut off. All the folds and strips formed on the ceiling, spread out in circular motions, heating with a construction hair dryer. After the installation of the ceiling, decorative covers are inserted. They are necessary in order to hide the fastening elements. Then the lights are installed. To mount the chandelier, a plastic ring is prepared, the outer diameter of which must be less than the decorative lining of the chandelier itself. It is fixed to the ceiling by means of glue, its center must coincide with the previously marked point in the place where the lamp is fastened. After the glue dries, a hole is made in the canvas, the chandelier is attached to the prepared hook. If you do the ceiling on a fabric basis, it can be covered with acrylic paint, creating various effects, for example, clouds, sea waves, etc. Back to contents</a>
Stretch ceiling made of fabric
Required:
- wooden bar for the frame;
- drill;
- self-tapping screws;
- molar scotch;
- cable-channel;
- curtain fabric.
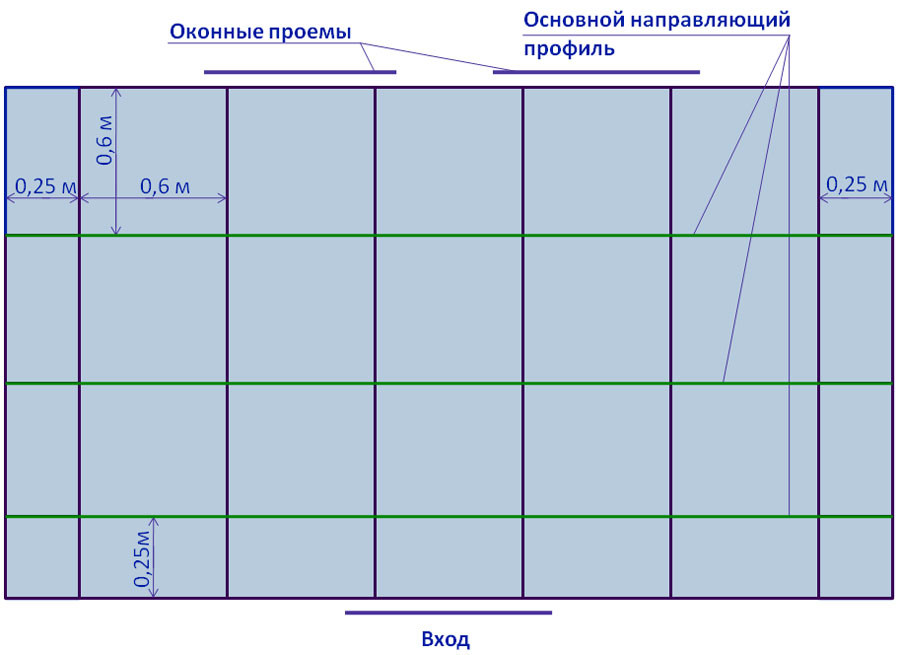 Scheme of ceiling markings for profile fixing. You can install the ceiling with your own hands from the fabric for curtains. To do this, take any curtain fabric of the desired color, the width of which is 3 m. If necessary, a neat seam is made which, when stretched on the ceiling, will not be visible. The length and width of the web should exceed the parameters of the room by 20 cm. After finding the lowest point of the corner and marking the entire perimeter of the room, the bar for the frame is prepared for installation. To do this, holes are drilled on it at a distance of 1 m under the screws, and corresponding incisions are made on the wall. Retreating from the edge of the beam, a cable channel is attached to it from below. In the corners of the room it is placed T-shaped. After this, a frame is made around the entire perimeter of the room. Then the surface of the ceiling is cleaned of dust, the floor is washed. The curtain fabric is ironed and treated with an antistatic agent. To ensure the fastening of the fabric, the plastic tubes are preliminarily pasted with paper tape. After that, the edge of the cloth web is put on the prepared tube, then it is inserted into the cable channel and jammed in it. Having thus established all the edges of the fabric, the fabric must be stretched as far as possible, starting from the center of the room, moving to its corners. For convenience, the canvas can be wet from the spray gun, as it dries better when it dries. At this stage of work requires a partner, because the stretch should be carried out in parallel, moving in opposite directions. In this case, one tube is held by the tube in the groove, and the other is regulated by the tension itself. Then the material is fixed with screws that are screwed into the base of the plastic tube at a distance of 50 cm from each other. The remaining edge of the fabric is folded with a platen and the stapler snaps into place. All fasteners are covered with baguettes, which can be painted with any color, sticking them on the wall in the usual way. Next, using an ordinary lighter, a hole is made on a tightly stretched canvas for the chandelier, the electric cord is carefully pulled out. At this the installation of the stretch ceiling is finished. </ ul>


