Many experts and craftsmen with no experience believethat the repair work associated with the leveling and subsequent lining of the ceiling is one of the most difficult activities. Here there are such problems as unevenness of slabs, asymmetry of corner zones, uneven levels of the ceiling base. It can be difficult to eliminate such manifestations, and besides, the assessment of such work is quite high. Installation will help not only master the installation process, but also significantly save money. 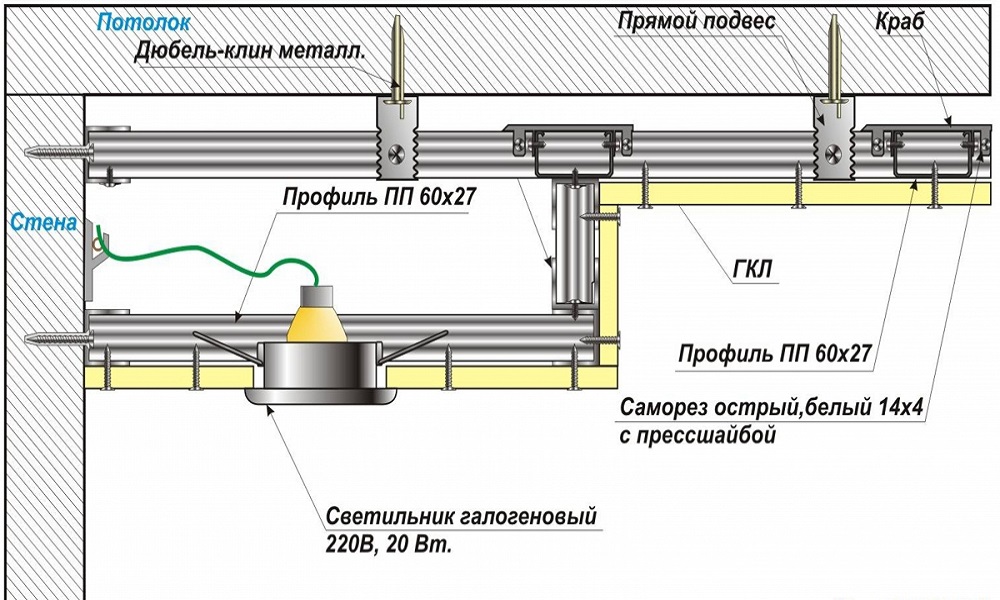 Scheme of suspended ceiling from plasterboard. What are the advantages of such designs? This is an affordable price, easy installation, high speed assembly. You can conduct such events on your own.
List of necessary materials and devices
 Drywall production scheme. and the process itself as a whole is inextricably linked with preliminary work focused on the acquisition of tools and finishing materials:
Also you will need:
It can be of two types: Guide, which is installed throughout the ceiling area, the function of which consists of the name itself, and the ceiling, configured with the letter "C". It is important to choose the product of one manufacturer, the other parameters are not so important. To calculate the required amount of materials, it is necessary to take into account the dimensions of the room. In calculating these indicators, it is important to foresee the fact that the material in the process of work can break down, failing, so it should be purchased with a margin.
There are 3 varieties: traditional, moisture resistant and fireproof. In standard apartment conditions, a suitable option is a sheet of ordinary material, and there is no need to spend extra money. Installation of the ceiling zone is carried out using sheets with a thickness of less than 8 mm, which greatly simplifies the design. To calculate the number of such layers, it is necessary to divide the total area of the ceiling into an area of one sheet. Normally a standard sheet is equivalent to 3 m².
To do this, stock upright suspension,the cost of which is low. For this reason, there is no need to calculate the exact amount of material. Their number determines the level of complexity of the ceiling coating, which will increase markedly when these indicators increase. The permissible distance between the layers is 600-700 mm. A ceiling that does not have a large number of connecting elements, can do without "crab" components. Installation of such parts is associated with the installation of direct hangers. As an analog, you can buy longitudinal joining elements in the same amount as the number of profiles. To do this, take the dowels, which will help fix the guide profile and suspension. To fix the profiles, you should take a set of screws, the length of which is 25 mm. With their help, there is also fixation of gypsum boards. Back to contents</a>
Preparing for installation
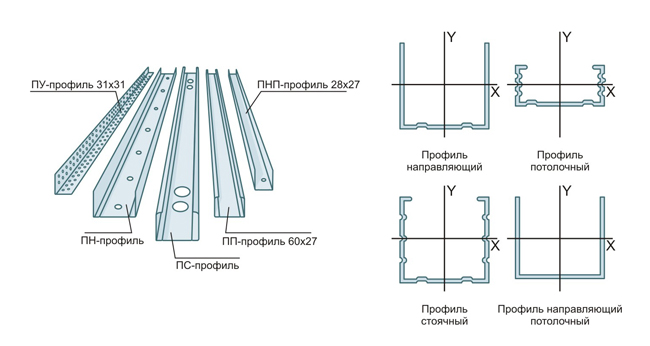 Types of profile structures.As soon as the basic materials are purchased and the tools are prepared, before carrying out the main installation work, it is necessary to carry out a number of important manipulations, which cannot be dispensed with during the installation process. After the main work is completed, it will be impossible to redo or correct such nuances in the future. is certainly associated with electrical installation work. To do this, you need to lay the wiring, think about the lighting of the future ceiling area and the wiring. The edges of the luminaire cable are lowered and secured with cable ties. After carrying out such actions, you should check its work. It is good if a detailed diagram is drawn indicating the exact dimensions. Back to the table of contents</a>
Establishing a ceiling level
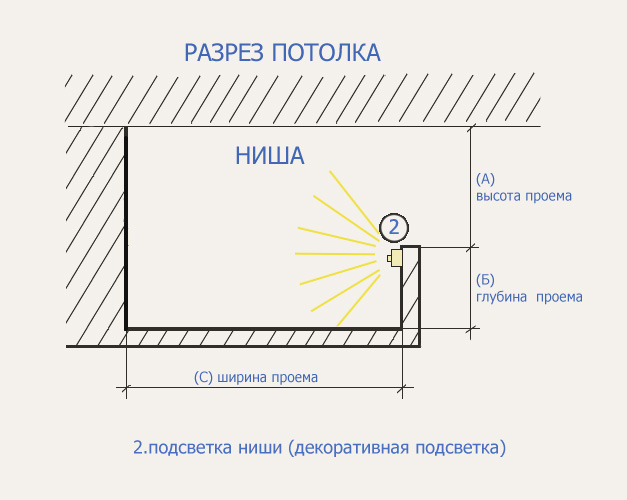
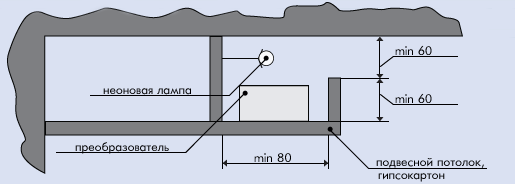 Scheme of installation of neon lights in a false ceiling from plasterboard. Alignment of the suspended ceiling from plasterboard is associated with the exposure on all walls of the level:
Back to contents</a>
Installation work on the installation of the frame
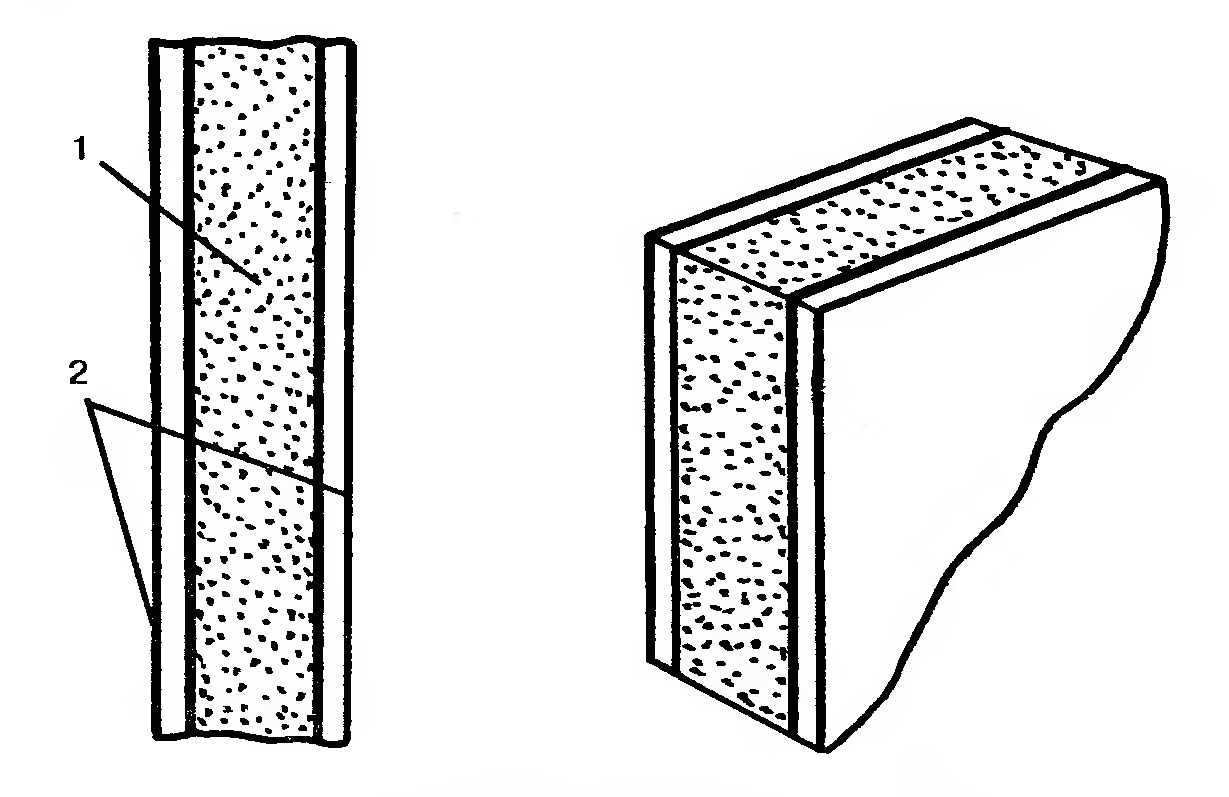 Composition of gypsum board: 1 - gypsum, 2 - cardboard plates. The fixing of false ceilings is inextricably linked with the definition of the guide profiles. For this you can use the water level. Correctly fixing and installing this device, you can mark. Of course, the height of the ceiling is determined by each owner, based on their own preferences, however, the desired dimensions will be 10 cm or more. This space can be used to lay a layer of insulation. Such marks are made on all walls, after which it is necessary to start drill holes with a perforator. They dub in it. The ceiling profile is then strengthened, the allowed distance between them is 30-40 cm, in the angular zones it is 10-15 cm. As soon as the mounting of the profile profiles is completed, marks are made along the entire border on the plane of the wall, the distance between which corresponds to 60 cm This method helps to mark the fixing points of the ceiling profile. If you intend to install a simple design in one level, fixing the profile in the form of the letter "C" is not required. Marking is carried out on both opposite walls. Next, the suspension is mounted to the base of the ceiling. The acceptable distance will be 60-70 cm, which will make it easy to fix a layer of thermal insulation in this space. However, slight deviations of 1-2 cm are completely permissible. As the existing suspensions are fixed, the ceiling profile is installed. Detailed instructions will help you easily and correctly install the ceiling.
 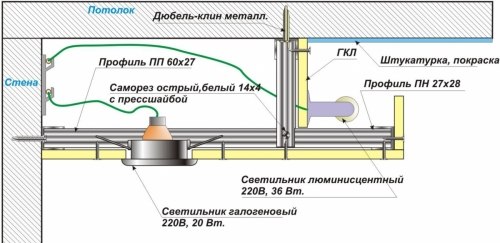 The scheme of fixing a two-level ceiling with a hiddenbacklight. If the length of the wall and profiles is the same, docking is not necessary. However, there are situations in which such a connection is necessary. To do this, at the connection points, you need to fix 2 suspensions to the ceiling, and fix them with self-tapping screws. With a drill or a screwdriver, the points of their joints are combined with the guides, the hangers are connected to a C-shaped profile. It is very important to pay attention to the following facts: in the process of twisting the suspension and ceiling profile level, the length of which corresponds to 2 m, must be controlled, bends and sagging are not allowed. If you ignore such defects, as a result of the erection, a plane with a wavy pattern may appear. Once all the metal parts are connected, you need to take the level and check the smoothness of the base, and in separate parts along the installed ceiling profile. In the process of detecting deviations, they should be corrected. Assembling the skeleton of the suspended ceiling is made, then it is possible to install the luminaire and lay the layer of the thermal insulator, it may be cotton wool. Now, when the preparatory work has been carried out in full, the suspension of the suspended ceiling from gypsum board begins. Back to contents</a>
Surface putty and facing with plasterboard sheets
 Ceiling scheme with illumination. Installation on the ceiling drywall is not particularly difficult. First, one of the layers approaches the profile and is fixed at its base by screws. The necessary distance between the fastening elements is 10-15 cm. Such firmware is carried out at the extreme points and in the center of the sheet, while focusing on the wall markings. While engaging in joining drywall sheets, it is important to keep track of the points of their joints. The layers are made in such a way that their edges are equipped with a rounded base, and such design is not accidental. It helps to get rid of the cracking of putty, the thick layer will provide a more reliable fastening. Where there are no such depressions, they can be made with the help of a knife. Further installation is associated with the fact that the screws together with the heads are deeply screwed into the GCR, approximately to a depth of 1 mm. The surface must be perfectly smooth, which must be controlled. There should not be any protruding elements. An impeccably smooth surface will help to easily apply plaster layers to the ceiling. Next, installation of lighting equipment and other communications. For this, small holes are made with a knife. For a drill, you can take the nozzle for more convenience. As the gypsum board is connected as accurately as possible and firmly, the connecting points must be carefully processed and the necessary notches are made. Spatting of the prepared substrate begins. Here gypsum plaster is taken, a grid for the design of joints, after which the proposed work is performed. Getting to work best from the joints. They are carefully dried, after which it is possible to treat the entire surface with a finishing plaster. The surface layer should dry out for one or two days. Then sandpaper is taken, a special lamp that highlights all the defects of the finished substrate. General surface smoothing is carried out. So, the installation of the suspended ceiling is completed. Its surface is ready for decoration. The chosen system is represented by mounting the elementary structure in one level. A detailed explanation will help to cope with this work for a beginner master. After its development, it is possible to install suspended ceilings of more complicated shapes. Back to contents</a>
Admissible variants of surface decoration
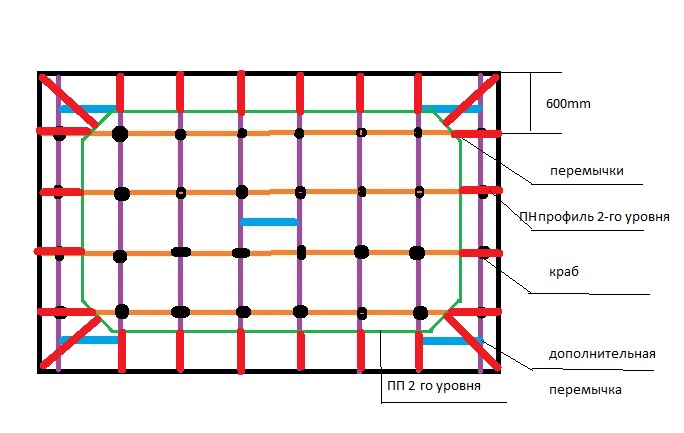 Scheme of installation of the second level two-levelthe ceiling. Speaking about the methods of decoration, it is important to note that they are difficult to identify and describe. Each consumer conducts the registration, being guided by personal privileges and preferences. The industry makes a variety of finishing materials, which do not seem to be difficult to choose. Focusing on material opportunities and their own desires, you can give preference to the best pattern of decor. So, the surface of the ceiling can be finished with plaster molding, as a result, a massive and sound composition will be obtained. As an option, the usual foam foam, presented in the form of ceiling skirting boards, is perfect. You can paint the plane of the ceiling, paste wallpaper on it, change the lamp, or come up with your own finishes. Do not choose only the most trendy versions of the cladding, they can not approach any room. Having clearly defined the choice, you can go to the store and purchase the necessary materials. The very technology of installation of suspended ceilings is quite simple. During the work should be very careful and attentive. Excessive rush can lead to wrong actions.


