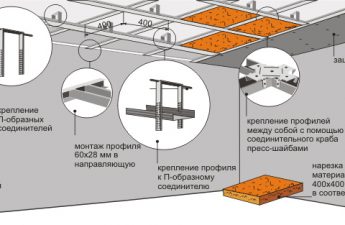
In recent years, it has become very popular withbuilders conquered drywall. Sheets of this material can be used in a variety of works when decorating a room. It is very easy to assemble. For designers, this material opens up a huge field for imagination. In most cases, a single-level ceiling using such sheets is made to create additional sound insulation. More complex designs differ. They make it possible to make lighting on the ceiling, create the necessary holes and cut original curly steps.  Plasterboard ceiling frame diagram.DIY installation is available to almost everyone, even if he has never dealt with such works. Plasterboard sheets are mounted on a special aluminum profile with guides. The result is a frame in which wires and various communications are hidden. Plasterboard multi-level ceiling has certain functions:
To install a multi-level ceiling from gypsum board was successful, you need to have a variety of tools: 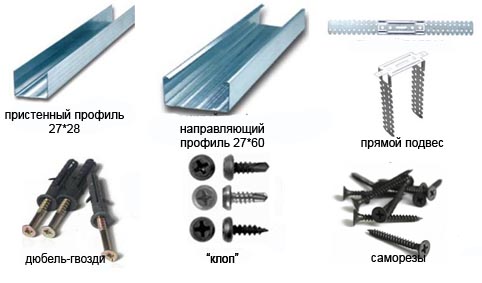 Necessary materials for installation of multi-level ceilings.
- perforator;
- Screwdriver;
- level;
- a building square;
- hacksaw;
- pliers;
- scissors for metal;
- pencil.
The following materials are mainly used:
- sheets of plasterboard;
- Metal profile to conduct the assembly of the frame;
- self-tapping screws;
- dowels.
In order to independently mount the GKL sheets and fabricate the frame, two types of profiles are used:
- UD;
- CD.
The walls are screwed with a guide profile, inwhich is installed ceiling profile. It will form the frame. The "CD" profile allows the addition of a ceiling structure from plasterboard with curved geometry.
Number and features of levels
Of course, installing a multilevel ceiling fromgypsum cardboard is a dream of many owners of premises, however the decision of this question is connected with height of a ceiling. It is this value that regulates the number of levels that can be made in a certain room. To accurately calculate the number of levels, you first need to determine what the height of the first level itself will be.  The scheme of multilevel false ceiling. To this end, you need to find the bottom point on the ceiling, from which you need to measure 2.5 cm on the wall is a mark of this value. It becomes a reference point for installing other labels on the corners of the entire room. The water level is used for accurate marking. A marking thread is laid along the entire perimeter. It shows the lower level. If this size is increased by 1.5 cm, the desired height of the first level will be obtained. In order to install the multilevel ceiling correctly and consisted of several rows of profiles, it is very important to determine how the skins will be made. It is necessary to calculate the number of profiles and sheets of plasterboard. You need to know very precisely how the material will be fixed. To answer all of the questions posed, you must first draw a sketch of a multi-level ceiling from gypsum board. On this plan show the installation of all levels. All preliminary measurements are made in the drawing, the required materials are indicated with their quantity indicated, the installation of auxiliary elements is taken into account. Back to contents</a>
Skeleton and features of erection
 Drawing of multi-level ceiling from gypsum board. After mounting the line, the "UD" profile is first fixed. It is necessary that its lower surface is in contact with the line. Fixing the profile is done by dowels, which correspond to the structure of the wall. On some profiles there are no holes. Therefore, they are attached to the wall through pre-drilled holes. The installation step must be more than 40 cm. The joints can be overlapped. The next step is to determine the direction of laying gipsokartonnyh sheets. A "CD" profile is mounted across the ceiling. The most level angle is found in the room. It should have 90 °. After his determination, they begin to do the installation. Ceiling marking is used to install the profile. This is done on both sides, withstanding the pitch of 50 cm. The warp thread draws lines passing between the marks on each wall. Each such label becomes a guide for "CD". With a step of 40 cm, fastening brackets are fastened directly along the line. Then you need to measure the distance between the opposite walls. Trim the extra parts. The length of the profile should not exceed the distance obtained by approximately 5 mm. After that, the "CD" must be inserted into the fixed "UD". In this case, the "CD" profile must be above the first level, it needs to be raised slightly. For this purpose, the profile is slightly bent and lifted by a mounting bracket located in the middle. Under the bottom of the "CD", according to the level of the surface of the frame, stretch the thread. To ensure that it was well stretched, self-tapping screws are attached to each side in the frame first. They wind the thread. Exposed to the thread set CD profiles. Initially, they are screwed to the central bracket with small self-tapping screws. For their small size they are called "fleas". Then remove all bolted profiles. After the CD has been fully exposed, the brackets are tightened in accordance with the level. The end of the staple bends upward. Back to contents</a>
How the frame is made: recommendations
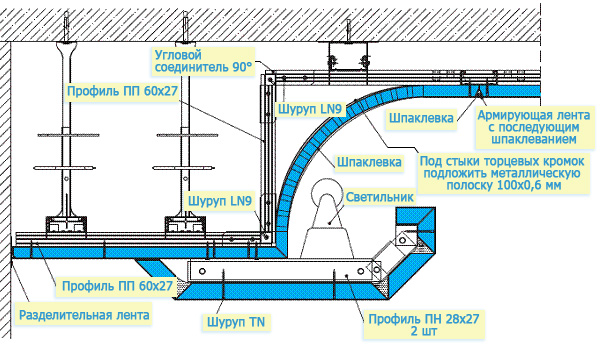 The scheme of installation of a multilevel ceiling fromdrywall. It is desirable to hold the fixation of the sheets uncontrolled. Installation of the first row is done on a single sheet. First, one part of the frame is closed, and the second sheet is set in the same way, but only on the other side. To fix the GCR, use a 25 mm dowel. Before you begin to sheathe skeleton, it is required on the profiles to make preliminary marks of those places where the second ceiling tier will be mounted. The installation of labels will not cover the invisible area. To hide the frame, the size of the resulting line is increased by 10 cm. To make a semicircular view of the second tier, it is necessary to install a screw in the profile and wind the wire on it. Postponing the required radius, draw an arc, the tensioned wire plays the role of a compass. After that, the radius should be increased by 5 cm and draw another line. According to this drawing, drywall is cut off. Thus, the installation of the backing profile will be made in accordance with the size of the second ceiling level. Back to contents</a>
Mount the second level
For reliable securing of the second level, it is necessary to mount the mortgage profile. 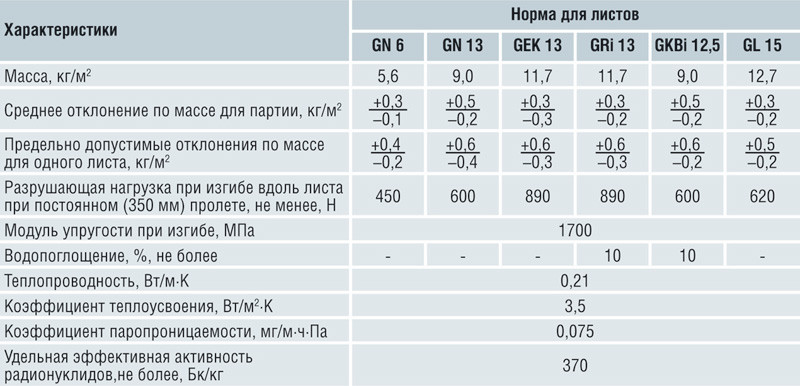 Physical and technical characteristics of gypsum plasterboardsheets. Take a perforated "CD", it is screwed to the guides using self-tapping screws. Fixation is done directly in the profile itself. After that, the "UD" is fastened, for which it is postponed 10 cm. This results in a second frame, for setting the second level. Part of the "CD" profile is fixed to the profile on the wall, while the other fixes the U-shaped brackets. The step of the brackets should be kept in the vicinity of 50 cm. The second level must be laid under the upper anchored profile, and the size of the profile should be made less by 4 cm. The sheet of gypsum board is cut with a 6 cm allowance and bolted to the frame. Similarly draws a circle, everything superfluous is removed by a construction knife. To the lower tier, the "UD" profile is attached, directly along the entire diameter line. A strip of drywall is placed on the profile. As a result, all profiles become invisible. To strip the strip into an arc, it is necessary to drill holes in it and moisten it with water. After an hour the strip will get the required shape. Now it can be screwed with screws. Following the technology mentioned above, you can install a two-level ceiling in your house yourself. Good luck! </ ul>