In recent years, consumers have already managed to evaluate such material as laminate. His popularity is growing every year.  Layout of the laminate in a section. The instruction for laying the laminate is simple. Among its main advantages are:
If you decide, then you need instructions forthis type of work. If you follow all the points indicated in the instructions exactly, you will get a high-quality coating that can serve you for quite a long time.
Laying conditions for laminate flooring
 Layout of the laminate along the wall. Immediately before the laminate is laid, it is necessary to ensure the following conditions:
Back to contents</a>
How does the floor preparation begin?
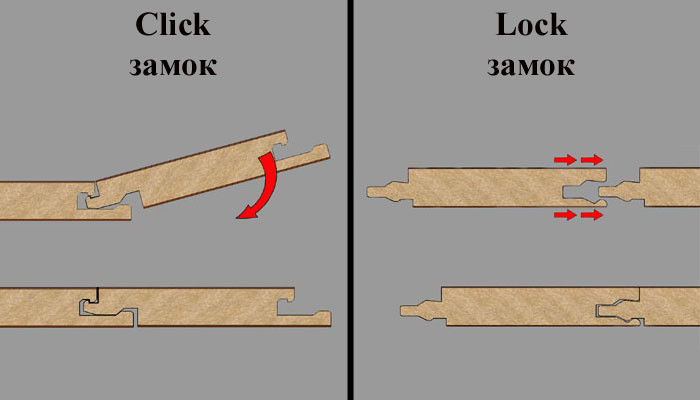 Scheme of joining laminate locks. Before you begin laying the laminate, you should prepare the surface. In order to prepare a concrete surface, it is best to wait for it to dry completely. The drying period is a month after it is poured. To ensure that there are no unevenness on the floor, it is necessary to fill all cracks with bulk floors or to resort to the services of masters. If cracks and unevennesses are too large, the floor is re-tied. If your house has wooden floors, then you have to prepare your floor. First of all, you should check all the beams so that when walking they do not bend. If a defect is found, fix the beams with additional screws. Check the floor for irregularities and bulging sticks. If you still find irregularities, you will need to eliminate them. When your floor has already been covered with linoleum or tiles, in most cases they can easily be dismantled. At the same time, you can install a laminate without a substrate, since high vapor permeability is already ensured. Back to contents</a>
Methods of laying the laminate
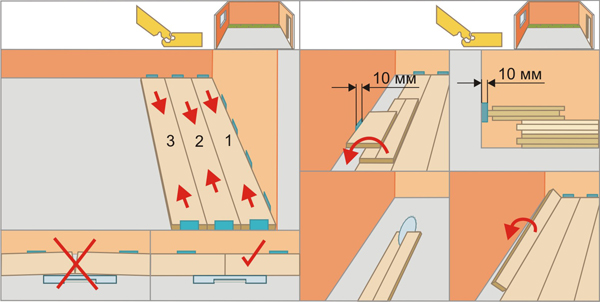 Technology of laying laminate. There are several methods for laying a laminate, among which:
Back to contents</a>
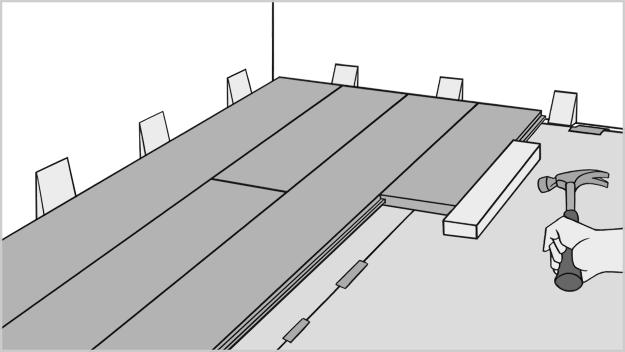
Installation instructions for laminate
Before starting work, clean theroom, vacuum the floors or use a broom. Next, you need to install a plastic film. After a successful laying, proceed to the installation of the substrate. Laying the substrate is not an easy task, and you should not rush into it. In order not to lose its tightness, it is best to glue the seams with a scotch tape. If you hurry, you can disperse the dust, which in the future can greatly degrade the adhesion of the substrate with the laminate itself. Try to do everything as necessary. As already mentioned, it is necessary that the canvas was slightly smaller than the size of the room, for this you can use the laminate itself, which is installed on the edges of the room. In this case, there may be other obstacles in the room, for example pipes. In such cases it is necessary to wrap an obstacle with a laminate. If you do everything right, then after laying the laminate you will not see blisters and unevennesses. When laying the canvas, one should take into account such a moment that the docking is made at an angle. To ensure that the joint does not miss either cold air or sound, it is best to use a sealant. The sealant will fill the gaps and at the same time hide the joints from the eyes. When you start laying the second row of laminate, it is best to start it from the corners, where it will be much easier to accurately adjust the first and second rows. Laying the second layer is similar to the first. After the second layer of the laminate has been installed, the gaps need to be released. In these gaps you need to insert plastic contours that will firmly hold your laminate and allow you to more evenly lay it on the floor. In some cases, the contours will not fit into your gap. It is better to cut off the panels a little, but do it very carefully so as not to cut out the excess. Fasten your layers together with special staples. The final step is the installation of a plastic skirting board. In the market you will find many types of this coating. The cheapest models will require you to fix them with screws. If you purchased more expensive models, they have special fasteners to the wall, on which a plastic skirting board is subsequently installed.


