How to make a diode light fixtureown hands? What it is? This is worth talking about in more detail. LED lighting is gaining popularity every day. It covers new areas of application.  Diagram of the LED light. Very often, LEDs are used not only for the main lighting of the room (fixtures), but also for some types of lighting (for example, in the kitchen, in the dressing room and so on). Such beauty, of course, can not be cheap, so if you want to use LED lighting at home, then you have to fork out a little.
Variants of lamps from the LED ribbon with their own hands
So, for the first version of the lamp you will need:  The scheme of connecting LED strips from one power supply.
- LED self-adhesive tape (8 mm wide);
- aluminum corner (size 10x10 mm, length 1.5 m) or plastic plastic box (optional);
- Screws;
- small switch.
Practical to use becomeLED strips. They look like a flexible "board" on which the LEDs and resistors themselves are fixed. It is very convenient to cut off the size of the LEDs you need from the LED strip. There are many manufacturing methods. They depend on the final look of the luminaire you want to get: a vertical luminaire, a horizontal one or with legs. Let's consider a few of these. Back to the table of contents</a> We carry out the construction of the lamp 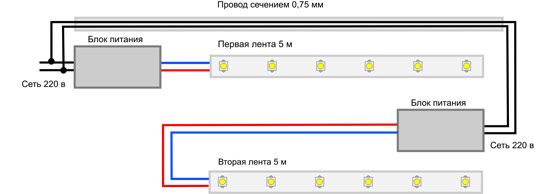 Scheme connecting LED strip with twopower units. To do this, you need to measure the length of the corner that you need. Then drill a hole in it so that it can be fastened with screws to the surface. Having done this, you will need to cut out the groove to secure the microswitch. After completing all the instructions, attach the corner to the selected place with screws. In order for the LED strip to adhere well to the corner, you need to rub it with acetone, for degreasing. Do not forget to install a switch in the notch and solder the wires. Connect them to the adapter or 12V power line. The light is ready. It is intended for a horizontal surface. You can use it, for example, in the kitchen (under the locker). If such a luminaire is used at a height of 70-80 cm above the surface, it will well cover 60 cm of its width, most importantly, it will not blind the eyes. Now consider the second version of the lamp. He will be more difficult at work, but more original. Let's start to make. To do this you must buy such materials:
- LED strip RGB (3 m long);
- 3 legs for furniture;
- nickel-plated pipe (diameter 25 mm, length 1.5 m);
- 2 fixings for the pipe;
- 9 m racks (trim);
- plywood (10 mm);
- ballon with black paint;
- RGB controller (console);
- piece of particle board;
- electric jig saw;
- thin screws.
First you need to cut the electricjigsaw plywood 6 rings with different diameters (2 large, 2 medium, 2 small). And also one circle of chipboard (it will be the base of our lamp) and a circle of plywood, in which you will cut out six holes (this is the top of your lamp - its cap). All cut rings and slats paint black, allow to dry. Painting is best done outdoors, as the paint has a smell. Pay attention, before you paint the slats, you need to drill holes in them at equal distances for fastening with screws. On a circle of chipboard and a circle of plywood, you should fix the fasteners for a nickel-plated pipe. It will connect the entire construction of the lamp, made by own hands. In the middle of the rings, glue the LED strip, which initially cut into pieces equal to the inner diameter of the rings. Each of the rings must be soldered to the wires. After that start to connect with screws small rings with slats. They will be in the middle of your lamp. Further on both sides of the small rings will be attached the middle rings and at the end the bottom and top of the lamp. Wrap the cables in the cable along the entire height. Do not forget to dye and cable in black, so it does not differ from the racks and rings. Back to contents</a> The final stage of work 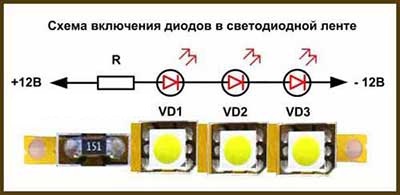 Connection diagram of LEDs in LED strip.So, we make the top: to a large plywood ring we attach a circle cut from the same material with six holes. We got a glowing hat, which we attach with the LED strip down to the lighting fixture. Then we make the bottom of the lamp. To do this, furniture legs should be attached to the chipboard circle from below (the lamp will hold on to them), and from above, attach the remaining large plywood ring. Next, you need to insert the nickel-plated pipe into the mountings to connect the entire structure. We also attach the RGB controller from below, with which the made will be powered. We got its bottom, which we attach to the entire structure. Your lamp will receive power from a computer power supply, if this does not suit you, you can come up with something of your own, for example, power using an electronic transformer and so on. For better reception of infrared rays from the remote control, you need to put the disc with the shiny side up under the lamp on the floor. Well, a DIY LED strip lamp is ready. In general, we received an inexpensive, beautiful, original, economical and ecological lamp for your room. But these options for the manufacture of lamps are not the limit, they are only basic. The rest you can come up with yourself. Don't stop at problems! Decorate your home with your own hands!