Among the modern materials thatUsed for laying flooring, a special place is taken by a natural and ecological cork. Such a floor is quite durable and comfortable. On the cork it is pleasant to walk even with bare feet, as it is elastic and quite warm. All the characteristics of the cork floor are achieved due to the porous structure of the material. It consists of solid cells, which are filled with a mixture of nitrogen and oxygen.  Cork flooring scheme.The cork floor is not allergic and does not electrify. It is quite fireproof, not susceptible to rotting and fungi. do it yourself is a rather interesting and creative process. After all, each of its components has a unique pattern.
Select the cork floor
If you decide to install the floorcoverings from a stopper, before you there will be an uneasy task of a choice. The modern construction market offers a wide variety of these panels. When buying a material, you should pay attention to the interior design of the room in which the repair will be carried out. After all, the cork is rich in various patterns. Not all of them will come to the place. Your personal preferences are also important. The price range of the flooring depends on the manufacturer, the appearance and thickness of the panels. Of all the variety of cork there is its following classification:
- cork plywood;
- laminate;
- MDF panels;
- pressed crumb of cork.
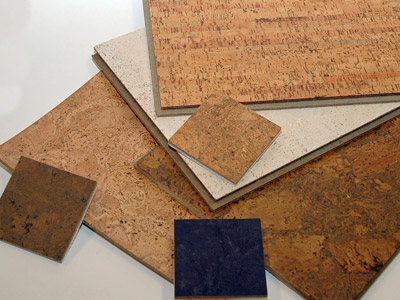 Cork floor coverings: agglomerate, cork veneer, mixture of veneer with agglomerate. Cork board is considered the most expensive kind of this material. It is a slice of a cork tree, which is covered with persistent lacquer. Such a coating is produced by large slabs or rolls. To facilitate installation from the wrong side, a protective film of vinyl is possible. Laminate of cork has standard dimensions. Installation instructions correspond to the laying of ordinary material. MDF panels are in the middle price range. Very often they are confused with the cork board, although by characteristics they are closest to the laminate. The basis of these panels consists of MDF, on which pressed cork crumb is applied. Only on top they are covered with a lacquered veneer 2-3 mm thick. From the pressed cork crumbs the most budgetary variant of plates is made. They have a characteristic structure with small granules, similar to a cork of champagne. Natural veneers are inherent in complex drawings against a background of yellow and brown hues. The quality of tiles from crumbs is a little inferior to solid veneer and can be an excellent version of the cork floor for a family with an average income. Back to contents</a>
Preparing to install the cork cover
Laying the cork floor with your own hands can be carried out in three ways:
- installation of flooring is similar to that of laminate;
- floating floor;
- installation of cork on the glue.
 Tools for laying the cork floor. It is recommended to choose a warm season for laying the cork. The drop in temperature during delivery should not exceed 7 ° C. After purchasing the material, it is advisable to leave it in the room to equalize the temperature regime. In addition, you should pay attention to the humidity level. When reaching a mark of 70%, cork laying is undesirable. To install the cover you will need the following tools and materials:
- electric jigsaw, which can be completely replaced by a Bulgarian;
- Rubber hammer;
- building level;
- plinth for cork floor;
- wedges for clearance around the perimeter of the masonry;
- roller and trowel when installing the cork on the glue;
- threshold for joints in the doorway;
- building corner.
Surface for laying the cork shouldmeet some stringent requirements. Do not install this coating directly on the screed. This can lead to a gradual crumbling of the cork board. The surface of the floor should be perfectly dry, because the panels have the ability to immediately absorb moisture. For leveling use liquid means to exclude damage to brittle material. Back to contents</a>
"Floating" cork flooring technology
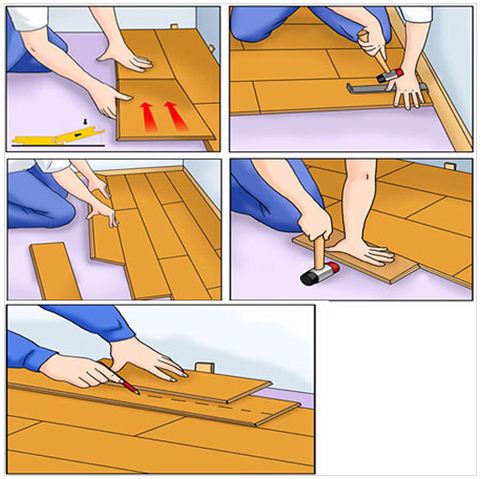 Picture 1. Sequence of laying the cork floor. Installation of a floating floor is similar to installing a laminate. It is used for plates with a lock joint. Laying the cork floor begins with waterproofing works. You need to cover the entire room with plastic wrap. Above the skirting we leave a small stock. Place the joints of the film to be carefully sealed with tape. A polypropylene base is laid on top of the film, the recommended thickness of which should be at least 0.2-0.3 cm. The sheets are installed end to end. Then we measure the length of the room across the direction of the cork placement. This value should be divided by the width of the panel to calculate their required number. The upper part should not exceed 0.5 cm. The cork floor is laid from the right corner of the room. The comb of the first row should be placed in the direction of the wall. After the cork has been laid along the initial line, insert the wedges to ensure clearance around the perimeter. With curved walls, you need to trim the panel neatly. The cork flooring direction should preferably be selected from the window opening. The next row of coverage starts from the end panel of the first row. If the previous line is laid without circumcision, then the initial component will have to be shortened to prevent overlapping of the joints (photo 1). The connection of the second row to the first occurs by mounting a panel at a right angle into the grooves. After a slight pressing it can be lowered to the base. With the next detail of the flooring we do the same. For a stronger connection it is desirable to punch the entire structure with a rubber hammer. When laying the cork, sometimes you have to go around various pipes and other means of communication. In this case, it is recommended to leave a small gap of 0.1 cm. To join the plates in the doorway a special threshold is used. It is attached to the floor with screws. After the completion of the laying of the plug, immediately remove the wedges for the gaps. The installation of skirting boards is carried out by fixing to the wall, and not to the floor covering. Back to contents</a>
Laying the cork floor on the adhesive
Coating technology usingsticking starts from the center of the room. Further, clockwise, the cork begins to be laid with a gradual increase in the working surface. It is recommended to lay out all the slabs on the floor before the installation and determine the shift between them. It is allowed to lay the cork floor and without displacement. There is no need to cover the whole surface beforehand. To make up the whole picture, you only need to lay out 2 m². It is not recommended to use PVA glue for laying the cork on the adhesive. It contains water, and cork panels have the property of absorbing moisture. There are special means for gluing cork slabs. When buying glue, you should pay attention to the time it dries. Beginners are recommended to use a tool with a setting period of 10 minutes. Mounting the cork on the adhesive allows it to be spread on the floor or directly on the panel (video 1). After laying the cork, it should be pressed with a roller, gently adjusted with a rubber hammer and always check the evenness with the help of a building level. A small gap should be left around the perimeter of the room. Dry such a coating will be within a day or two. </ ul>


