After installing the stretch ceiling between the canvasand the wall is always a small gap. Since lightweight ceiling material is subject to slight fluctuations due to draft, this gap does not always look neat. To complete the design of the room, the gap must be something to disguise around the perimeter of the room. The best is a decorative ceiling skirting that will harmonize with the ceiling material, wallpaper, and the whole room.  Decorative ceiling skirting is idealTo mask the cracks at the junction of the wall and stretch ceiling. As a rule, installation of fillets (elements of which will be framed) does not cause any special difficulties. The most difficult thing is to qualitatively decorate the places of their connection in the corners. It can be carried out manually, especially having processed connecting sites, or to use ready-made corners. They must enter the same batch of materials as the main elements. Of course, you can not glue the plinth to the suspended ceiling, as this can lead to irreparable damage to the expensive ceiling cover. Mounting is carried out exclusively to the walls.
Varieties of material and tools for its installation
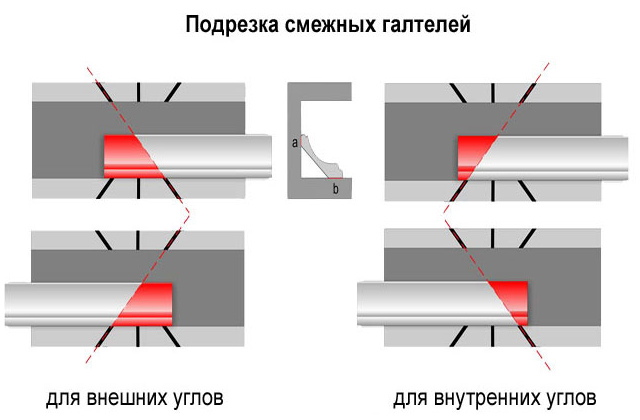 Cutting adjacent fillets with a stool. Most often the plinth is made of polystyrene foam or polystyrene. The main advantages of foam products are their low cost and low weight, due to which it is possible to glue the parts even on top of the wallpaper. But this material is inflexible and rather fragile, so it is not suitable for rooms with a complex perimeter. Many types of glue in the work with it can not be used, since they dissolve the foam. If you glue the skirting board of polyurethane to the wallpaper, because of the heavy weight of the latter at some point, it can break off and crumble down both. Therefore, it is better to mount the fastener before the finish of the walls is made. Parts made of polyurethane will be quite expensive, but the material is very resistant to chemical attack. Thanks to this, when choosing an adhesive, there are no such limitations as in the case of foam. Molding (an overhead decorative strip) is used for suspended and suspended ceilings, but it is usually used only in rooms with perfectly smooth walls and joints between them. The wooden frame, trimmed for gold or valuable wood, looks very impressive, but it is not glued, but mounted with the help of special fasteners. But for adhesive fastening, it is best to choose products with a sufficiently wide vertical part to ensure the necessary strength of the fixation of the elements due to a large area of adhesion. Before work, you need to stock up on the following materials and tools:
 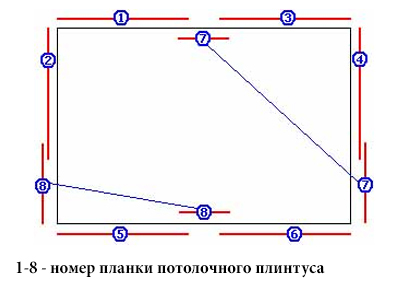 Example of calculating the required amount of ceiling skirting.
- folding meter or tape measure;
- pencil;
- cord for punching;
- mounting knife;
- stool or finished corners;
- putty knife;
- glue or putty;
- sealant (for sealing seams);
- clean rag;
- fillets length 1.3 m (for large rooms - up to 2 m);
- ladder.
When installing, it is best to use a special,designed specifically for ceiling skirting, glue. This will help to avoid unforeseen complications. Adhesive compound is selected colorless, but white finish material and glue can be used. Good characteristics have the compositions "Ogas", "Europlast", "Moment Editing", "Moment superstykiy", "Titan". In order not to stain the ceiling, it is covered with a food film beforehand. Back to contents</a>
Technology and workflow
First of all, you need to make a markup. It is carried out on the lower edge with a simple pencil or beaten with a cord. If the wallpaper is already pasted and the plinth heavy, make a notch over the marking line with a knife, after which the strip of wallpaper above the notch is carefully removed. Installation begins at the corner of the room in which the finished corner is placed. If it is not there, the fillet is placed in a stool, and then one edge is cut with an acute knife at an angle of 45 °. Similarly, the second part comes in, after which the prepared pieces are applied to the walls forming the corner and check how well they fit together. The cutting of each corner will take at least 10 cm of detail, which must be taken into account when buying products. Glue spread only the butt and that part of the plinth, which will be subsequently glued to the wall. Installation is made at a minimum distance from the ceiling. But if you want, you can increase the gap to 2 cm and place the LED backlight in it. When installing, you need to make sure that the frame does not touch the vinyl sheet, which is very sensitive to point damage. The details are fixed sequentially, from one corner to the other. There is another way: first glue the cut pieces to all corners, and then connect them to even areas. It is desirable that the length of fillets forming an angle is not less than 7 cm, for which it is sometimes necessary to shorten the remaining components a little. Using ready-made corner elements greatly simplifies the work. After applying the glue it is necessary to withstand the time specified in the instruction (from a few seconds to several minutes), and then a piece of plinth pressing against the wall strictly along the line of marking. On uneven areas, the frame should be pressed as tightly as possible. For better fixing, you can use paint tape, which is removed only after the glue has completely dried. Its remains, which protrude along the edges of the product, must be wiped off immediately with a dry cloth, without waiting until they become stiff. If the adhesive was used putty, it can only be applied to a pre-moistened surface, cleared of wallpaper and paint. Remains of putty are removed with a dampened cloth. Back to contents</a>
Correction of minor defects and final finishing
Despite the fact that the flexible polyurethane plinthis able to repeat the contours of the uneven wall, so that the assembled structure has no appreciable slits, as a result, it forms a not very accurate line. Therefore, many installers achieve a tight fitting of the fillet to the wall only along the edges, and the gap is then closed with a silicone sealant. In some cases, it is also used as the main adhesive. The same sealant fill the place of joining the parts. You can also use a special docking adhesive, which provides a strong connection at the molecular level. Despite the fact that the range of edging made of polyurethane is now very diverse, some prefer decorating in accordance with their own preferences. In particular, the products can be painted in any color. However, the staining of the skirting board that has already been glued is carried out only after the glue has dried completely and gains the necessary strength, that is, not earlier than in a day. If the installation was done by an inexperienced master, sometimes cracks may appear in the fillet junction areas. Before taking on repairs, you should wait until these cracks cease to increase, and then completely clean them from the old glue with a saw. Then the slots are filled with a docking glue. In the process of solidification, it forms a foam, the excess of which must be periodically removed. The part of the frozen foam that protrudes above the surface is cut with a knife, and then the joint site is ground with fine-grained sandpaper.


