Today in the construction market there are manymodern finishing materials for ceilings: tension, hinged, rack, ceiling tiles, etc. But along with them, the plaster was, is and will be an actual finishing material for both walls and ceilings. Plaster - the material is relatively inexpensive, and its use does not involve the use of expensive tools.  Application of plaster to the ceiling. About how to plaster the ceiling with their own hands, without resorting to the help of professionals, and will go today speech. To do this, you need a minimum set of tools:
- spatulas wide and narrow;
- bucket;
- roller or brush;
- drill with a nozzle mixer;
- trowel;
- sandpaper or mesh for grouting.
Surface preparation
 Ceiling leveling scheme using plaster.So, the first step is to prepare the work surface. If possible, remove old plaster with a hard trowel or trowel. If the ceiling was previously whitewashed or painted, then these unnecessary layers must also be removed. On the modern market, there is a wide variety of washes that will help get rid of any old coating within half an hour. Corners, joints of plates, places of passage of electrical wiring, abutment of pipes and other communications are the most vulnerable places. They must be tapped with a hammer or a spatula handle. By the dull sound, it is easy to determine the places of unreliable attachment of thick layers of old plaster. They also need to be removed. Due to high humidity or insufficient ventilation, the presence of mold and mildew is often found. You can get rid of these organisms with your own hands. If the lesion is small, then copper sulfate will cope perfectly. If, for example, the basement and the scale of the fungus are impressive, then it is burned out with a gas burner, after applying special aerosol-based products. Fire can also be completely dispensed with by using phosphoric acid or another. Back to the table of contents</a>
Leveling and plastering of the ceiling
 The scheme of the direction of the ceiling plaster.The stage, which in no case should be neglected, is the priming of the ceiling with your own hands. The primer is the link between the ceiling and the further applied material. The P-Primer is an excellent choice. It has good adhesion, the material adheres to it excellently. Penetrating deep into the surface, it prevents the possible formation of mold and mildew. This applies to any type of floor, be it concrete, wood or drywall. Leveling the surface is an important part of the repair. If the ceiling is wooden, then you cannot do without a special mesh. It will give strength and serve as additional reinforcement. The joints of the plasterboard ceiling are glued with reinforced paper, serpyanka. The places of convergence of the slabs of the concrete ceiling (rustic) are pre-sealed with gypsum mixtures with the addition of liquid glass. This provides the desired waterproofing. In the case of a very curved ceiling, the beacon alignment method is used. The lowest point of the ceiling is located by the laser level, then aluminum guides are installed in the places of the "failure". When done, a stretched cord can be used to determine the lowest point. In recessed places, "cones" are placed from the mortar in increments of 300 to 1000 mm. Focusing on them, it is easy to make a rough leveling of the ceiling with a medium-sized rule. Ceiling plaster starts from corners, wall bends or other non-planar areas (pipes and other communications). Use two spatulas: wide and narrow.
 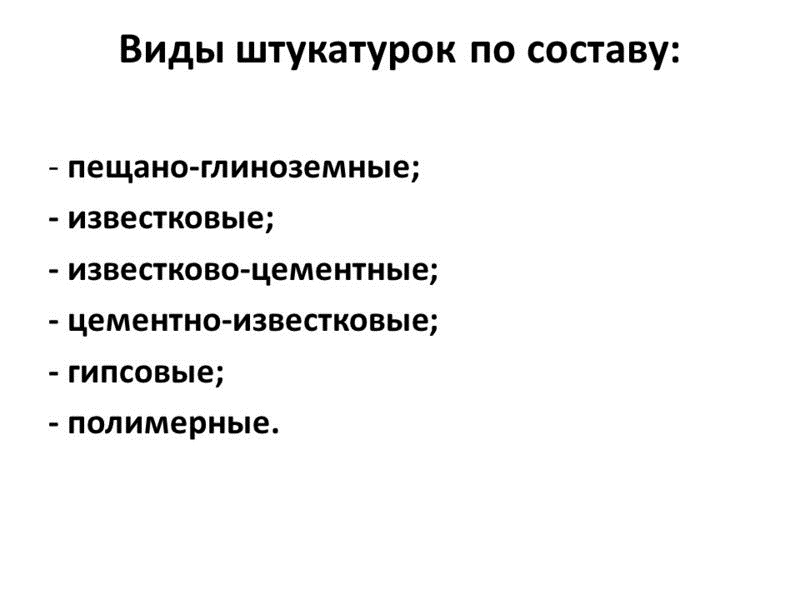 Types of plaster composition.Narrow ones need to apply an even line of putty on a wide spatula, it also cuts off uneven residues from a wide one. With a wide spatula, the solution is applied to the surface and stretched, the excess is cut off with the same spatula. After the first layer has dried, the second is applied, but already perpendicular to the first. Then everything is overwritten with coarse sandpaper or mesh. After that, a finishing layer of plaster with a finer grain fraction is applied. Then it is rubbed with fine sandpaper. The choice of a high-quality mixture should be in favor of gypsum plaster. The ideal option is Rotband gypsum plaster. You can choose a cheaper cement-based mixture, but more professional skills are required to use it. It lays down worse, dries longer and is less resistant to all kinds of vibrations. A clean bucket is required to prepare the working solution. Water is poured first, then, using a drill with a mixer nozzle, gradually add the dry mixture until the consistency of thick sour cream is obtained. Wait 5-10 minutes and stir again. The solution is ready. Plastering the ceiling yourself can and should be done. This very inexpensive way is much better than the money spent on the services of a professional. In the future, a high-quality plastered ceiling can be covered in any way chosen from a wide range of materials available on the market.


