One of the most common ways of finishing the ceiling when repairing a room is painting it.  The most common, economical and simplethe option of finishing the ceiling is painting. This is due to the wide variety of colors offered, the combination of good quality materials with reasonable prices and ease of finishing. You should consider the answer to the question: how to paint the ceiling with your own hands?
Preparatory work
To get an ideally painted ceiling, you must first carry out thorough preparatory work. They include:
- selection of quality tools;
- choosing the appropriate paint;
- correct surface treatment.
Painting the ceiling with your own hands will not take place without the required materials and tools. These include:  Tools needed for painting the ceiling.
- paint;
- primer;
- putty;
- Large and small rollers with long handles;
- a set of brushes of different sizes;
- containers for puttying, priming and paint;
- spatulas (narrow and wide);
- sandpaper;
- shkuroter;
- a brush on the long handle;
- mesh abrasive (if necessary);
- ladder;
- protective suit with a headdress;
- glasses.
The modern construction market offersa variety of water-based paints suitable for any room. For interior decoration of dry rooms, acrylic, water-based, silicone paints are most suitable. When repairing in rooms with high humidity: in the kitchen, bathroom, toilet - you can use silicate paint, which contains antiseptic additives. Silicone paint has a very high quality, combines the positive properties of acrylic and silicate painting materials, but has a rather high cost. All of them are environmentally friendly, safe, vapor-permeable, practically odorless, easy to clean with soapy water. Back to the table of contents</a>
Preparing the base of the ceiling for painting
Painting the ceiling begins with the preparation of its foundation. These works can be divided into several stages:
- cleaning from old coating;
- putty;
- primer.
First of all, it is necessary to clean the surfacethe ceiling from the old coating: wash the chalk whitewash, take off the wallpaper, paint, discard the tile, etc. After that, check its evenness, the presence of cracks, swings, bulges. Considering that painting the ceiling implies a perfectly flat surface, then if necessary, it should be leveled using a putty. For large defects, it is necessary to apply the starting and finishing putties. The putty mixture is diluted in a prepared container, using a wide and narrow spatula is applied to the surface. After drying, the finish putty is thoroughly cleaned by a shurter with sandpaper.  The ceiling with a roller must be applieda primer. To improve the adhesive properties of the materials used, it is necessary to primer the entire ceiling surface. Before priming, the surface is cleaned of dust with a brush with a long handle. To produce these works, a deeply penetrating primer is used, fully ready for use, of good quality. Using a roller, it is applied evenly over the whole surface of the ceiling. After the primer has dried, the second primer layer is applied in a similar manner. Only after carrying out qualitative preparation the paint will lay flat on a surface. In the room where the repair is done, it must be warm and dry. There must be no drafts. Now we need to go on to the direct consideration of how to paint the ceiling according to all the rules. Back to contents</a>
The technology of painting the ceiling with a roller and brush
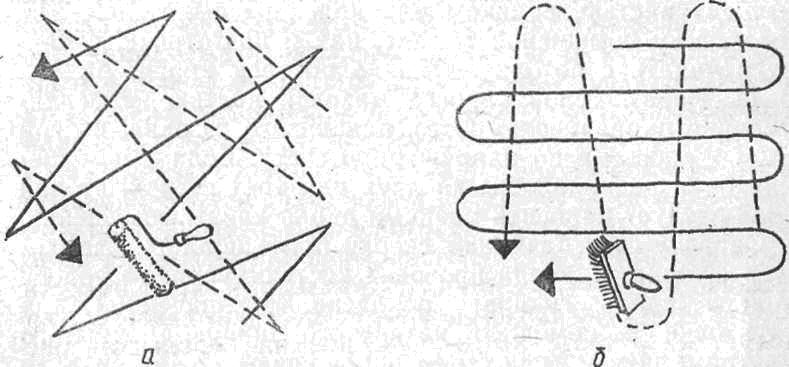 Schemes of motion of paint tools for painting the ceiling: a - roller; b - with a brush. The ceiling painting, as noted above, can be produced independently in 2 different ways:
- traditional (using a roller and brush);
- with a vacuum cleaner or a spray gun.
The most common is the first methodstaining. How to paint the ceiling with a roller and brush? Work on painting should be done in a special protective suit, a hat and glasses. First of all, the brush is painted with corners and hard-to-reach places: near pipes, decorative elements, lamps, etc. First, with the help of a brush, the corners of the room opposite the entrance door are painted. After that, along the entire perimeter of the ceiling, a paint is applied with a brush in the form of a strip about 5 cm wide. This is to ensure that in the future, when working already roller, do not damage the connection between the walls and the ceiling and corners. The main painting of the ceiling is done with a roller with a long handle or using a ladders. A small amount of paint is poured into a pre-prepared wide container. After dipping the roller into the paint, it is necessary to slightly roll it in the container, so that the paint is distributed evenly. Its excess can be removed with a brush. 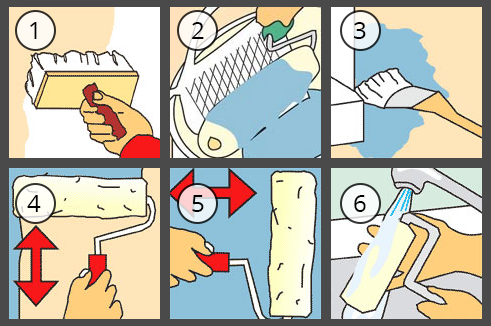 Ceiling painting scheme: 1 - priming the surface, 2 - preparing the paint for work, 3 - painting the corners, 4, 5 - the first vertical and second horizontal layers of paint, 6 - cleaning the tool from the paint. To make the surface of the ceiling impeccable, it must be applied at least 2 layers of paint. To prevent divorce, it is necessary to paint the ceiling perpendicular to the window with the first layer. The second layer of paint is applied to the surface in a direction perpendicular to the first layer. Only this way will not arise on the ceiling of the divorce. Before applying each next coat of paint, the previous one should dry thoroughly. The mechanism of painting with a roller is simple: a small amount of paint is applied to the surface in parallel strips, overlapping each other. It is important to avoid streaks and wrinkles during work. The painted area should be carefully inspected from various angles for defects in painting, so that they can be eliminated immediately. At the end of the work, the painted ceiling should be dried by hand. Brushes and rollers are washed in kerosene, turpentine, white spirit, and then in warm water with soap. Back to contents</a>
The technology of painting the ceiling with a vacuum cleaner or spray gun
Now you can consider how to paint the ceiling with a spray gun or a vacuum cleaner. This method of staining is more productive: less time and effort is spent, and the quality of work does not suffer. 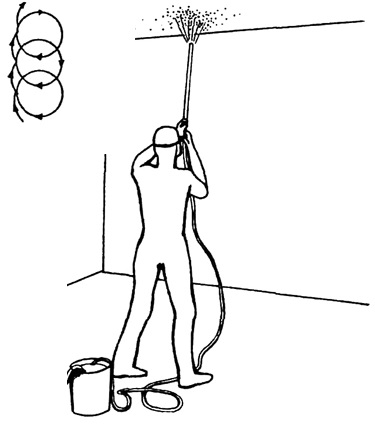 Scheme of painting the ceiling with a spray gun. Vacuum cleaners are used for work, which have a special function that allows painting ceilings. This function is available in many domestic vacuum cleaners. The spray gun is a special device designed for painting various surfaces. First, the paint is prepared, it must be diluted with water to the desired consistency. Then the paint is placed in an ordinary jar, on which a sealing ring is mounted, by means of which it is connected to a vacuum cleaner. The spray gun usually has a special container for filling the paint. Then, the spray distance of the paint spray is selected. Usually it is approximately 70 cm. It is important to paint the ceiling with the same distance, smooth movements, long not delaying in one place, so that there is no staining. For the convenience of work, you can use a stepladder. If you follow these simple rules of coloring the ceiling in this way, the surface is covered with an even and a thin layer of paint. Thus, having the paint and the necessary tools, guided by the recommendations for painting the ceilings listed above, you can independently cope with the work and, as a result, get the ideal surface of the ceiling.


