Any kind of decoration, whether it's tile, wallpaper orpainting of walls, requires alignment of the base. This is necessary to make the decorative material look smooth and beautiful. To level the surface, plastering and wall filling are performed. 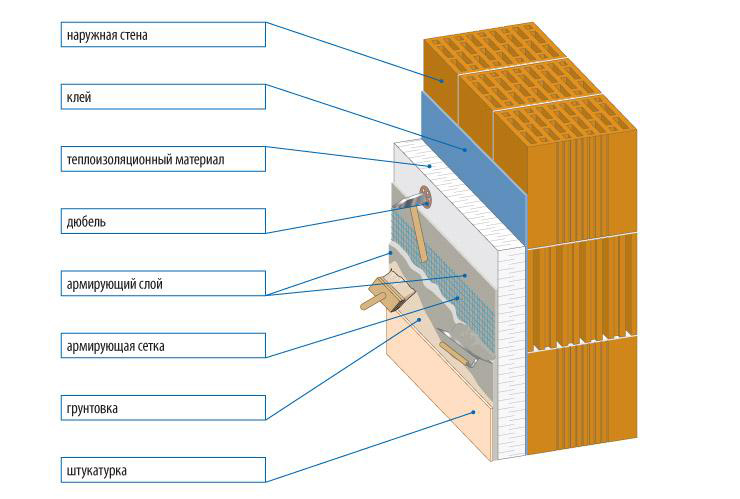 Scheme of applying plaster and primer to the wall. Not everyone knows what distinguishes these two types of work and sometimes confuses them. And in connection with this, in order to have an idea of what is the difference, you need to consider each material and type of work separately. So, putty and plaster.
Wall plastering: features
Plastering the walls is quite labor intensiveprocess. Plastering of walls and ceilings is carried out with solutions based on gypsum or cement. Before starting work, it is necessary to prepare the surface. If the walls are covered with wallpaper, then they are removed. The wallpaper is easy to remove if it is moistened with water and then cleaned off with a spatula or special brush. Same . 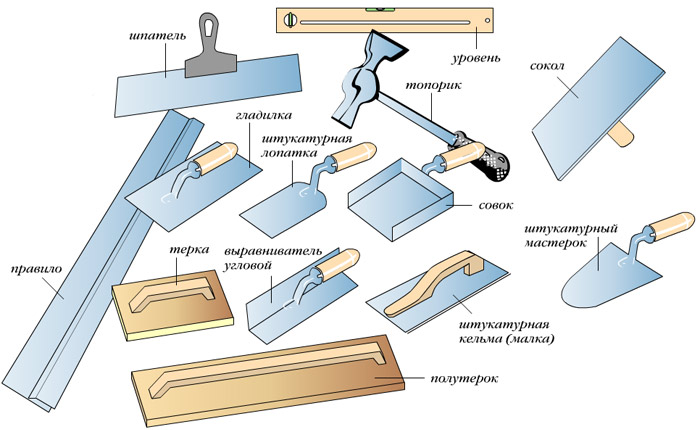 Tools for applying plaster. If the wallpaper were cracks, then they need to be expanded and covered with mortar. For better adhesion of plaster in places where there were cracks, a sickle or a building net is glued. Stone, brick or concrete walls before plastering are beaten to a depth of 1 cm, this is necessary to firmly fix the solution on the walls. For chipping use an ax or chisel. It is necessary to make as many incisions as possible, the quality of the plastered surface depends on this. But for the finishing of wooden walls you will have to make shingles, which is necessary in order that the plaster firmly kept on the ground. Shingles - this, if you understand, wood chips, which are packed in the form of a grid. Currently, there is an alternative to shingles - it's a metal mesh. It is stuffed and on a wooden base. Before use, the metal mesh is covered with paint and dried. This procedure is necessary so that the mesh is not rusted. In order to make the surface smooth after the plaster, the beacons are installed during operation. To set the beacons, use a long level or plumb line to check the verticality of the walls. Above and below the walls, corners are driven into the dowels, to which the twine is fastened, and its verticality is checked by the water level.
  The scheme of installation of lighthouses. The horizontal twine is stretched by the same principle. For rooms with a small ceiling will be enough and four contours. A stretched twine will be a guide for the beacons from the profile. They are installed on the solution, which is applied under the line in the form of slides and where subsequently the profile is pressed. When installing beacons, it is necessary to take into account that the profile must be in contact with the string, but in no case should it be moved. First, vertical beacons are installed, and later - horizontal, according to the same principle. The leveling of the beacons is also checked by the level, their location should be in the same plane. As the surface with the beacons will be ready, to the plastering proceed to the next stage - preparation of the solution. Back to contents</a>
Mortar and plaster technology
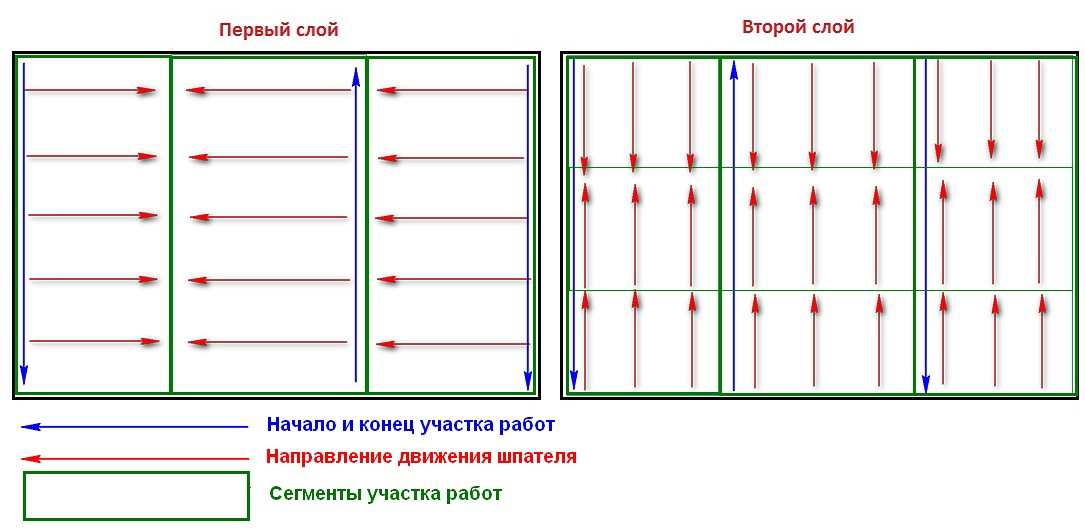
The plastering of walls, as a rule, is carried out by three layers:
 Preparation of the wall for plastering. As the finishing layer will dry a little, you need to do the grouting. Grout is produced by wetting the grater, which should be strongly pressed to the surface. Also perform a finishing grout, for which a felt or felt is beaten on a grater. For plastering walls and ceilings for the preparation of mortars, cement, lime or gypsum is used. A particularly strong solution is made on the basis of cement, and the lime solution is vice versa. It is important to remember that the mortar on the cement very quickly sets, and therefore after cooking it should be used within an hour. But as for the solution on gypsum base, it should be prepared in small portions, since gypsum has the ability to harden quickly. And when using ready-mixed mixtures, follow the instructions for use indicated on the package. You need the following tools to perform the work:
- guide rails;
- water level;
- Master OK;
- rule;
- a set of putty knives;
- latex gloves;
- solution tank.
Back to contents</a>
Wall plastering: recommendations
 Wall plastering scheme. The puttying of walls is considered the final stage before pasting wallpaper, painting or facing with tiles. There are plaster mixtures capable of giving a perfectly flat surface, but such work is expensive, and for this reason they do not refuse the putty. Tools for putty apply the same as for plaster. But there are some nuances. For example, putty spatulas should be used much thinner so that they can flex when pressed, which helps to apply a thinner, even layer. When carrying out the putty it is necessary that the blade of the spatulas be flawless, that is, completely even, but with rounded edges. When grinding walls after performing putty work, you need a grate with clamps. It is not recommended to coat the putty with sandpaper, especially for gypsum surfaces, since the lumps that will be removed from the putty may damage the surface. For puttying tools, the tools should be kept separate and kept clean, since the sticky solution dries, and it's hard to remove, and the dried particles will not allow to achieve an ideal base. Before starting work, you need to choose the right composition for wall leveling. There are several types of material, and which one is better, you can learn by thoroughly studying each. Back to contents</a>
Putty on an oil-based adhesive
This kind of material is the cheapest, soas in their composition is linseed oil. This material has sunk into oblivion due to the fact that the linseed oil is in its own way an oily composition and after the wallpaper is pasted outwards. It can also show through the paint and soak into the concrete walls. But it is still used today. It has a beneficial effect on waterproofing and protects the plastered surface from moisture damage. It has found its application in the decoration of basements and ancillary facilities, bathrooms - in general, those places where the walls are painted with oil paint. It is irreplaceable for stucco walls too. It performs a protective function for the crate floor and molding from mold, putrefaction, and metal elements - from rye. And thanks to varnish the walls of the tree under the plaster will last for a long time. Back to contents</a>
Gypsum cement putty
Gypsum cement is much more expensive, butit can be used for any finishing work. Such a putty has the appearance of a dry mixture, which is diluted with water. It has a different brand and is divided into material for finishing living quarters and for rooms with high humidity. Basically, it is used to level the walls for wallpaper. In turn, it is divided into:
- water-dispersive;
- acrylic.
Water-dispersion putty is produced in liquidform. It is implicated in a water-polymer emulsion and packed in buckets. Its price exceeds the cost of dry mixes, but the work with it is simplified by the fact that it does not need to be bred. There is only one requirement for the master - do not forget to close the container with the solution, otherwise the composition will lose its properties, and the mixture will not grasp well. Such putty, manufactured in industrial conditions, has a toughness, strength and smoothness. It is easy to work with, since it is simply applied and does not make holes when grinding the surface of jointer. With water-polymer materials, even a non-professional can work. To get a good surface for painting, it is necessary to produce the putty three times. Acrylic composition has the best qualities, but it also has one drawback. The surface of the wall after the putty is perfectly smooth. A cheap paint on it rolls down, so you can not use low-quality paints. So. Puttying and plastering of walls is a rather laborious process and applied on one surface, however the process of execution is different. But the connecting link is that only when combining these two types of work can achieve an ideal foundation for finishing.


