Some time ago the lath ceilings weredetail of the interior of only public spaces. They could be found in shopping centers, entertainment establishments, foyer of administrative buildings. And only recently this type of ceiling coating began to gain popularity among the masters who install the rack ceiling by their own hands. But even in these cases, most often the area of application of the ceilings is limited to a bathroom.  The aluminum ceiling rack is suitable for installationin any room. The attractiveness of non-rotting and corrosion-resistant ceiling coatings in a similar place is easy to explain: it does not promote the propagation of harmful microflora and is not damaged by it, it can withstand any detergents and disinfectants. Installation of the rack ceiling is relatively inexpensive and is quite affordable for the home master. Another obvious plus is that it is not necessary to level the surface of the rough ceiling, as the suspension system and smooth even stripes of the coating allow creating an ideal ceiling. And the possibility of placing spotlights in it, the convenience of performing a multi-level coating, the high decorativeness of some types of coatings on the ceiling panel make it more attractive for the design of residential premises.
Tools, calculation of quantity of materials
Among the necessary tools for assembling the lath ceiling with their own hands of tools and materials are the following:
- elements of the suspended lath ceiling (profile, stringer, pendants, panels);
- perforator, screwdriver;
- construction level;
- tape measure, ruler;
- scissors for metal, pliers or pliers;
- Fastening elements (dowels, screws).
You can calculate the material based on the results of measuring the perimeter of the room and determining its area: 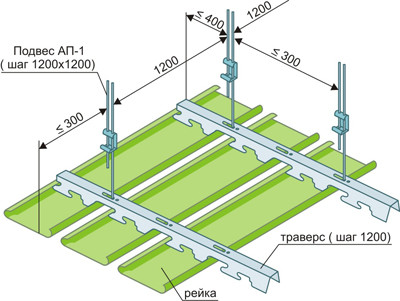 Scheme suspension ceiling rack.
When the installation of a ceiling in severallevels, it will be necessary to calculate separately the number of materials for each of them. Choosing an open ceiling for installation (with a gap between the rails of up to 15 mm), it will be necessary to take care of calculating and purchasing a special profile - the layout between the panels. Back to contents</a>
Mounting technology for suspended ceilings
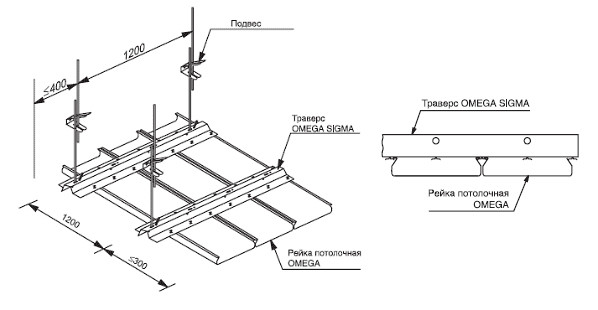 Figure 1. The design of the rake ceiling. To the surface of the future coating was horizontal and flat, the first step before the installation should be a horizontal marking. For its repaving, the hydraulic level is traditionally applied, but at home it can be replaced by a building one. When applying the instrument to the wall and following the placement of the air bubble in the bulb exactly in the middle marked with a special risk, several marks must be applied to the walls along the entire length. After that, they connect, drawing on the ruler the place of attachment. The distance to the overhead cover can be at least 5 cm, if it is not planned to place the communications hidden in the ceiling. In other cases, the distance is determined individually, depending on the needs. For marking under stringers, it is necessary to take into account the specified step of the details and to monitor the parallelism of the lines with respect to each other. The perpendicularity of the stringers to the side walls and panels is measured with a square. After applying the marking, you can go to the installation of the rack ceiling. Back to contents</a> Installation of load-bearing parts The carriers include profiles, hangers and stringers.
 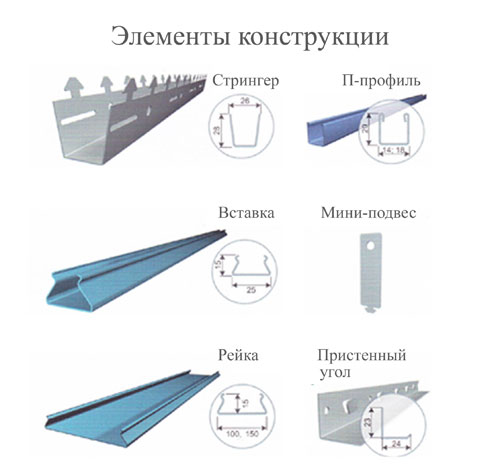 Elements of the design of the rack ceiling.
The established skeleton of a ceiling it is desirable to check up once again on horizontality and after that to pass to installation of a ceiling rejka (fig. 1). Back to contents</a> How to install the panels on the frame Before starting installation, measure the rail of the required length, taking into account the gaps of 3 mm between the wall and the part. 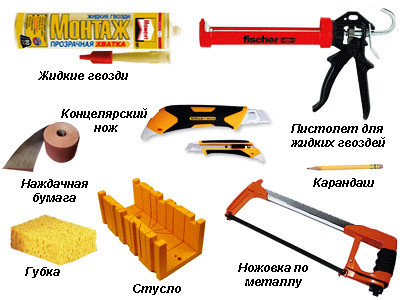 Tools for installing a rake ceiling.
In the event that the total width of the panels wasMore width of the room, one of the last panels should be cut in width. To do this, make a sharp cut with a knife or a knife over the metal along the entire length of the panel. Bending it, break off the superfluous. If the length of the panel is large, you can make incisions on the part to be removed with scissors before the line and break off the individual pieces. It is recommended that such a trimmed part be mounted not last but the penultimate one. Back to contents</a>
Useful tips for the master
When the length of the room exceeds the standard lengthpanels, they will have to be increased. For this, there are special details - intermediate liners. The need for their acquisition is clarified in the course of measurements and calculations before the assembly of the rack ceiling begins. 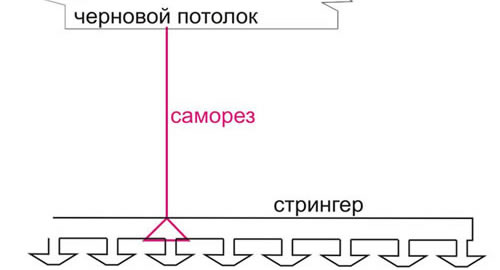 The principle of mounting the stringer. Rack panels are best positioned in a direction perpendicular to the wall, in which there are windows. But if you place a window in the end wall of a long narrow room, you should prefer a direction perpendicular to the long walls. This will help visually to change the proportions of the room to more successful ones. When installing spotlights, cut holes in the panel. To do this draw a circle of the desired diameter and from the center of it make a series of cuts, bending them on the wrong side of the ceiling. In this case, it is necessary to make incisions more often, so that the bent elements can be made as soon as possible. When installing, remember that scratches on the front of the panel can deprive the new ceiling of a part of the appeal. When choosing the type of panel coating, it is better to stop on anodized metal. This is the most stable coating known to date. Installation of the rack ceiling is simple. He is quite capable of even a single master, who does not have the opportunity to attract an assistant. The ease of completing allows you to independently install them and a woman. </ ul>


