Repair of chairs with their own hands will not only allowsave money, but also give the old things a second life. At minimal cost, you can dramatically change the appearance of furniture, everything will depend only on your imagination and selected materials.  Thanks to the restoration, any "old" chair willlook like new. Before you repair a chair, you need to familiarize yourself with the detailed technology, this will prevent serious mistakes and do everything right.
Upholstery of an old chair
It will take:
- nailing;
- pliers;
- small nails and a hammer (furniture stapler);
- upholstery fabric;
- sackcloth;
- dense wide tape;
- dense fabric (canvas, tarpaulin);
- batting or sintepon;
- coconut fiber.
Repair the chair if it does notvery damaged and has a decent look, you can by replacing the upholstery. First of all, it is necessary to take out the seat, then remove the old nails with the help of a nailer, carefully remove the fabric, remove the rest of the contents and springs.  Stretching tools: stapler, screwdrivers, pliers, drill, jigsaw, screwdriver. It is important to remember the sequence of disassembly - then it will be easier to assemble the seat again. Assess the strength of upholstery materials, those that are still in good condition, you can leave, and those that have already served their own, it is better to replace them with new ones. Do not leave old nails in any case - this will complicate the subsequent work, especially when using a furniture stapler. Repair begins with fastening of a dense tape to a frame of a seat, it is better to make it by means of a furniture stapler. But such a tool is not available in every family, and buying it in order to repair a couple of chairs is impractical, so you can use short furniture nails and a conventional hammer. The tape is nailed in the form of a lattice, intertwining the verticals and the horizontal with each other, it should turn out to be a kind of wickerwork. The distance between the strips should not exceed 5 cm, the ideal variant is 3-4 tapes along the vertical and horizontal lines. In order to tighten the tape well, its end is wound on a wooden bar. On top of the grilles, a burlap is beaten, then springs are arranged, sewn from below with a gypsy needle and a strong twine, the usual sewing thread is not suitable in this case. The main task is to secure the springs in such a way that they become stationary. After that they start to knit, opposite each spring they hammer a nail (not to the end), tie a dense rope on it (you can linen or linen twine), drive the nail to the stop. Then, the strapping of each spring is done from above, in this case it is simpler to use a knot that is used for netting. The mating is carried out vertically, horizontally and diagonally, at the end of each row the rope is tied to a hammered nail. It is very important to choose a tight twine, which is difficult to break, because that will determine the life of the new upholstery.
 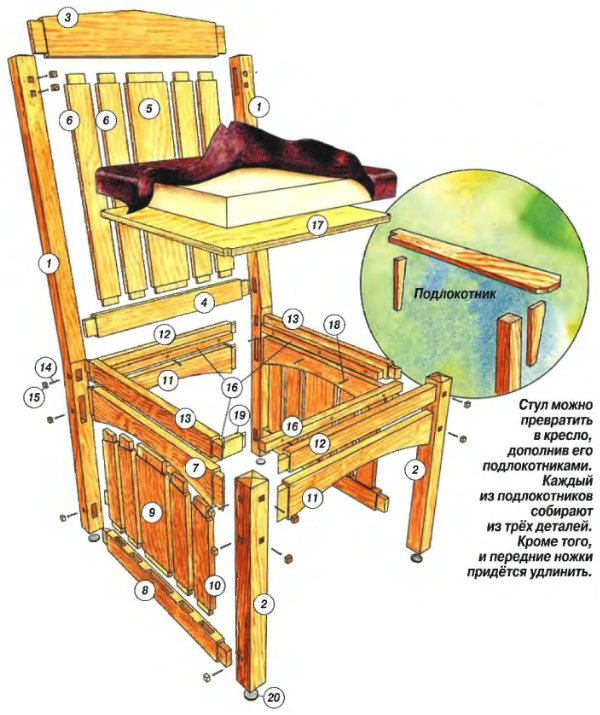 Assembly diagram and chair constriction.A dense fabric (canvas or tarpaulin) is fixed on top of the springs, followed by a layer of coconut fiber, which is covered with batting or padding polyester (you can replace it with furniture foam rubber), all this is fixed with another layer of fabric. Next, the upholstery material is cut out to make a pattern, it is enough to wrap the seat with newspaper. First, the upholstery is nailed in the center of one of the sides, then from the opposite edge. At the same time, make sure that the threads of the fabric are not twisted. The corners are fixed last, if necessary, the fabric is collected in small folds. The edge of the upholstery can be trimmed with a cord or braid, the decor is glued with a glue gun. All that remains is to put the seat back in place. This can be considered complete. Back to the table of contents</a>
Removing old cover
It will take:
- sandpaper;
- cycle;
- putty on wood;
- putty knife.
In most cases, the repair of chairs begins withremoval of old varnish. For this purpose, it is easiest to use sandpaper (grinding sponge) with medium grain moistened in water. Under the influence of moisture, the varnish will soak and go off gradually. At the same time, it is necessary to wash the sandpaper in the water from time to time. It is important to pay attention to the quality of the abrasive material, if it leaves a black trace when wet, then such sandpaper is unsuitable for use. If you use a grinder to remove the old coating, put it at the lowest speed, otherwise the wood may be damaged. A special solvent for the removal of paintwork can be used only if the varnish is not removed in other ways. It is important not to exceed the allowable dose (read the enclosed instruction), otherwise the agent will be absorbed into the tree, which will complicate the subsequent treatment. Remove the old cracked varnish with a cycle or broken glass, with neat movements just scraped off the surface. After that, the chair is polished with fine-grained sandpaper, then the dust is removed with a rag. If there are places on the surface of furniture that are beaten by a shacel, various chips and scratches, then it is necessary to restore them. Repair begins with a special insect repellent treatment, then they put a putty on the wood (it happens white and under the color of wood). After the putty dries, it is ground with fine-grained sandpaper. Which way to remove the old coating is to choose - it's up to you, it all depends on the degree of damage to the varnish and the availability of tools. Back to contents</a>
Toning, painting, waxing
It will take:
- furniture wax;
- woolen cloth;
- flutes (wide brush);
- stain or acrylic paint.
Repair of furniture is not so difficult, ifto know some nuances. So, toning and varnishing can be replaced with waxing. You just need to pick up a colored wax that will emphasize the texture of the wood, give it a beautiful shade and at the same time fix the result. On a small surface, wax is applied with a thin layer with a woolen cloth. In this case, it is undesirable to return to the same place several times, otherwise dark spots may be formed, which will be difficult to remove. To cover a large area of wax, it is desirable to melt in a water bath. In this case, it is more convenient to apply it with a wide brush. It is possible to emphasize wood texture with stain, it is best to use alcohol, since it is easier to work with, besides it gives a more saturated color than water. Stain is applied with a brush, you can mix colors to get the right shade. After you have applied alcohol stain, you need to remove excess (to wash). Using a brush dipped in a solvent, walk on the surface of the chair. After the stain dries out, you can detect the uplifted wood fibers, they need to be sanded with sandpaper. When working with water stains, there is an important rule: you can not return to a painted place, otherwise dark spots will appear. The work is fixed either with colorless furniture wax or covered with varnish. If the wood on the chair has lost its former attractiveness, then it is better to paint it. First the furniture is ground, then painted with acrylic paint. It is important to apply the paint in thin layers with mandatory intermediate sanding with fine sandpaper. You can use high-quality aerosol dyes, spray paint at a distance of 40 cm in a very thin layer, allow to dry out, then apply again. After each use, remove the nebulizer and wash it in turpentine. Following these simple tips, you can easily carry out the repair of the chair with your own hands. </ ul>


