The first thing that catches your eye in any house isceiling. Seeing the gloss of the ceiling coating, few people think about the fact that under it there is another ceiling (rough). It is on the way it is made that the overall appearance of the ceiling depends.  The device of the attic floor: 1 - a ceiling beam, 2 - a cranial bar, 3 - a heater, 4 - a rough ceiling (накат), 5 - an internal covering of a ceiling. The rough ceiling, in addition to providing a floor covering, forms the basis for final finishing. If in urban buildings with a foundation everything is clear (it was erected by the builders in the form of concrete overlappings), then in private construction they have to be arranged from the zero cycle.
Constructions of the rough ceiling
There are two basic rough draftsceiling: based on concrete floor and wooden ceiling. The rough concrete ceiling can be based on overlapping by one monolithic slab, and then the leveling is not necessary (but only the finishing putty). In panel houses, where the overlap is usually a composite of several slabs, additional alignment is necessary. In single-storey buildings with concrete overlapping, it is necessary to impose waterproofing and thermal insulation. Making a wooden rough ceiling implies that there is only an overlap of the wooden beams and a complete cycle of ceiling creation is necessary (from the carcass installation to the leveling of the ceiling surface). At the same time it is necessary to form simultaneously the floor of the attic (attic) and the ceiling of the room, providing protection from moisture, steam and cold. Back to contents</a>
Rough concrete ceiling
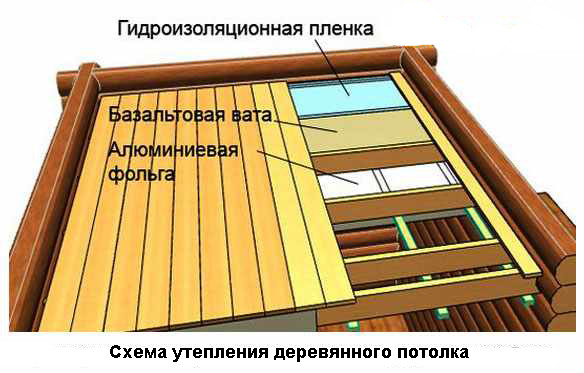 The scheme of warming the wooden ceiling. First of all, concrete floors are thoroughly cleaned of dirt, old coatings. If there are manifestations of mold or fungi, then these areas must be treated with antiseptic composition. It is best to use a ready-made plant compound designed for these purposes, but an aqueous solution of copper sulfate can be used. After preparation of the surface, a primer coat is applied. Primer is produced by a solution of a dry primer mixture of deep penetration. Plaster of the rough ceiling must be made from the installation of beacons, since it is necessary to level the ceiling with respect to the floor and control the thickness of the layer without beacons is very difficult. The beacons are installed vertically at a distance of 25-30 cm from each other on plaster patches. The horizontality is checked on the tops of the beacons using a two-meter level. The height of the beacons should correspond to the thickness of the plaster layer, which should not exceed 5 cm. It should be remembered that the accuracy of setting the beacons determines the quality of the entire rough ceiling. The plaster of the ceiling itself is made in three layers. The first is a leveling layer with a thickness of up to 5 mm. Its main task is to smooth the joints between concrete slabs. Then the main layer of plaster is applied to a thickness of up to 3 cm. With this layer, the horizontality of the ceiling is corrected. Finally, the last finishing layer is completed by smoothing the surface. Its thickness is 10-15 mm. For plastering the ceiling, it is better to use a dry construction mixture on a gypsum basis for interior work. The first layer for better adhesion to concrete overlap is better to impose from a dry mix on a cement basis. Each layer is superimposed after the previous layer has solidified. After the plaster beacons are removed, and the places of their installation are shpatlyuyutsya. Back to contents</a>
Rough concrete ceiling in a private house
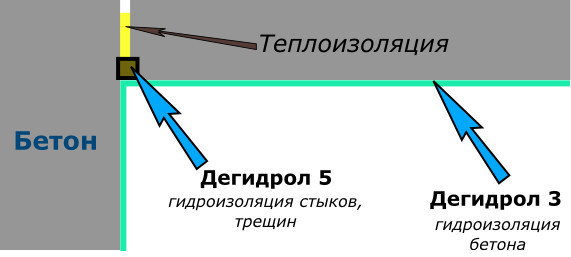 Warming and waterproofing of the ceiling of concrete. In a single-story private structure, a rough ceiling based on concrete overlappings must be insulated. Isolation should be imposed from the outside of the floor, that is, from the attic side. It is necessary to consistently lay on the ceiling a layer of thermal insulation, waterproofing and vapor barrier membrane. Protection can be made in two main ways: a concrete screed or using wooden logs. When manufacturing a concrete screed, you can limit yourself to applying only a layer of thermal insulation. In this case, it is advisable to use bulk claydite. The thickness of the layer should be about 15 cm. After filling the insulation and leveling it on the surface, a concrete screed is made. For this, a concrete solution is poured on top so that it partially penetrates into the layer of expanded clay and forms an upper layer of 2-3 cm. The horizontality is verified by the level. Further surface treatment depends on the purpose of the attic space, for which the rough ceiling has become a rough floor. If you want a more lightweight version of the insulation of the rough ceiling, then wooden logs are used from 40x40 or 40x50 mm beams. Lattice from the beams is fixed to the ceiling by means of anchors or dowels. Consistently heat insulation, a layer of waterproofing from a polyethylene film or roofing material, a vapor barrier layer from a foil-coated film are stacked between the lags. As a thermal insulation, mineral wool or foam sheets can be used. When laying, do not allow gaps between the beams and thermal insulation. On top of the log are laid a wooden covering, plywood or chipboard. Back to contents</a>
Manufacture of wooden flooring
The process of manufacturing a rough ceiling beginswith the condition that the house is installed with a wooden beam 10x10 or 20x20 cm. First, a ceiling grille is installed. To do this, between the beams are fixed logs of a wooden beam. On the bottom of this grill is fixed the roughing. Usually, a board with a thickness of 25-30 mm is used. You can use a chipboard thickness of 18-20 mm or two layers of plywood. The advantage of using the board is that the grid is not mounted in case of its use. The board is securely attached directly to the joists. The board is attached to the beam with at least two nails or powerful screws. When fastening with nails, it is recommended that they be slanted at an angle of 45 °. Particle boards or plywood are attached to the ceiling grid. Fastening is recommended to be made with screws. In this case, a hole is pre-drilled in places where the screw is twisted in the sheets, so as not to damage the sheets when the screw is screwed in with force. Hats of screws or nails must be recessed. Back to contents</a>
Selection of materials for insulation
 Spasoby applying plaster. When making a rough ceiling, it is important to choose the material for thermal insulation and protection against moisture and steam. Different materials can be used for thermal insulation. Mineral wool has high thermal insulation properties, but they decrease with aging. The material requires a good waterproofing, as when wet, it loses its thermal insulation properties. Its application is quite common. When stacking, do not ram it: the presence of air enhances its positive qualities. Expanded clay is a good heat insulator. However, even when the minimum layer (15 cm) is applied, the weight of the insulation becomes significant, which should be taken into account especially with the wooden floors of the house. At the same time, this is one of the cheapest options. Polyfoam is one of the best heat-insulating materials, has a low weight, and in the course of time is practically not subject to shrinkage. To flaws should be attributed flammability (and with the release of harmful substances).
 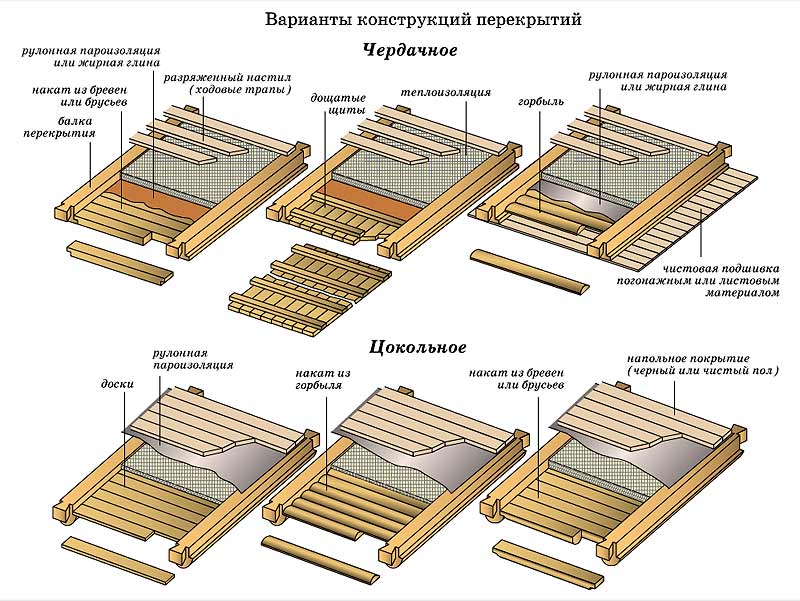 Variants of the structure of floors in a wooden house. When using it, you can do without protection from steam. Polyfoam is somewhat more expensive than mineral wool, but it has many advantages. As a waterproofing material, a polyethylene film is usually used. Due to its availability, cheapness, with the highest moisture resistance, the material has practically no competitors. To protect from steam, use a layer of foil. You can use just aluminum foil. But wide use is made of foamed polyethylene film with a layer of foil. Such a film, when protected from steam, also provides additional thermal insulation. Back to contents</a>
Production of a rough ceiling on a wooden floor
Installation of protective layers in the rough woodenThe ceiling begins with the laying of the vapor barrier film. Between the beams overlapping, over the deck, the film is overlaid with a layer of foil up. The lateral edges of the film are bent to the beam and attached to it. The thermal insulation material is laid on top of the vapor barrier. It is best to use mineral wool or polystyrene. Thermal insulation is sometimes made by falling asleep dry wood sawdust. In the case of thick beams, foam sheets or bulk foams are preferred. Further, the polyethylene film is laid as a waterproofing layer. The film is superimposed with an overlap of at least 20 cm. All protective filling between the beams should completely fill the space, and the polyethylene film covers the entire area of the ceiling. Over the beams and protective filling, a planking of wooden boards with a thickness of at least 20 mm, plasterboard, chipboard or plywood is applied, forming the floor of the attic (attic). Back to contents</a>
Rough ceiling of the attic
In the attic, the main function is thermal protection. In this case, all protective elements can be applied only from the bottom. First, the vapor barrier layer is laid down with foil and fastened to the roof rafters. Then a polyethylene film with overlap is placed between the rafters. The film is attached to wooden rafters using a construction stapler. Further, a layer of mineral wool is applied so that there is no gap between the rafters and thermal insulation. On the top of the heat-insulating layer, another vapor barrier layer is laid up with foil up. Then the lining of boards, chipboard or plywood is mounted, which is fixed to wooden rafters. Back to contents</a>
Stucco of a wooden rough ceiling
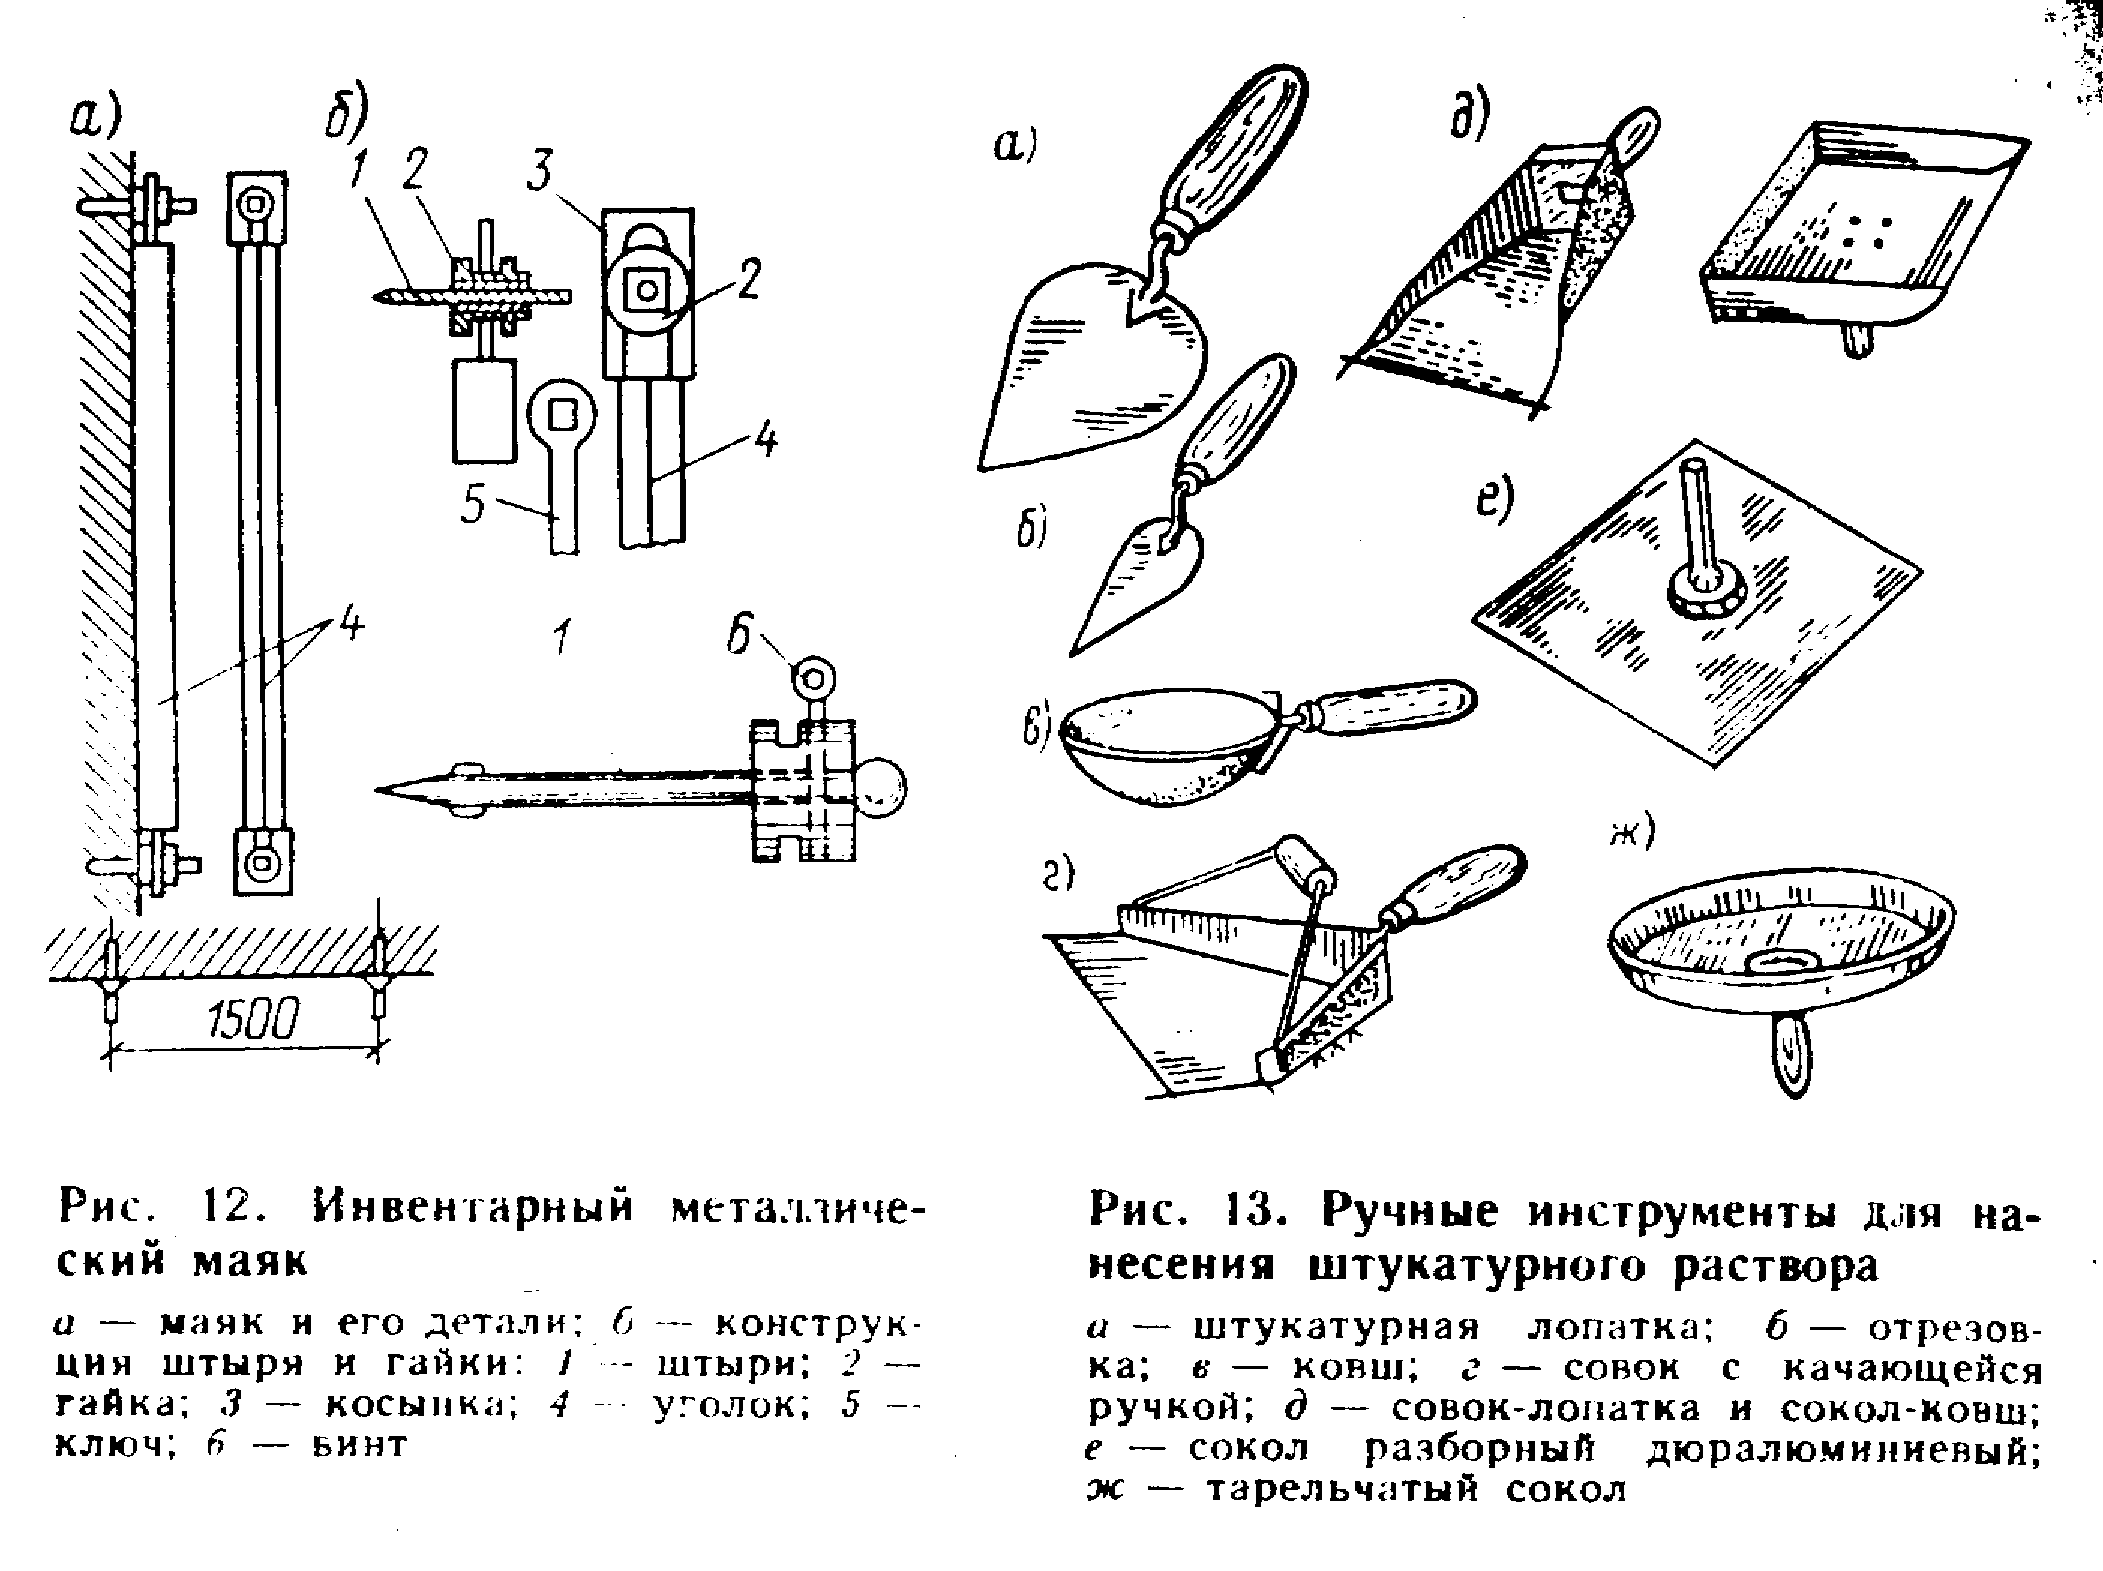 Tool plastering and beacons used forplaster ceilings. The ceiling ends with the plaster surface. In the beginning, all the seams of the wooden coating should be filled with a dry, deep-penetration mixture for wood. Then use the brackets to attach the mounting mesh. The first primer layer is applied over it. After it is dried, the entire surface is rendered. It is better to use a dry plaster mixture on a gypsum base. The plaster is carried out in three layers along the beacons. Screws can be used as beacons. After the plaster has dried, the ceiling is ready for decoration in any way (painting, whitewashing, facing). Back to contents</a>
Required Tools
When manufacturing a rough ceiling on a concrete base and for plaster, the following tools and tools must be prepared:
- capacity for a solution of 15-20 liters;
- a device for mixing the solution;
- shovel;
- the bucket is dimensional;
- spatulas of 3 kinds;
- Master OK;
- grater;
- a hammer;
- paint brush;
- paint roller;
- perforator;
- the level is two meters high.
For work with wooden floorsit is necessary to take care of another instrument in advance: a Bulgarian, an electric drill, a screwdriver, a hacksaw, a hammer, a chisel, a tongs, a screwdriver, a construction stapler, a knife, scissors, a level. The ceiling in the house can not be made even and beautiful without making a rough ceiling. It is quite possible to install such a ceiling with your own hands. To do this, you need to buy quality material and follow certain recommendations.


