Over time, almost everyone has toface a problem like. You don't have to be a skilled master designer to complete it. Of course, if you are not confident in your skills and abilities, it is worth contacting specialists, but a large number of people prefer to do this work on their own.  Wallpapers occupy the first place among finishingmaterials for walls, as they are simple in gluing, practical and economical. To save not only the effort and time spent on redoing the wrong work done, but also the money for spoiled material, it makes sense to master the technology of sticking paper wallpapers. Even if the wallpaper will be glued by an invited specialist, such knowledge will be useful to control the quality of its work. The reasons why most consumers prefer paper wallpapers are obvious:
- they do not emit harmful impurities;
- Do not interfere with walls to breathe;
- relatively inexpensive.
They also have disadvantages: they are unstable to pollution, they burn out and lose their brightness over time.
Varieties of paper wallpapers
It should be taken into account that the wallpaper is just paper and onpaper basis - not the same thing. Wallpaper on a paper basis have a coating of another material - vinyl (prevents air exchange!), Cloth, velor, etc. On ordinary paper such coatings do not. Paper wallpapers are available in two varieties: 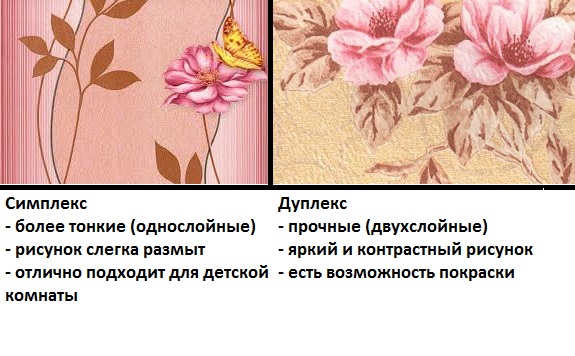 Scheme of types of paper wallpaper.
A special kind of material for pasting - wallpaperunder painting. They allow from time to time with a minimum of costs to change the color scheme of the walls. There is no need to shoot old and glue new wallpaper - just paint a new layer of paint on them. In the initial state, they are usually unpainted. Back to contents</a>
Wallpapering your own hands
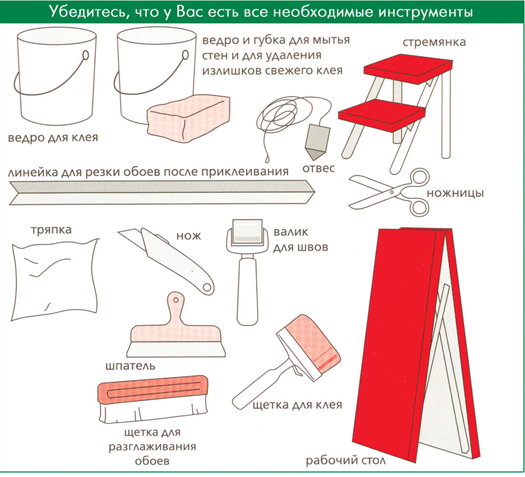 Necessary tools for gluing wallpaper. To perform this work on your own, you will need the following tools and materials:
- wallpaper in rolls;
- knife and scissors;
- roulette, pencil and plumb line;
- The brushes are narrow and wide;
- adhesive PVA, wallpaper paste and dishes for its breeding;
- spatula (better plastic), rollers - needle and clamping (for seams);
- sponge and soft cloth.
Back to contents</a>
Preliminary preparation of walls
 Scheme of removing whitewash from the walls. This is a rather laborious process, it contains several stages:
Back to contents</a>
Sequence of wallpapering your own hands
First, dilute water at room temperatureglue. The execution of the manufacturer's instructions is mandatory, otherwise you can get an unpredictable result. Then the wallpaper is cut to length. If a combination of the pattern is required, the roll is rolled upwards with the front side, a piece of the desired length is cut off. Next to him rolls roll out again, the pattern is combined, and then the next piece is cut. 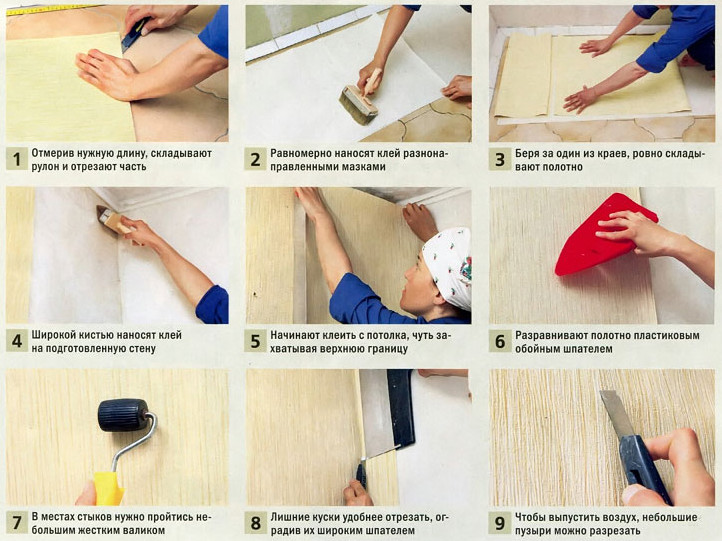 The main stages of wallpaper gluing. You should start from the corner of the room adjacent to the window. At a distance from it, equal to the width of the roll, a vertical line beats against the plumb line. The first piece is pasted along this line. Glue is better to apply a broad brush on the wallpaper, and not on the wall. Particular attention is paid to the edges of the pieces - they should be smeared carefully. After lubricating them should be left for a few minutes - the glue must be absorbed. It will not be superfluous to smear a narrow wall in the area of joints with PVA glue, diluted with water. This is also useful in the corners, as well as around the openings. PVA dries quickly, fixing the wallpaper and not allowing them to disperse at the joints. To the question of how to carry the label - overlap or butt. It has already been mentioned that the first method is suitable only for single-layer wallpaper produced from thin paper, and the corresponding edge should be cut off. The overlap must be facing the light, which will get rid of the shadows. In all other cases, a butt-seal is applied. The wallpaper is smoothed with a soft cloth, plastic spatula or brush from the middle to the edges. If the formed bubbles are not smoothed, they can be pierced with a needle in inconspicuous places. Drafts and artificial drying with a sticker are not allowed - they can simply peel off. Particular attention requires wallpaper light colors. It is necessary to monitor the cleanliness of the hands, and in the process of leveling, a clean paper sheet should be placed under the rag or roller. If glue is accidentally left on the joints, it should be immediately removed with a slightly moistened cloth or sponge. The work is not so complicated, but requires care, accuracy, excellent response and a good eye. </ ul>


