Ceiling defects can be hidden withtechnology stretch ceilings. To install the suspension structure, you need a water level, a punch, a drill, a tape measure and a bulgarian. Such ceilings with their own hands are mounted using a profile.  Scheme of a railing suspended ceiling.
Preparatory work
Preliminary calculations are made. The guide profile is calculated along the perimeter of the room (total area, length of walls and profile are taken into account). Drywall is of the following types:
- moisture resistant;
- normal;
- refractory.
The amount of this material is calculated bythe following formula: the area of the ceiling is divided into an area of 1 sheet. Suspended ceiling is mounted on a direct suspension. Calculation of such fastening is made taking into account the area of the room and the type of the structure to be installed. Installation work is carried out with the help of crabs, dowels (dimensions 8x10 cm) and self-cutters of 25 mm length. Marking of the installation location of the guide profile is made using the water level. If the installation of spotlights is envisaged, then an indentation of 10 cm is made from the ceiling. The layout is done on 4 walls. Then make holes for the dowels. The guide profile is mounted to the wall in 30-40 cm increments. A distance of 10-15 cm is observed in the corners. 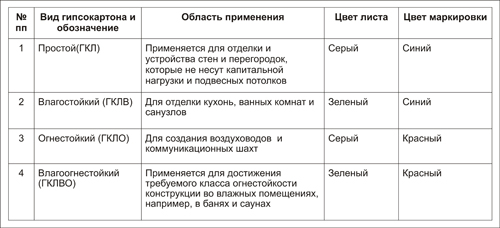 Types of plasterboard and their marking by colors. Then, along the perimeter of the room, marks are made on the wall in 60 cm increments (for mounting the ceiling profile). Marking is made on 2 opposite walls (when installing a single-level ceiling). The suspension is fixed to the ceiling. The next step is to install the ceiling profile. To connect the docking point of the guide to the ceiling profile, use a drill or a screwdriver. The profile must be fastened exactly, without deflections. If necessary, the wiring and heat insulation wool are laid. Installation of drywall is done with self-tapping screws (10-15 cm pitch). The ceiling is sewn on the center and around the perimeter of the room. If the sheets do not have rounded ends, then small indentations are created with a knife. The heads of fixing elements are flooded into the GCR by 1 mm. Holes for installation of communications are cut with a knife or a perforator with a special nozzle. The next step is laying the surface. Preliminary need to buy gypsum plaster and a special adhesive mesh. Putty is applied to the joints. Then the entire surface of the ceiling shpaklyuklya with the help of finish plaster. To get a smooth ceiling, you need sandpaper 100/120. Specialists distinguish several methods for decorating a single-level suspended structure. For the finishing of such ceilings, various materials are used, including gypsum molding and baguettes. Back to contents</a>
Plastic hanging structure
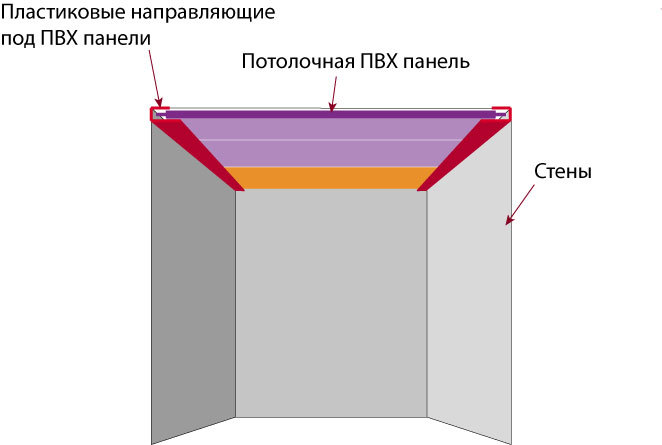 The scheme of installation of PVC panels on the ceiling. Installation of ceilings from PVC panels is carried out in premises with high humidity. Experts consider the advantages of this material:
- ecological compatibility;
- hygienic;
- low weight;
- easy installation.
Similar panels are available in different colorscale. On the glossy PVC ceiling can be applied to the drawing. The design conceals communication under it, allowing to equip spotlights and false chandeliers. To collect such a ceiling, you will need bars, level, rule, roulette, pencil, wood hammer, drill, concrete drill (diameter 6 mm), screwdriver, hammer, knife. To install the luminaires, the wire is pre-laid. If PVC ceiling is installed on the loggia, then the wiring is laid from the next room. Shtroby make in the wall with a perforator. Wiring is placed in a corrugated plastic sleeve. It is designed to protect the wiring from deformations and ruptures when the temperature level changes in the plaster. It is possible to lay the cable in a special plastic channel. In this case, the corrugation is not required. The channel boxes are mounted on the wall. On the floor, he is hiding under the plinth. Back to contents</a> Step-by-step instructions A ceiling made of PVC panels is installed after appropriate calculations. The material used is produced with the following dimensions:
- length - 2700, 3000 and 6000 mm;
- width - 200, 250, 300 and 330 mm;
- thickness - 8-25 mm.
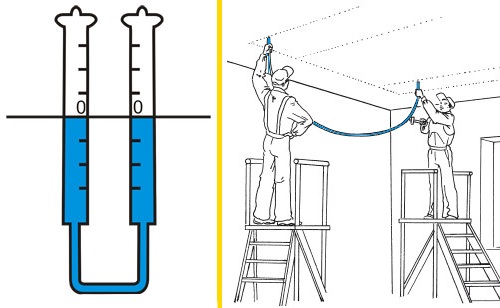 Layout of the ceiling with a water level. To calculate the number of panels, you will need to calculate the area of the ceiling and the 1st plate. The first value is divided into the 2nd number. The frame for such ceilings is made of a pine beam measuring 20x40 mm. The design is mounted along the perimeter of the ceiling and perpendicular to the direction of laying the plates (40 cm pitch). To calculate the number of bars, use the following formula: (A, 4) xB + Ax2 = K (m), where A is the width of the room, B is the length of the room, 0.4 is the step of securing the beam, and K is the number of bars. To fix the overhead luminaire, the lath is strengthened at the place of its installation. Therefore, 1 m is added to the value obtained. If installation works are performed in regions with high humidity, then PVC panels are installed on the galvanized profile. For fastening of a bar apply dowels and self-cutters (a step of 1 m). The installation of the metal profile involves the use of straight hangers. Panels are attached with the help of fastening bars, represented in the form of 90 ° angles. Their number is equal to the perimeter of the sheathed ceiling. On the slats, a plastic ceiling skirting board is mounted. Its number corresponds to the perimeter of the ceiling. The plinth is joined by means of corners and joints. On 1 plate you need 3 screws. Pre-overlapping is primed with a mixture of deep penetration. On 1 sq. M. It is required 300-400 g of a first coat. The frame is attached to the ceiling after the primer has dried. To flatten the beam, you will need a level and self-tapping screws. In the concrete ceiling make holes for dowels. This will require a drill, a hammer and a drill. Reiki mount with a step of 0,4 m. To strengthen the lathing in the places of installation of the luminaire, fix the additional bar perpendicular to the racks of the frame. To fix the product, use wood screws. The next step is to install the bar. One shelf is fixed to the crate, and the second one is put on the ceiling skirting. In the last product, a groove is provided for this. Fastening elements are screwed in the center of the strip with a screwdriver. The corners are fixed to the edges of the plinth after its pruning. The skirting board snaps into the groove of the fastening bar. In the resulting recess, the ceiling panels are turned on and leveled. The subsequent panel snaps into the groove of the previous bar. The design is fixed to the crate by self-tapping screws. Under the lighting device make a hole for the withdrawal of the wire. The last panel is cut to fit along the length. The installation of PVC ceiling is completed.


