Drywall is a very malleable building material. Any shape can be easily cut out of it. These properties of the material make it possible to manufacture.  Installation diagram of a plasterboard suspended ceiling.Nowadays, drywall is used in a wide variety of interiors. It is available in different forms, can be easily decorated and fixed with standard parts. All this makes working with drywall available to anyone. Suspended is an opportunity to create any design and provide comfort in the house.
Features of material selection
 Layout of the ceiling under drywall. Gypsum cardboard is a sheet material in which a solid gypsum mass with a filler is placed between two layers of thick paper (cardboard). At the same time, the content of gypsum by mass of the material exceeds 90%. Drywall is produced by standard sheets 120 cm wide, 250 and 300 cm long, 6, 9 and 12.5 mm thick. The usual drywall (GKL) has no waterproofing properties. Therefore, for the ceiling in the bathroom should use moisture-resistant plasterboard (GKLV). Back to contents</a>
Elements of suspended structure
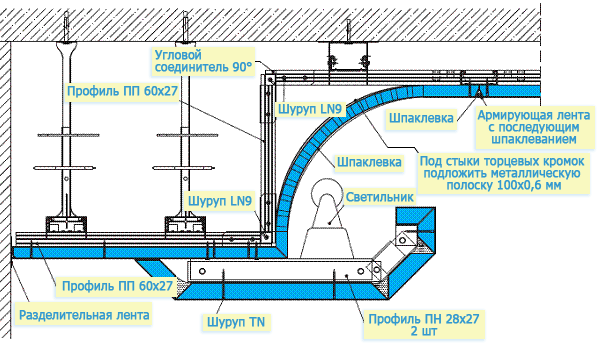
Suspended ceiling is aThe horizontal plane of the sheets, which is installed on metal profiles, fastened to the wall and ceiling. In addition to sheets of drywall, the structure includes fasteners. To install the suspension structure, two types of profiles are used, guiding and ceiling profiles. The guide U-shaped is fixed to the wall and is intended for fixing sheets of plasterboard and ceiling profiles at the correct height. The main mark - PN28 / 27 (28 mm - width, 27 mm - height). 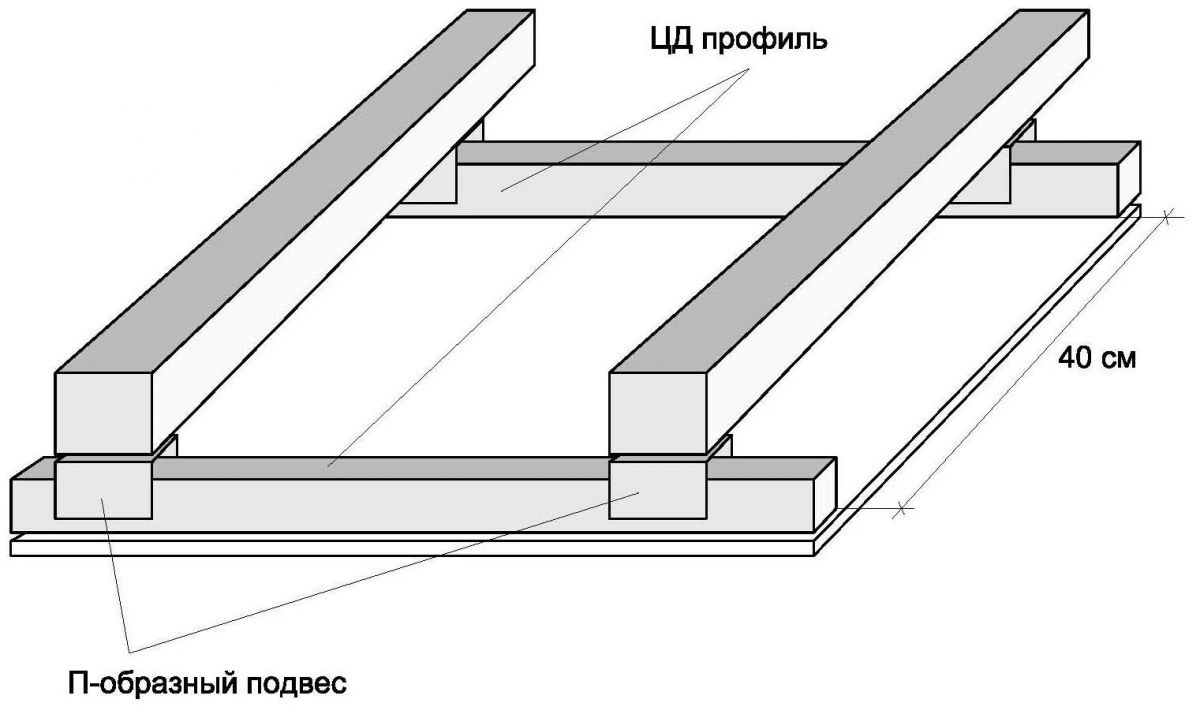 Fastening of plasterboard. Ceiling C-shaped profile is attached to the upper plane of the plasterboard and is intended for suspension of sheets to the ceiling through a special fastening. The main brand - PP60h27 (60 mm - width, 27 mm - height). Both types are realized in lengths of 275, 300, 400 and 450 cm. Plasterboard sheets are connected by means of special fasteners. Directly to the ceiling fastening is carried out with the help of hangers. The suspension is a bar, in the middle of which there is a platform for fixing to the ceiling. On the sides of this platform the bar is perforated, which makes it possible to bend it at the right distance. Ceiling profiles are connected with each other by means of the "crab" fastening, which has a cross-shaped shape. Back to contents</a>
Step-by-step instructions: preparation for installation
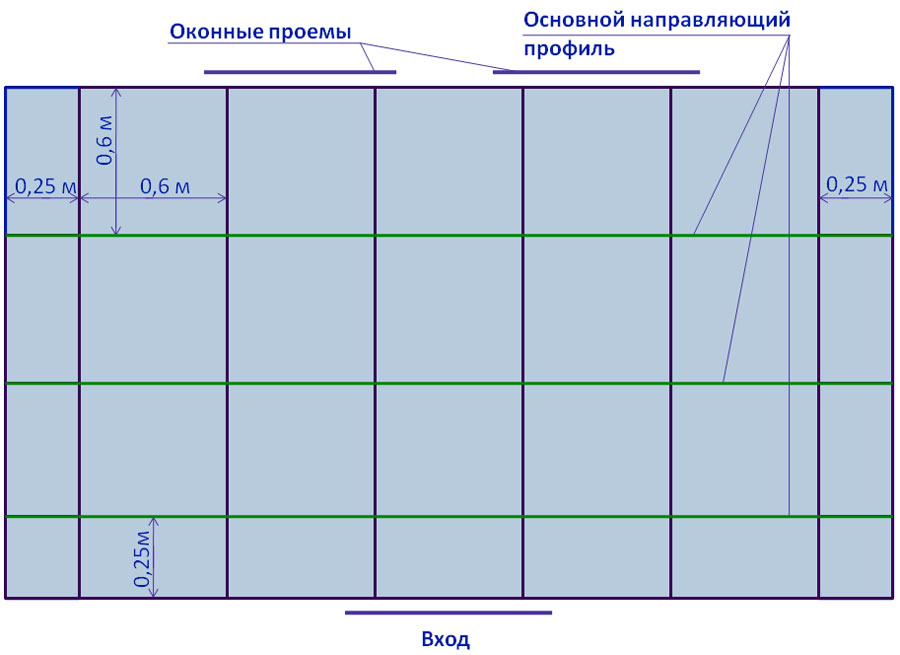
The installation of a suspended ceiling fromgypsum cardboard with their own hands begin when the wall is completely finished, especially at the top. In the place where the guide profile is fixed, the wall must not have any bumps or other irregularities. Installation of a false ceiling is better for making before the beginning of finishing furnish of walls in a premise. The first stage of the installation is the marking of the walls for installation. Typically, the height of the ceiling in different places of the room is different. Therefore, the tape measure measures the height of the ceiling in the corners and the center of the wall. The layout of the wall should start from the corner, where the ceiling height is the smallest. Here we must note the beginning of the guiding profile. 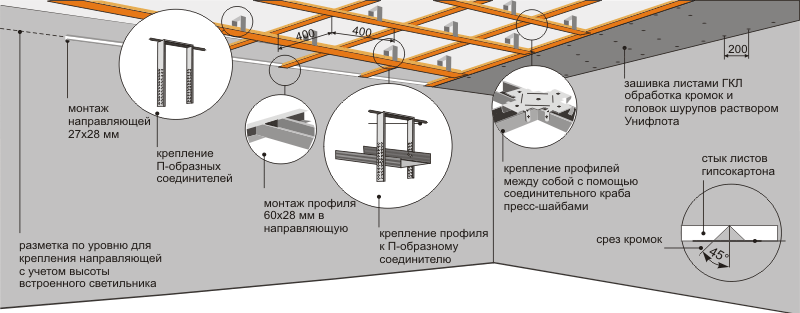 Scheme of installation of a single-level false ceiling. If the installation of built-in luminaires is planned, the distance from the ceiling to the profile is set to 80-100 mm. In the absence of built-in luminaires, a distance of 50 mm is sufficient. Then the mark is placed in the other corner, but taking into account the deviations in the ceiling height (the suspended ceiling should be installed parallel to the floor). Between the marks is a straight line. The next stage is the marking of the surface for the hangers. Marking is made in the form of parallel lines in the longitudinal and transverse direction, which are the projection of the ceiling profiles on the surface of the ceiling. The first lines are parallel to the walls at a distance of 30-35 cm from them. So four lines are held. Then in both directions parallel lines are drawn so that the distance between them is 60-70 cm. These lines mark the centers of the location of the ceiling profiles. Holes for hanging will be drilled on them. Back to contents</a>
Fastening of guides
On standard guides there are holes for fastening, so they are alternately applied to the wall along the marked line, after which the holes are marked out.  Scheme of a simple false ceiling from plasterboardwith illumination. If there are no finished holes in the profile, then they are drilled with such a consideration that from the wall the first hole is made at a distance of 10-15 cm, and between the holes the distance is 60-80 cm. The holes in the wall are made by a perforator or an electric drill (diameter of the order of 8 mm). Plastic dowels are inserted into the hole. The maximum distance between the fastener is 1 m. The guiding elements are cut off by the required length with the help of a grinder or a hacksaw for metal. Then they are alternately installed and fixed with screws. Before installation on the outer surface of the elements, a sealing tape with an adhesive layer is glued. If necessary, the profiles are aligned with thin gaskets. Back to contents</a>
Installation of ceiling profiles
Installation of ceiling profilesbegin with the manufacture of holes in the ceiling for the installation of suspensions. Holes are made along the lines of marking on the ceiling with the proviso that the distance between the suspensions is 60-80 cm. The first suspension to the wall is fixed at a distance of 30-40 cm from the wall. Based on these conditions, all the lines of marking on the ceiling make holes with a perforator or an electric drill. Dowels are inserted into the holes. 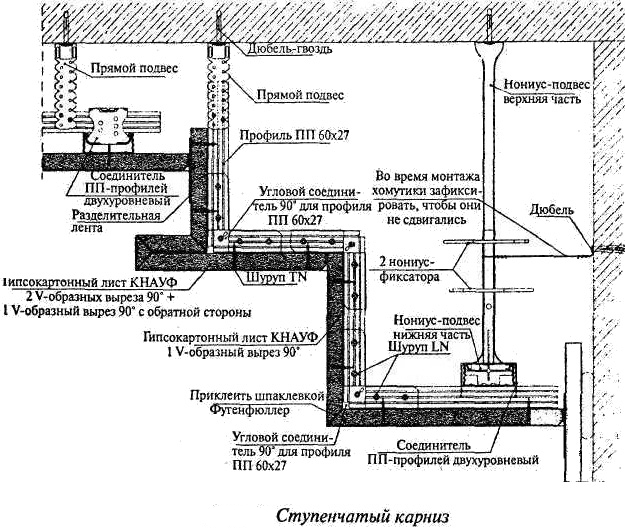 The arrangement of a false ceiling located inthree levels. Then the installation of the ceiling profiles begins. First, the profiles corresponding to the length of the smaller wall are set. These elements should be installed in one length or, if necessary, of lengths rigidly fastened together. The ends of the ceiling profile are installed in the cavity of the guides on opposite walls. Their location (the central line) must strictly coincide with the lines on the surface. The ends are fixed in the guide elements with screws. Ceiling, which is installed perpendicular to the first profile, is precisely cut according to the distance between the mounted profiles. This element is sent strictly on the markings on the ceiling and is fastened to another profile using a cross-shaped "crab" type attachment. This fixation fixes two segments of the mounted profile with the already mounted element in the form of a cross. Thus, all elements are assembled, forming a peculiar checkered suspension system. The suspension is installed in the following order:
Back to contents</a>
Installation of plasterboard
 Scheme of a two-level ceiling made of plasterboard. Before installing plasterboard with their own hands, it is necessary to conduct all communications (pipes and wires). It is advisable to assemble the electric wires with a bundle and place them in a corrugated tube. If built-in luminaires are provided, it is necessary to provide wiring. The sheets of plasterboard must be cut on the floor in a horizontal position. If necessary, cut openings for built-in luminaires or for installation of other lighting systems. Dissolved sheets of plasterboard are raised one after the other and fixed to the guides and ceiling profiles with self-tapping screws. The distance between the screws is 10-15 cm. The heads of the screws must be drowned in the cardboard sheets. When joining the sheets, it is necessary to make sure that the edges are chamfered. If not, then it must be made a file or a knife. Plasterboard sheets must be densely joined together (gap between sheets of 1-2 mm). The final stage of installation of drywall with their own hands is puttying the surface. At first, the joints of the sheets and the places where the screws enter are shpatched. After this putty has dried, the finishing putty is applied with a thin layer on the whole surface of the suspended ceiling. After 1-2 days, sanding the surface with sandpaper or sandpaper. Back to contents</a>
Required Tools
In order to make a suspended structure of gypsum board with your own hands, you must take care of such equipment and tools in advance as:
- perforator;
- crepe;
- electric drill;
- Screwdriver;
- Grinder;
- Bulgarian;
- a hammer;
- screwdriver;
- pliers;
- knife;
- scissors for metal;
- hacksaw for metal;
- bit;
- level;
- plumb bob;
- roulette;
- line meter.
Drywall is a great building material. Working with him is easy and simple. Install the suspended ceiling from gypsum cardboard with your own hands under the power of almost any person.


