When you come to the kitchen, the first thingpay attention to the table and chairs. Without them, it would be uncomfortable and uncomfortable. You can, of course, buy in the store a complete set, which includes several chairs and one table. However, this is not cheap. Therefore, you can try to make tables and chairs with your own hands.  Making the table and chairs with your own hands is not such a difficult process as it seems at first glance, and besides, it will save you money on purchasing new furniture.
How to start a workflow
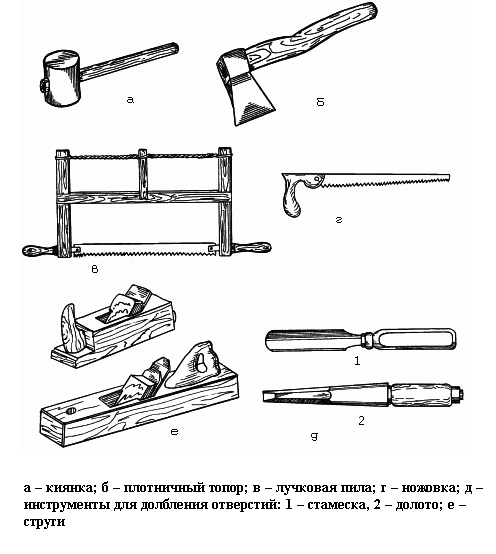
To perform this work you will need:
- jointer;
- electric jigsaw;
- chisel;
- drill;
- screwdriver;
- self-tapping screws;
- crafting table.
- glue joiner.
To make tables and chairs, you must havewell dried lumber. The moisture content of the wood should not exceed 10%. Otherwise, the work will turn out to be unreliable and substandard. In most cases, the tables are made of several types:
- rectangular;
- round;
- square.
 Tools for making tables and chairs. In the kitchen, most often set the table and chairs of one set. The most laborious process, when a table is made, is the creation of a table top. It consists of two parts:
- countertops;
- podstolya.
To make a table you need edged sheet piling boards with dimensions of 50x100x3000 mm. It takes 20 m for assembly. Each board must be flawless. Not allowed:
- cracks;
- deformation;
- inaccuracies;
- knots.
Especially I want to say about knots. When you look at them on the cover of the magazine, it seems like everything is beautiful. However, in life everything is different. When the wood is handled by hand, there are a lot of difficulties when making a table. Each board should be planed with a plane. Pencil marks are placed, which show the planing direction, passing without scoring. The edges of the boards are treated with a jointer. In this way:
- absence of scuffing;
- straightness;
- perpendicularity.
Back to contents</a>
Practical recommendations
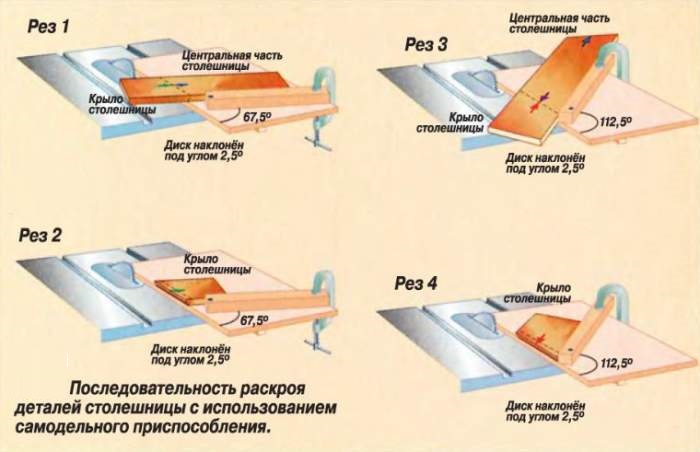 The scheme of manufacturing the table top. The worktop is assembled from several boards, which have a length with a small allowance. The whole set of boards is assembled in several steps, for which the wedge clamps are used. Usually their number does not exceed 5 pieces. For the clamps, 50 mm bars are taken, fastened with bolts and glue. All slippery surfaces of the clamping wedges are required to be sheared. First, a central unit consisting of 3 parts is assembled. All of them are glued together. After this, one more plot is glued to each side. To create strength and imperceptible seam fit PVA. This glue is mainly used for wooden furniture products. When the workpieces are glued, it is necessary to lay them so that the non-planar planing is directed in each plot in one direction. Annual rings should alternate at the same time. Increased strength will give a round table top dowels fastened to the sides of the table, with a pitch of 250 mm. When the glue is completely dry, each workpiece is treated with a jointer. The flatness is controlled by the edge of the ruler. No gaps are allowed. The front side of the countertop should be the one with the minimum of defects. For work, the table is covered with a sheet of hardboard. On the lower side of the table there is a geometric center. The marking of the circle is done. To get a round billet you need a jigsaw. The countertop of the required diameter is produced. The jig saw must be located on the underside of the workpiece. For cutting the chamfer, the jigsaw is installed at an angle of 45 °. If the table should have a semicircular edge on the table top, the chamfer is removed from the outside. Now hardboard is no longer needed. It can be deleted. The place of sawing is covered with PVA. This will prevent wood from dying. The construction must be well dried.
 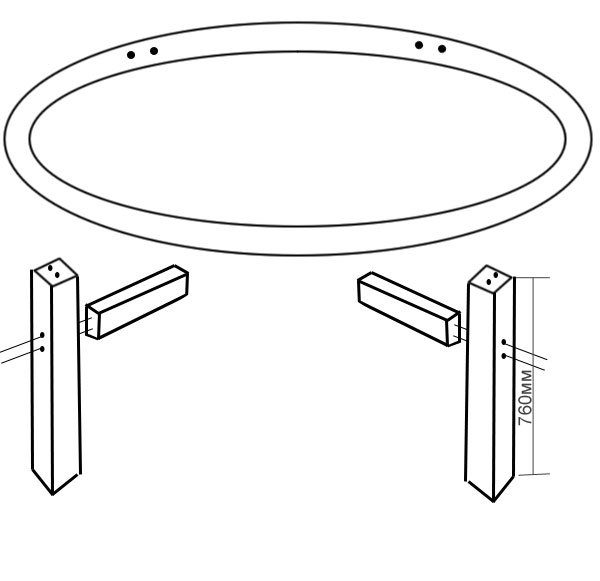 Scheme of assembly of table details. The edges are drawn with a well-ground plane. For the operation, a template is used to control the form. Finishing is done by sandpaper. The worktop is ground until a smooth surface is obtained. Excellent results are shown by an electric grinder, which processes wooden surfaces. To make the table stable, a support cross is made. The material for it is hardwood. Most often used:
- oak;
- Birch.
For a crossbar two boards with the sizes40x100x1000 mm. They are finished, then combined in the center with glue and screws. The table can not exist without legs. For this, birch cuttings are used, intended for shovels, the size of which is not less than 50 mm. They are carefully cleaned with a sandpaper. Suitable for the legs are different balusters. All parts are fastened together with clamps so that the geometric dimensions match. The fibers of the countertop must be perpendicular to the fibers of the substructure. To install the legs, the spider is pre-drilled to the desired size. The worktop is glued to the table, screwed with screws, while inserting the legs. It is necessary to wait until the glue dries, then the legs are glued together with the base. Thus, the parallelism of the base relative to the table top is observed. Back to contents</a>
We make chairs: features
To make tables and chairs, you needprepare the bars. The legs of the chairs can be made from bars measuring 40 × 70 mm. The front legs at the attachment points must have an allowance of 30 mm. Footsteps are made of bars, the dimensions of which are equal to 30 × 45 mm. Under the collet, the front legs are equipped with blind nests. 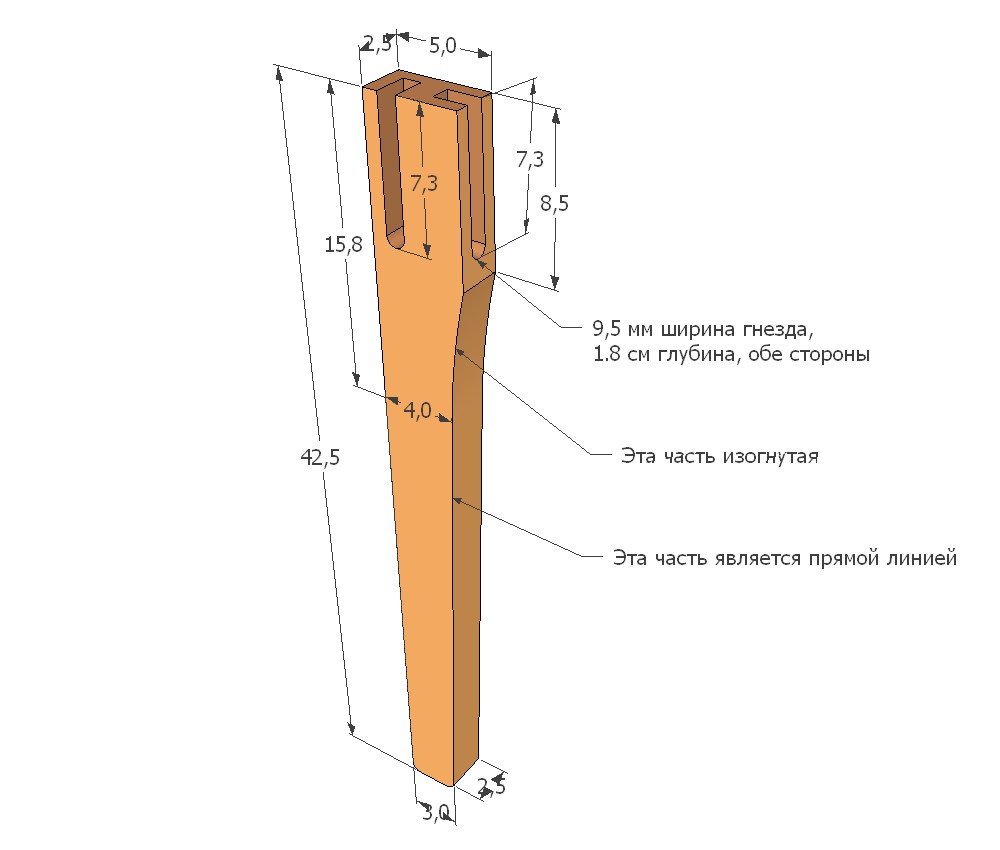 Scheme of the chair leg. The connection of the front legs is spiked with dimensions of 20 × 50 mm, the rear legs are spiked 20 × 68 mm. In each must be made groove with dimensions 15 × 43 mm, where the footsteps will be inserted. To insert the backrest, the rear legs are equipped with grooves 20x90 mm. The grooves are selected by the chisel after the marking. When all parts are made, a rough assembly of the side of the chair is carried out. Spikes are adjusted. To do this, the hacksaw removes excess material from the spikes. With the help of a kayak, the joint is sealed. For the appearance of skills and experience, at first it is better to make one workpiece. When the roughing is performed, the inaccuracies of the details are immediately detected when marking is performed. Elements of the chair, having a curvature, are cut by hand electric jigsaw, adhering to the dimensions indicated in the drawing. The received parts are processed by several tools:
- plane;
- cycle;
- sandpaper.
The back is connected to the legs and broughtfitting joints of the transverse mandrel and thorns. Then the chair that was collected for fitting is dismantled. Cut off all the allowances, the details are brought to the final round shape. To do this, it is desirable to use control templates. Very good results show a belt grinder. In order to produce a chair seat, three sheets of thick plywood are pre-bent according to certain dimensions. Plywood pieces are glued together. 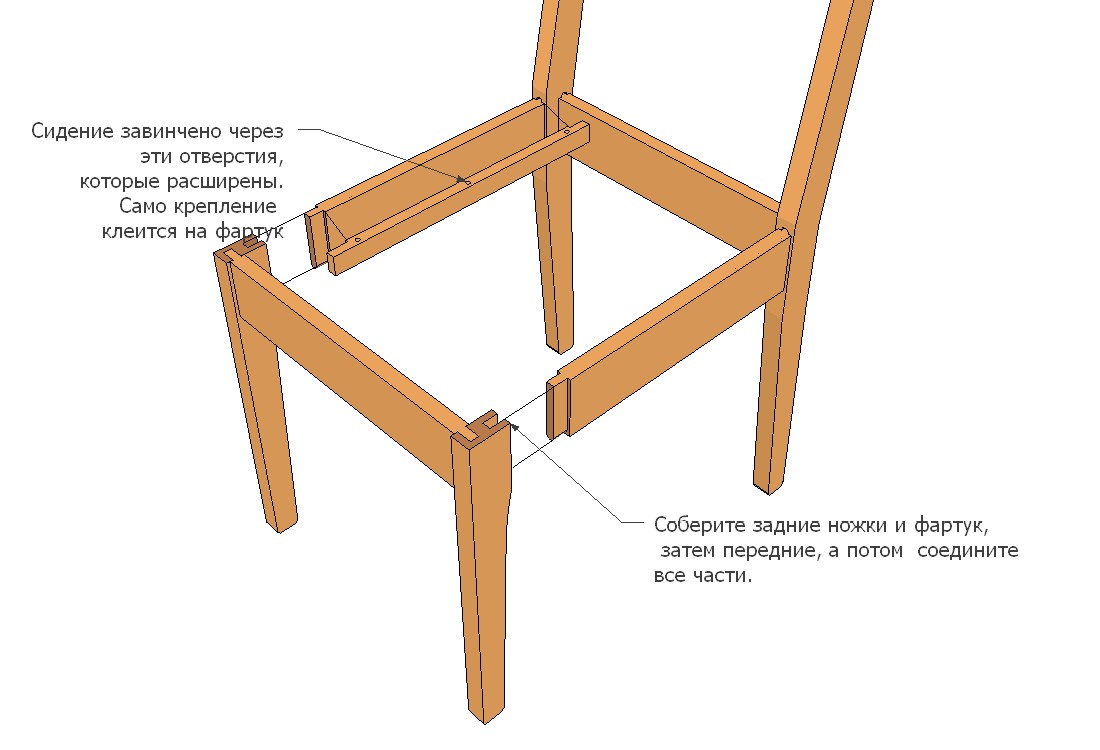 The scheme of assembly of a chair. To maintain the bend, before flexible plywood must be covered with ammonia. Then it is placed sideways on supports and put heavy cargo on top. When the plywood dries, the bend will be preserved. For sitting it is necessary to have:
- foam rubber;
- batting;
- furniture fabric.
On the prepared seat is put foam withbatting, then it is covered with a cloth. From the bottom, the fabric is attached with a construction stapler. The sides of the wooden chair are inserted into the prepared wedge-shaped wedges, then all is glued together. After this, make a joint of the longitudinal bar and support bars. They are glued together, but to get more reliability, they are screwed with screws. Each front seat is equipped with a recess that exactly matches the shape of the seat. The king, intended for back fastening, also connects to a bar having a similar notch. When everything is assembled, the sidewalls are glued together and the chair frame is assembled. The final touch is the seat anchorage. Screws are screwed on the supports. Back to contents</a>
Tables and chairs: lacquer work
Technological operation of varnishing suchWooden products consists of applying a varnish coating to furniture products. Tables and chairs are varnished with a paint sprayer. You can also use an ordinary vacuum cleaner with a special nozzle. The varnish is first diluted with a diluent. To give the countertop a mirror look, you need to close its edge with scotch tape. And he must rise above the plane of the table. Then dilute the varnish with a very thin layer. For this work, it is necessary that the table top has a strictly horizontal position. In order not to get dust, the coating must be protected with a shield. I must say that varnishing is the final operation, when tables and chairs are made by themselves. To correct nothing will be impossible. In this regard, before proceeding to the main lacquering, you need to try such an operation on harvesting. Especially if foreign paint and varnish materials are used.


