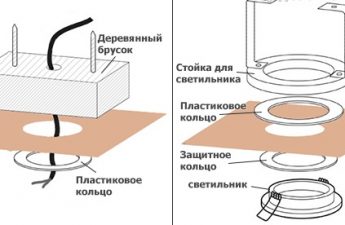
Stretch ceilings look modern andare characterized by ease in care, and in addition to decorate them you can by mounting the backlight. You can make the lighting possible by attaching it to the ceiling structure of the LED strip, this will save energy and make the ceiling even more refined.  Scheme of the frame and facing of the box with a niche forbacklight. represents contour-type lighting. Today, the most common option for such lighting is the duralight cord, which is a plastic tube containing LEDs. LED backlighting features long life, variety of colors, low voltage and no heat. The latter circumstance makes such lighting the most optimal for suspended ceilings, which are afraid of exposure to high temperatures.
  Thanks to its flexibility, LED lightingmounted on any ceiling shape. It is very easy to make LED backlighting, since the back of the tape has an adhesive base. The tape is not only lightweight, but also flexible. During installation, the system must be supplemented with a step-down transformer, because it works from 12 volts. The main disadvantage of such lighting is the high cost. It is important not only to install an LED lighting system for a stretch ceiling, but also to choose a tape. Such products have some differences. The tape is presented in several types, the most commonly used are SMD 5050, as well as SMD 3525. The named 2 types of diodes have different sizes, in addition, SMD 5050 has 3 single-color crystals, and SMD 3528 - 1 crystal. The backlight also differs in the density of the diodes per 1 m. This characteristic determines the brightness of the glow. Stretch ceiling lighting can be made with moisture protection function. You can buy ribbons that have a different number of colors, among them there are one-color ones. Equipment such as RGB will illuminate the stretch ceiling in any color, but this will require a controller responsible for controlling the device.
Tools and materials
- a step-down transformer;
- LED Strip Light;
- drywall;
- self-tapping screws.
Back to contents</a>
Mounting options for LED strip
 A simple RGB-tape connection scheme. To strengthen the tape on the stretch ceiling is simply not possible, because in itself it does not act as an independent lighting device that has an aesthetic appearance. Such a tape is to be hidden, and externally it will be possible to see exclusively reflected light acting as a background. Make a highlight for a stretch ceiling in this case, you can use a box with a niche that protrudes from it. The box is made of plasterboard. Thus, the equipment that is responsible for the operation of the backlight must be placed in a niche. The equipment has a power supply unit, a tape and a control unit. In this case, you can make the ceiling tension light by placing the box around the perimeter of the room. Regarding the position of the slabs and, depending on the level at which the tension web is supposed to be installed, the height of the box should be 15 cm, while its width is not more than 0.5 m. The lower part of the system should be forwarded to the central part of the room, approximately at 8 cm. At the end of the structure, a branch should be formed upwards, which should be positioned 90 ° in relation to the main part, and the height of this branch should be 6 cm, which will act as a niche. From the edge of the niche to the ceiling should remain 11 cm, which will make it possible to easily install LED equipment. The lighting for the suspended ceiling should be located on the bottom of the niche, only after you can begin to connect the system to electricity.
 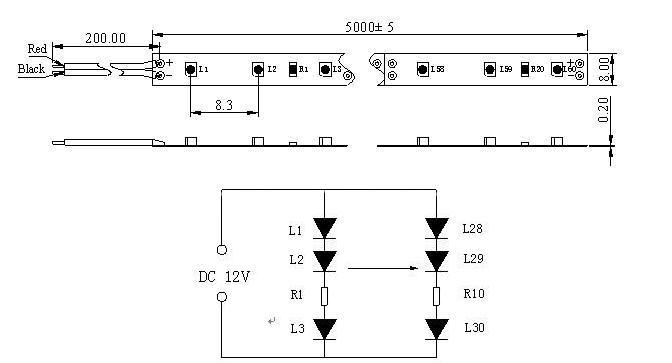 The scheme of the device of the LED tape. Backlight stretch ceiling can not be installed in the form described above, if the blade has a glossy base. This is due to the fact that the surface of the canvas will display the backlight and the inside of the niche. For similar tension systems, the box must have a hidden niche. The illumination can be located in the space formed by the system film and overlapping. This will allow you to get a film that is highlighted from the inside. In order to assemble a similar system, the LEDs should be mounted at the corners between the walls and the ceiling. After fixing the baguette and the subsequent installation of the curtain canvas. If you have wondered how to make a highlight in the field of curtains, the tape with its equipment should be placed behind the ceiling skirtings or in a niche.
  Scheme of one of the connection optionsLED strip. Installation of the tape on the ceiling is made before the installation of stretch ceilings. The main task after determining the location of the tape is to conduct electricity supply cables, in addition, it is necessary to equip the switches with this line. The switch should not be installed, if a multi-colored tape is installed, such diodes assume the presence of a control unit. After that, you can mount a "heavy" equipment, which includes a power supply and control nodes. As a rule, these devices are mounted in plastic cases, in which there must be holes for fastening. Do not fix the housings to glue, for this purpose it is recommended to use dowels or screws. Glue as a fastener for the elements of ceiling lighting should not be used, as during the operation it may be necessary to make repairs, and dismantling the box will cause damage to the finish. Back to contents</a>
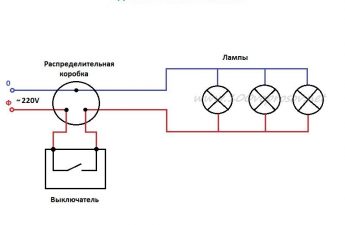
Recommendations for installing the tape
When doing backlighting, removing all the protection,which is located on top of the adhesive layer of the tape, do not produce. Initially, it is necessary to clear the place on which it is supposed to strengthen the tape. The surface can be wiped with a rag. After the substrate has dried, you can start sticking. To do this, release 0.5 m of the self-adhesive tape from the protective layer in order to strengthen it in the right place. After you can unwind the coil with the equipment, gradually removing the protection and reinforcing the tape. In the end, an extra piece of equipment may remain. Cutting the tape should be done in specially designated places, which are marked with a perpendicular strip. As soon as the equipment has been strengthened to the ceiling, it is necessary to walk one more time with fingers to strengthen everything a little more densely. Then you can start to connect. After the completion of installation work, it is not recommended to hide the power supply and module far beyond the surface of the overhead hinged system, as it may be necessary to carry out repairs. After all, the ceiling design should remain intact after this. Despite the fact that the LED equipment was purchased by you immediately before the start of the work, hope for high quality is not worth it. </ ul>