Today, the cost of going to the heatingenergy resources has a tendency to constant growth. Loss of heat under such conditions is not only desirable but also necessary, it will save the budget for paying bills for gas and electricity consumption. The most effective measure in this direction can be considered the insulation of the bearing walls of the house.  The scheme of insulation of walls with foam plastic. One of the most popular materials for this today is polystyrene foam. It is quite possible to warm the walls with foam plastic with their own hands, without attracting hired labor, which is very beneficial from the financial side. The cost of the material is relatively small, so if certain rules and recommendations are followed, the warming process will not cause great losses to the family budget. At the same time, the result will be quite effective.
Properties and Features of Polyfoam
It is a foam polystyrene,the most significant of its properties are a very small specific weight, low thermal conductivity and complete impermeability to moisture. That is why the insulation of walls with foam plastic is made in the vast majority of cases from the outside. The material has not only thermal insulation, but also sound-absorbing properties. It can also be used in combination with other insulating materials, but this is usually not necessary. Enough foam itself, you just need to correctly choose its density and thickness. 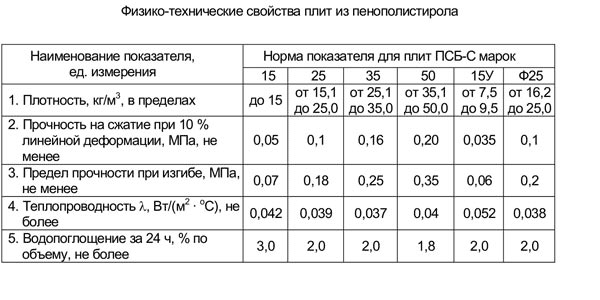 Table of characteristics of foam plastic. The material is offered for sale in trade networks either in the form of slabs, or rolled into rolls, which again depends on the thickness and density. It is the thickness of the foam that determines the degree of thermal insulation of the wall, which is covered by it. As a rule, a plate with a thickness of 5 cm is taken to fix the wall surface. This immediately reduces heat losses in the interior of the house by almost 2 times. If this is considered insufficient, you can take 10 cm, which immediately increases the cost. In order to calculate the correct thickness, it is necessary to take into account the material from which the bearing walls, their thickness, and the average air temperature in winter in this area are built. In addition to thickness, the density of the material is also of considerable importance. Specialists recommend the coating of external walls with foam plastic having a density of 25. If it is lower, the vulnerability of the wall surface to mechanical damage will be too high. If higher, then it unnecessarily overstates the cost of the material, since the density of the insulating parameters affects very little. Back to contents</a>
Consumables and preparatory work for covering the walls with polystyrene foam
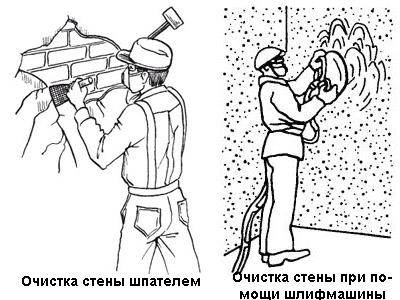 Scheme of wall preparation for insulation with foam plastic. First of all, you need to calculate the amount of foam that will go to the insulation of this wall. To do this, its area is divided by the area of one slab, from this number the area of window and door openings is subtracted. It is desirable to buy a quantity of polystyrene with a small margin. In addition, you need to purchase a primer, a special adhesive for fixing the foam, dry plaster, reinforcing mesh of fiberglass, reinforcing corners, starting metal profile and dowels, conventional and with umbrella-shaped heads. In addition, for their mounting on the walls of foam plastic, they will need tools such as an electric drill, drills of different caliber, a spatula, a solution tank, a tape measure, a level, a plumb, a bundle knife, a construction stapler and a string of string or line. Before you begin the insulation of walls with polystyrene foam with your hands, you need to qualitatively prepare their surface. It is necessary to remove all old plaster, layers of paint, lime and other similar coatings. Then use a hose to wash off the dust, dirt and stains of mold and fungus, and cover the cracks and depressions with putty. After that, the cleaned surface is covered with a primer, best of all, made by the German company Ceresit. It penetrates deep into the surface of the wall and keeps well. Only after that it is possible to start covering the walls with foam plastic. Back to contents</a>
Heat insulation of walls with foam plastic by one's own hands: technology and sequence of actions
 The location of the fastener for foam. The process of insulation of external walls with foam plastic provides a combined method of attachment. First, the material is glued to the surface of the wall, and then attached using dowel-type umbrellas. If you neglect one of these procedures, the quality of the coating will suffer so much that after a year it will have to be reinstalled again. To begin with, at a distance of 50-60 cm from the surface of the ground, a metal profile is fastened with dowels and leveled using a level. It puts the first row of foam plates, it will ensure a smooth laying of all subsequent. Glue on a cement basis is applied to one of them in groups of 3 rows of 4-5 points, the plate is firmly pressed against the wall. The procedure is much like laying tiles. However, in the case of foam plastic, the seam breakdown is not done for the strength of the insulation itself, but to prevent the appearance of cracks on the plaster, which will later cover it. It is cut, unlike tiles, very easily with a batch knife. Especially important is the location at the corners where the danger of cracking is greatest. With the help of a plumb, the alignment of the plane of each row is controlled. After the glue is slightly clamped, after about a day, in the center and at the corners of each plate, 5 dowels-umbrellas are screwed. It should be remembered that it is impossible to leave the walls covered with polystyrene for a long time. Ultraviolet rays begin to destroy it, so immediately after the final fixing it is necessary to cover it with plaster. Before applying the plaster, the reinforcing fiberglass network must be fixed to the insulation, since the walls of the foam plastic without it will not have a strong adhesion to the plaster layer. It is attached to a special adhesive for reinforcement, which is produced by the same firm "Ceresit". The surface of the foam plates is spread with a continuous thin layer of glue, the net is pressed into it. Excess adhesive stains should be removed immediately with a spatula. The lateral sides of the grid segments need to be joined not in the butt, but overlap, otherwise the crack will pass here. At the corners it needs to be wrapped so that it covers the corner edge. Only on top of it you can put a reinforcing corner. In window openings in any case, you need a double reinforcement, in addition to the corners, the grid stripes are additionally superposed along the diagonal. After the adhesive has dried, which keeps the reinforcing mesh, it is possible to start the plastering process. Using a wide spatula, the same glue that holds the mesh is applied to it with an even thin layer. All irregularities after drying should be leveled with an abrasive float. Only after this, you can begin to apply the finishing plaster layer, which is usually of a decorative nature. Thus, to warm your own hands the walls of the house with plates of foam plastic are available to almost everyone. If all recommendations are observed, the result will be quite decent.


