In the living room space it is especially important to decorateeverything, including the ceiling, is correct, as guests will most often evaluate this part of your house. Today, more and more popular is gypsum cardboard as a material for the formation of perfectly flat surfaces or multi-level structures. This variant of registration can be considered excellent also because the GKL has a very low cost. If the surface of the ceiling in the living room has significant unevenness, the plasterboard cloths will help to hide flaws, without requiring preliminary preparation of the substrate. From cracks before the beginning of works too it is possible to not get rid. Such designs will hide under themselves and all kinds of communications.  The ceiling of plasterboard will help to emphasize the style of your living room.
Preparatory work
Initially, we need to draw a sketch, according to whichthe ceiling will be executed. The design can be multi-level or solid. If the ceilings in the room are low, then the first option is preferable to abandon. Immediately need to determine the location of lighting. Before the beginning of the work it is necessary to prepare all the necessary materials and tools, among which: 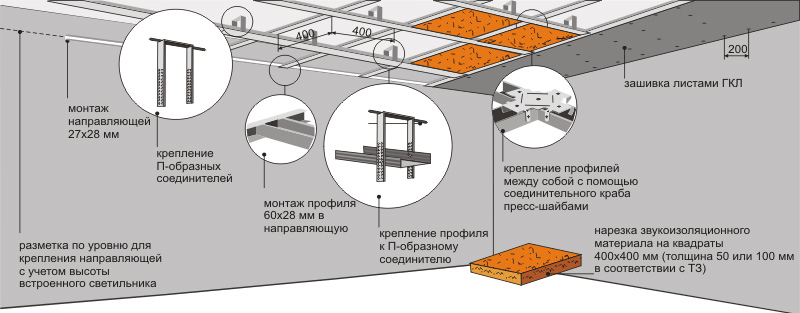 Scheme of a single-level ceiling made of plasterboard.
- Bulgarian;
- electric jigsaw;
- scissors designed to work on metal;
- rasp;
- gon;
- construction knife;
- level;
- perforator;
- saw for GCR;
- roulette;
- Screwdriver;
- Needle roller;
- profiles;
- self-tapping screws;
- dowel-nails;
- rule;
- pencil;
- hangers;
- GKL.
Back to contents</a>
Mounting the frame
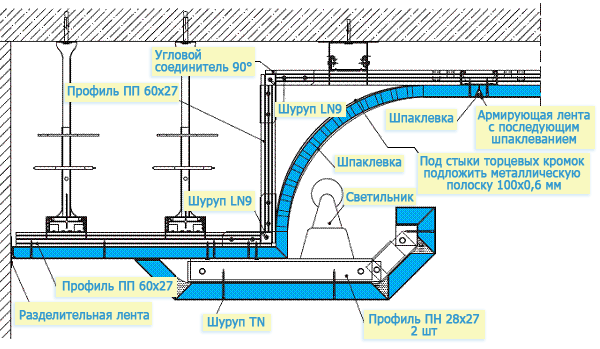
The process of preparation of the premises includesthe need to free him from furniture and equipment, since the work will entail the formation of a large amount of dust. The surface of the floor and things that can not be taken out, you need to protect the film. Before fixing the sheets of material, markings should be made. 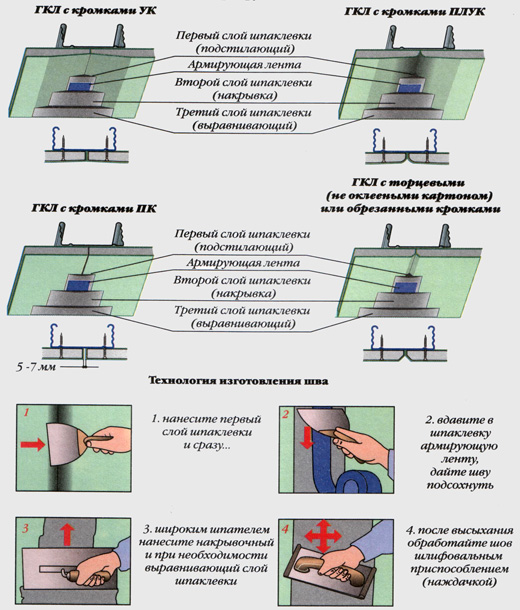 Scheme of processing gypsum cardboard joints. The easiest way is to install a single-level design. In any case, the sheets will be installed on the frame. It will take a layout for the location of the guides, which can be achieved by means of a laser level. Fastening of these elements should be made at 20 cm from the ceiling surface, this distance can be reduced, it will depend on the number of communications. Pencil should be noted parallel to the location of the bearing guides, as the optimal distance between them is a step slightly more than ½ the length of the GCR. As soon as it was possible to make the markings, the steel anchor wedges need to be installed with the suspension, observing the step equal to 40 cm. The horizontality of the frame system should be checked by means of a laser. Then you can start marking for the location of the longitudinal profiles. Their fixation should be performed with the help of special crabs. After installing the frame system, the wiring should be laid in place and reinforced with adhesive tape on the surface of the rough ceiling, this will eliminate the possibility of its displacement or damage during the work. Back to contents</a>
Technology of finishing the ceiling GKL
 Complete scheme of plasterboard ceiling. Gypsum plasterboard ceilings can be started to be fastened after the sheets have been cut, what is better to do on the floor surface. In this case, you need to use a stationery knife or jig saw, designed to produce curvilinear blanks. It is not so difficult to work with glyc, initially it is necessary to make a markup on the surface of the sheet, and then to hold a knife along the received line, only after it is necessary to take the cut piece and break it. Drywall should burst exactly in the right place. This process can be compared to the work where glass is involved. If uneven edges form in the places of the fracture, then you need to get rid of them using the equalization method, using a rasp or a plane. To ensure that the ceiling of gypsum board began to have higher waterproofing characteristics, each sheet must be treated with a primer before the installation, using a special composition. Mounting the ceiling from gypsum board, you need to fix the sheets to each installed profile, using for this purpose self-tapping screws for metal. Installation of fasteners is recommended to be carried out at a distance of 20 cm. The ceiling of gypsum board between adjacent sheets should have grooves, the width of which is 2-3 mm, this requirement is mandatory. Fittings should not be completely inserted into the material, since there must be a temperature gap between the screws and the sheet. In order to avoid the possibility of excessive fastening of the fasteners in the body of the material, it is recommended to use a screwdriver, which will need to install a depth gauge screw. As soon as the living room finds the ceiling from the GCR, it is possible to analyze whether there are any errors, which in case of detection should be eliminated by the method of partial screwing or unscrewing the fasteners. In the next step, you can proceed to cutting through the holes for the fixtures. The ceiling needs to be covered with putty, which involves several stages. First it is necessary to close the joints between the canvases. They need not only to miss, but also to strengthen. This is necessary in order to avoid the possibility of shedding the composition after drying. On the seams it is necessary to strengthen the reinforcing mesh or special paper base. The ceiling in the joints should be filled with a layer of putty, after the composition has to be applied, the next step is to apply another layer of putty. The same treatment should be carried out in the areas of gaps between the finishing sheets and the wall. After the ceiling dries, you can proceed to surface treatment with fine sandpaper. The ceilings will not look aesthetically pleasing, if you leave unattended the places where the self-tapping screws were unsuccessfully screwed, these areas have to be covered with putty, and then level with the skin. If necessary, the ceilings can be completely treated with putty. Surfaces must be allowed to dry, then you can go to the primer base, using special compounds. Now the living room can be trimmed in the ceiling area with finishing materials. As a decoration, you can choose wallpaper or glue ceilings. Suitable for any material, as drywall is an excellent base for fastening. Despite the variety of finishes, it is more often used today for the ennobling of a gypsum board base paint. To do this, you can use almost any tool. If you decide to prefer a water-based paint, it is recommended to treat the surface of the ceiling with putty.


