Decorative plaster is the originalmaterial for wall finishing. With its help, you can create relief unique patterns that fit into the interior of any style. Plaster looks advantageous both in finishing large surfaces and as an accent, drawing attention to a certain area. Types of decorative plaster:smooth, textured, embossed. But even devoted fans are often stopped by the high cost of the material. Meanwhile, a structural stylish surface can be made with your own hands without significant expenses. All you need is regular putty, knowledge and minimal skills.
Materials, tools, preparatory stage
To do the important work of ennobling the walls with your own handsby hand went without difficulties, and the result was completely satisfactory, it is necessary to treat each stage with full responsibility. You can not exclude any of the stages and try to do without any tool. can be successfully done only if enough effort is applied. So, for the work you will need: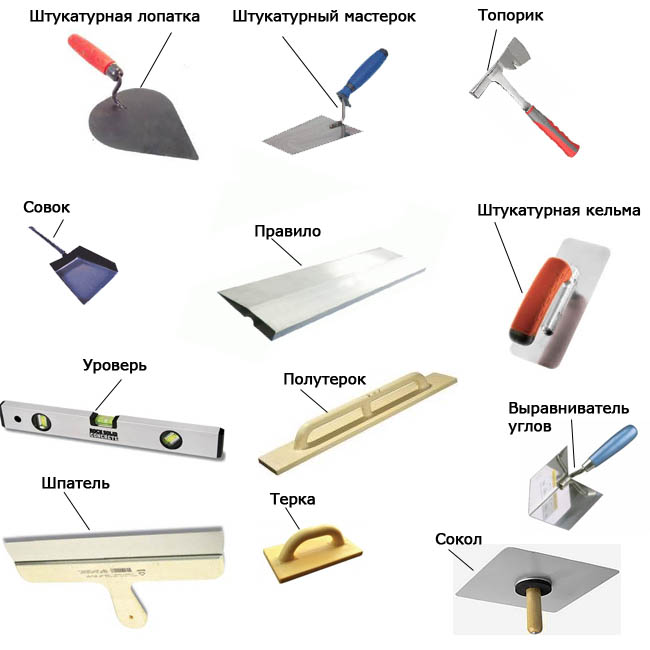 Tools for plastering.
- dry or ready putty (cement or gypsum);
- solution tank;
- a construction mixer or a comfortable long stick;
- a metal grater;
- trowel (trowel);
- polyethylene cut;
- putty knife.
Before you start searching and purchasingmaterials, you need to measure the surface area that needs to be covered with the original plaster. It will not be difficult to calculate the consumption, manufacturers indicate this figure on the container. You can use both gypsum and cement putty. For rooms with high humidity, the second is better suited. Next, you need to prepare the wall. Remove the old coating, knock down all the bulges, and cover the cracks with cement mortar. The smoother the wall, the better the new plaster will lay. And it will be easier for a beginner to work on an ideal surface. Decorative processing toolsplaster: a - scraper; b - nail brush; c - comb; g - roller; d - seam roller; e - bush hammer. At the next stage, you need to take care of the reliability of the coating base. If the wall tends to crack, it must be reinforced with a plaster mesh, which can be purchased at any hardware store. If the wall is reliable and can withstand the weight of the putty without additional help, it is enough to carefully treat it with a primer. These manipulations will not take much time, but will significantly improve the adhesion of the surface and the plaster layer. To achieve an ideal result, you can apply a thin layer of putty to the wall. It will not only level the surface, but will also avoid such an unpleasant surprise as the appearance of dark spots. After the coating has dried, you can begin to create a spectacular and inexpensive masterpiece. The main thing is to choose a suitable structure in advance, since the creation technologies are slightly different. Return to contents</a>
Original and catchy "Fish Scales"
The first type of structure is distinguished by its originality.and looks especially presentable when painted. From the outside, such a wall will look as if a whole team of masters of their craft worked on it. The final result will largely depend on the thickness of the putty layer and the accuracy of the master, so each stage must be performed with the utmost care.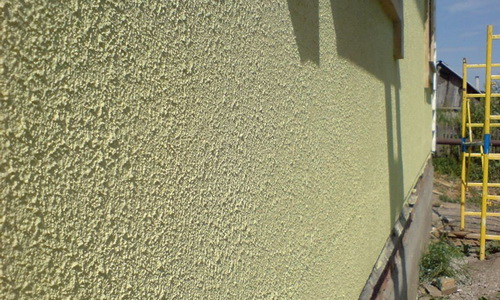 Methods of applying decorative plaster.
This wall relief will emphasize individualityinterior. With its help, you can highlight a functional area. And it will be especially pleasant to realize that such beauty was created with your own hands. Return to the table of contents</a>
The modern version of antiquity
Another interesting relief can be created by yourselfwith your hands. And you won't need expensive decorative plaster for this. The main thing is to have putty, a wide spatula, and a piece of polyethylene at hand. An interesting structure reminiscent of a "fur coat" applied to the base of Soviet-era buildings will fit harmoniously into the interior of a living room, bedroom or kitchen. In a child's room, you shouldn't decorate the walls in this way, as active children can get hurt. The order of work is as follows:
When working with these structures it is extremely importantchoose the right consistency of the solution. The putty should adhere well to the wall, but at the same time it should stretch behind the polyethylene. Return to contents</a>
"The bark beetle in a new way" or the structure of a stone
An original and easy to execute designcan be obtained by having only putty and a trowel at hand - a tool that is a sheet of metal equipped with a convenient handle. If you approach the work with sufficient diligence, you can get a completely unique pattern that surpasses the most expensive wall coverings in beauty.
The decorative element made in this waythe structure of the plaster resembles natural stone or rock. This finish can be used to decorate an interior in country or eco style. But that's not all. There are many ways to give the putty an original relief. You can use regular paint rollers, they will provide a charming "hairiness". In addition, the roller can be covered with leatherette, laying chaotic folds. Such a handy tool will leave interesting grooves on the wall surface, which will look original after painting. You can give the desired relief to the putty with literally anything that comes to hand: tree branches, stamps from craft kits, stencils. The main thing is not to be afraid of the beginning of work and small defects, because on a relief wall, imperfections are practically invisible.


