— no problem.It is much more difficult for them to make a curtain rod themselves. Antique curtains are like sails, because they came into being thanks to sailors. Roman blinds in their simplicity resemble sail panels, their lifting mechanism is also very similar. They will easily fit into any style of space of an apartment, house, non-residential premises. Buying a ready-made curtain rod is quite an expensive pleasure. But, if you have patience, you can create it yourself. The rules for making a curtain rod are quite simple and understandable even for beginners in the art of housekeeping. Scheme of a cornice for Roman blinds with an open control system.
The system has not changed since ancient times?
And this is really so, because everything is ingenious— simple. Cornices for Roman blinds are made today in the same way as before our era. The age of Roman blinds is several thousand years. Materials change, new styles, fashion trends, movements arise, but Roman blinds remain unchanged, like the Eternal City on seven hills, where all roads lead. It should be noted right away: a popular element of the room decor is installed depending not on design preferences, but on where exactly it will be most functional. Roman blinds can be attached directly to the window profile, they will fit very tightly to it. The curtain is also placed inside the window opening. outside the window opening, fixing it to the upper slope. The ceiling is an excellent option for placing a curtain, it is fixed on the outside of the window opening. Diagram of the structure of a Roman cornice.To understand how to make a cornice for Roman blinds, you need to analyze the specifics of its design. The curtains themselves consist of a rectangular piece of fabric, which is larger in area than the window being decorated. The texture of the fabric can be very diverse in density, color and pattern, the main thing is that it fits harmoniously into the aesthetic space of the room. Raised Roman blinds look aesthetically pleasing, because in this form they form neat folds. This happens because the strips on the back side do not allow the fabric to sag, and the threaded strings into rings collect the curtain. The fabric is fixed using clamps. Note: Roman blinds can actually be installed without a cornice element. What are the advantages of Roman blinds with and without it - a controversial issue that is decided based on the features of the interior of the room, window openings and the desire to maximize the functionality of the space. Fastening Roman blinds without a cornice has its own nuances. The canvas is fixed to a mounting board, a block, which still needs to be secured. A common mistake of those who decide on such an operation is a construction stapler. It will, of course, securely fasten the curtain. But how can you remove it later without damaging the fabric? Roman blinds are fastened without a cornice and with screws. They are screwed through holes made in the fabric. You can also buy special clips or a rail. The latter works regardless of the presence or absence of a cornice. Interior design specialists also use special sticky tape to work with curtains, however, as practice shows, the presence of a cornice for Roman blinds is the most optimal, practical option.
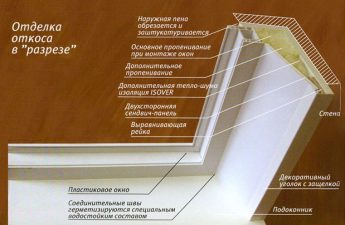
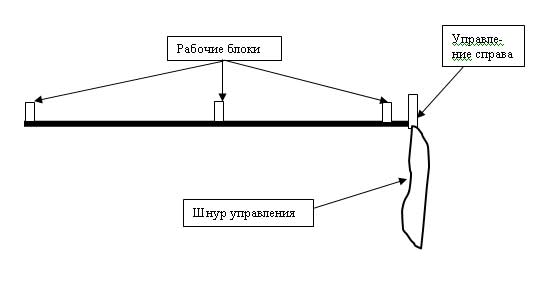 Scheme of the lifting mechanism for Roman blinds. When choosing a place where Roman blinds will be installed, proceed from the functionality indicator. They can be installed:
- very tight to the window, directly onto the window frame itself;
- inside;
- outside, directly on its upper escarpment;
- outside the opening of the window, directly to the ceiling.
Return to Contents</a>
On the options for the mechanism and its selection
There are different mechanisms for Roman blinds,The most common are: cord, rotary-chain, motorized. The first is the simplest, it is the easiest to make yourself. The cornice looks like a system of cords by means of which Roman blinds are raised and lowered. The cord mechanism is easy to repair or replace one or another part in it. However, it has a weak side. It is not suitable for heavy Roman blinds, since fabric weighing from 4 kg or more and such a system of moving the canvas are not compatible. In this case, it is better to choose a rotary-chain mechanism. It is much more difficult to make. The system of raising and lowering the curtains is based on chain control, when a block is affected by a chain, it, in turn, sets in motion the tapes that are fixed to the canvas. Cord and rotary-chain mechanisms are very similar, but the cornice, where the second is used, is capable of performing actions with fabrics weighing up to 7 kg. Motorized cornice - the most modern mechanism for raising and lowering Roman blinds. The remote control controls the entire process.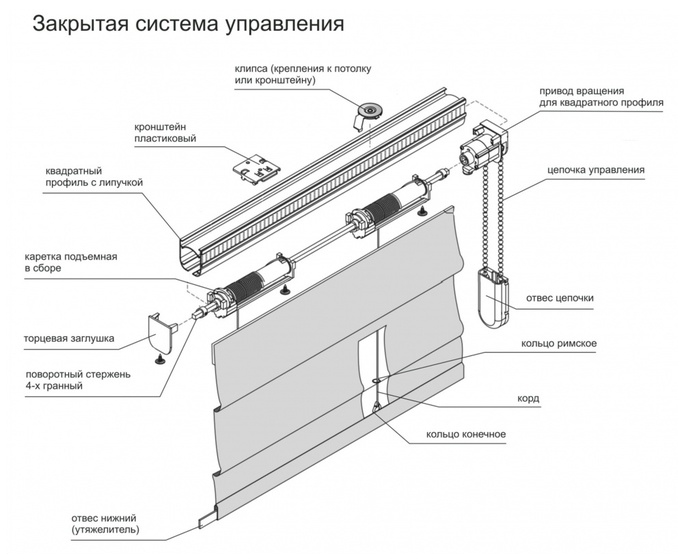 Scheme of a cornice with a closed control system.This type of curtain rod is designed for curtains of any weight and size. It is not a problem for it if the window opening is at a great height or in a hard-to-reach place. A real craftsman can make a motorized curtain rod, especially since installing the mechanism will require considerable effort. In order to choose the right mechanism for a Roman blind rod, you must take into account a few more points. The cost of making a rotor-chain mechanism will be higher than a cord mechanism. When choosing a curtain rod, you must take into account the weight of the curtain itself. For light curtains, it is best to make a curtain rod with a cord system. It is perfect for installing curtains on a window sash or window frame. The latter mechanism is especially convenient in small rooms and small city apartments, because it does not require much space, and as a result of its use, the room will begin to look neat, well-groomed, and elegant. Return to contents</a>
Shoelaces, Velcro and what else?
How to easily and quickly make a mechanism forRoman blind? First, you need to buy rings for it. How many will you need? We count the number of horizontal folds, multiply by 3 and get the required number of rings. Usually, no more than 4 ears are required for fixing the Roman blind at the top. You also need cords and textile Velcro. For one curtain, you will need three equal cords. Calculating the length of the segments is not difficult: the height of the canvas is multiplied by 2, and allowances are added for the knots that will be located on all the rings. First, the rings are sewn on. The distance between them should be the same. The operation is performed on the inside of the canvas. The rings are fixed to the textile tape. The textile Velcro will play two roles at the same time. Its hard part, fixed to the bar, will act as a cornice, and the soft part is sewn to the back of the canvas - to its upper edge. Once the curtain is attached to the rod, it is turned face down to attach the eyelets. Three of them are located opposite the rows of rings, another one is where the cords will be brought out, that is, from the side of the curtain. The cords are passed through the rings. This operation begins from the bottom of the curtain. Knots are made on all the rings, but not on the eyelets. There you can only pull the cords, or rather their bundle. If it is passed through the fourth eyelet, the system is ready to function. However, you must remember the next stage of the work: fixing the curtain to the window opening. For this operation, it is best to use a metal bracket.