Modern construction suggests usingall types of plasterboard for wall surface cladding. In this case, the use of the frame method is caused by the need to carefully hide the unevenness of the wall and hide various communications, for example, pipes, wiring or sewerage. Plasterboard walls will help to hide unevenness or existing communications. There are several options for frame cladding:
Advantages of the frame method of wall cladding with plasterboard: Technological scheme for cladding walls with plasterboard on a metal frame.
- the possibility to perfectly level the surface of the wall, to hide its irregularities;
- the fastest execution of work;
- the ability to hide all communication lines, for example, electrical wiring, water supply pipes and sewerage;
- an additional possibility to produce sound and thermal insulation of the wall surface.
Necessary tools and materials:
- gypsum plasterboard sheets (GLC), the length of which fluctuates between 1200 and 3000 mm, and the width is 1200 and 12.5 mm;
- material for sound and thermal insulation of the wall surface;
- Wooden slats or metal profile, depending on the type of frame;
- hangers and screws, as well as dowels for fixing to the wall;
- drill and screwdriver;
- Hacksaw for metal (frame method using a metal profile);
- mounting adhesive for gypsum board (Knauf is considered the most popular and high-quality adhesive);
- tools for marking, for example, plumb, level and pencil;
- mallet, preferably of rubber;
- planes for edge work.
Correct selection of the material for the carcass construction
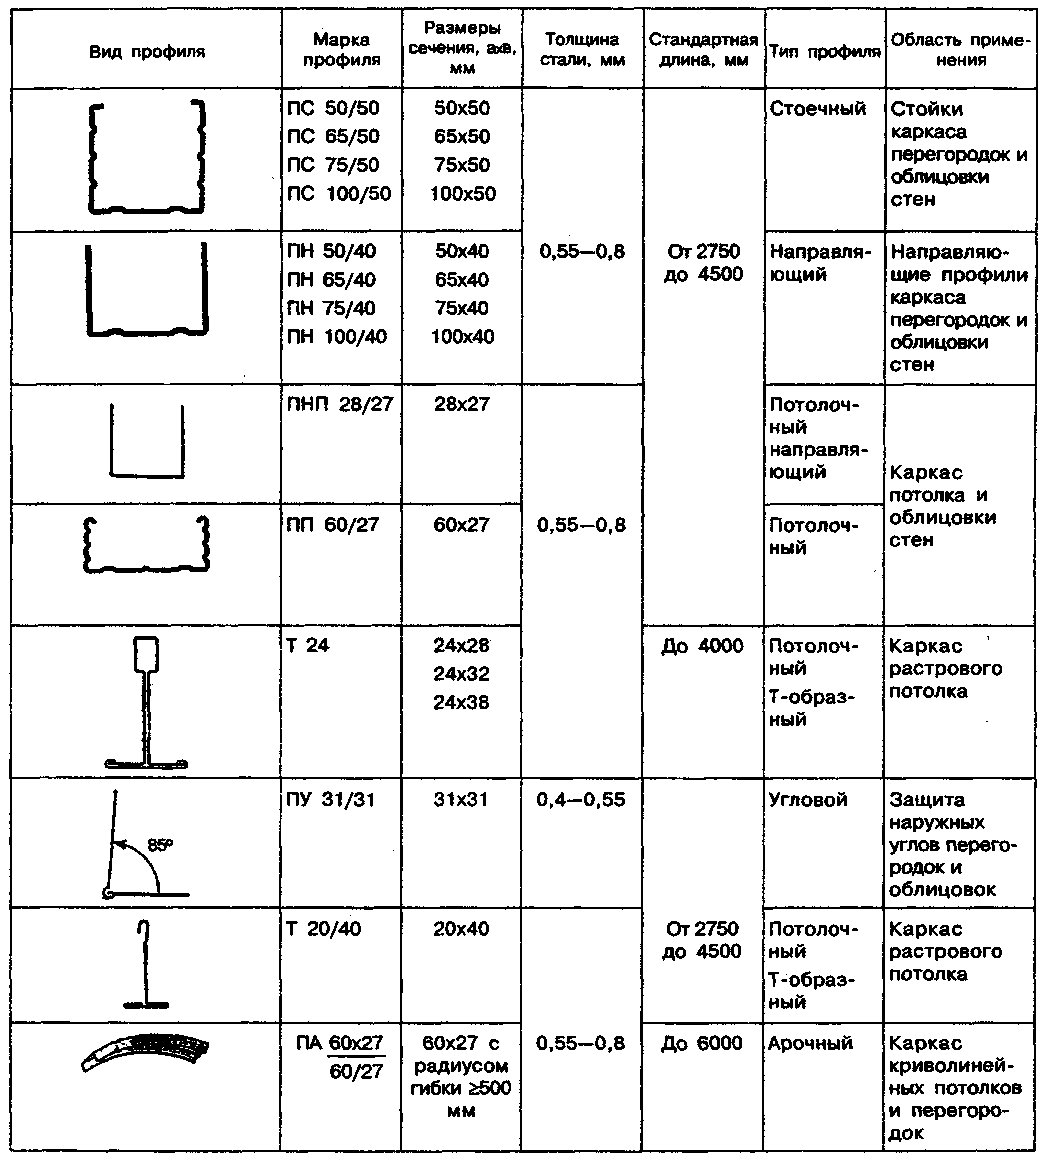 Profile types and areas of application.The use of a frame for plasterboard sheets is in demand if it is necessary to level the walls. This is an ideal option to hide communication lines of various purposes or electrical wiring. If you additionally use mineral wool or foam, you can significantly insulate the room. If desired, you can make the wall soundproof. It is necessary to create a frame for plasterboard on the wall from metal profiles or wooden slats. In this case, it is recommended to treat wooden slats with special anti-fungal compounds before use. The use of a wooden frame is acceptable only in dry rooms. Moisture is harmful to wood. Each individual slat must be well dried and not have a single knot. This eliminates the possibility of warping after it has completely dried. If knots remain, such a wooden slat can easily break. The slat used must be completely intact, without a single defect. The best choice for making a wooden frame for plasterboard sheets is considered to be a 3x5 cm strip, with the front side being wider. It is to this that the plasterboard will be attached.
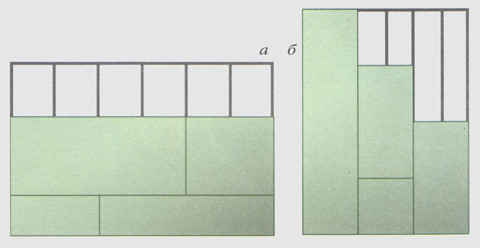 There are two options for installing the frame frommetal profile: transverse (a) and longitudinal (b). If you use the frame option, you need to approach its creation responsibly. It is to the frame that the plasterboard sheets will be attached in the future. Special profiles, which are manufactured in factories, are suitable for making a metal frame. The more rigid such a profile is, the better. As for the sizes, you can buy profiles of 2, 2.5 and 3 m in height with dimensions of 3x6 cm. There are no significant differences between fastening plasterboard sheets to a wooden or metal frame. Therefore, we will further consider the option using a metal profile. It is more popular. Return to the table of contents</a>
The procedure for mounting drywall sheets on the wall surface
Important!It is necessary to install plasterboard sheets at the time of finishing the room. If this happens in winter, then it is necessary to have working heating and a positive temperature (not lower than 10°C) in the room. Return to the table of contents</a>
Installation sequence
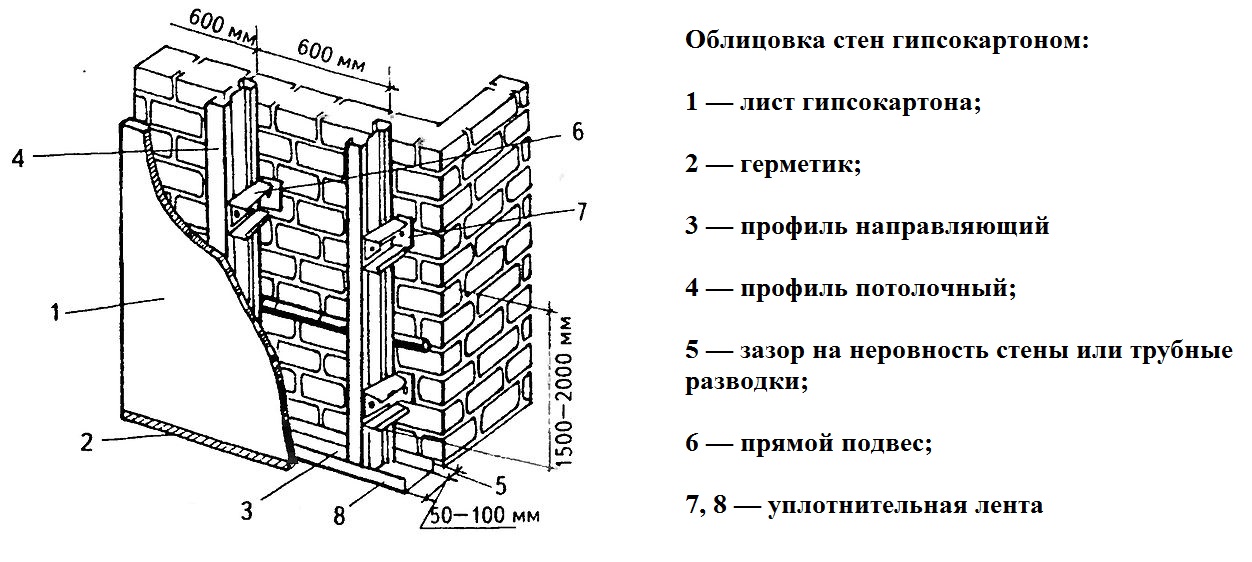 Scheme of wall cladding with plasterboard on lathingfrom the profile. First, it is necessary to mark the position of each frame element. For convenience and accuracy of the installation of partitions, it is best to make marks on the floor with the obligatory indication of the rack profiles, door and window structures. And only then, using a plumb line, transfer the markings to the surface of the walls. If the cladding is longer than 15 m, then it is necessary to make expansion joints. As for expansion joints, they must be made at the places of expansion joints of the building. Important! Those profiles that will subsequently adjoin the surface of the floor and ceiling are recommended to be pre-pasted with sealing tape or treated with silicone-based sealant. Taking into account the previously outlined markings, install the guide profiles with their subsequent fastening to the surface of the floor and ceiling with special dowels. Those rack profiles that adjoin the wall surface are also subject to fastening with dowels. The fastening step is recommended to be no more than 1 m. Although for one profile it is prohibited to place more than three fasteners. The frame rack is installed in 60 cm increments using a level or plumb line. If plasterboard sheets are used as sheathing, it is recommended to remove the screws.
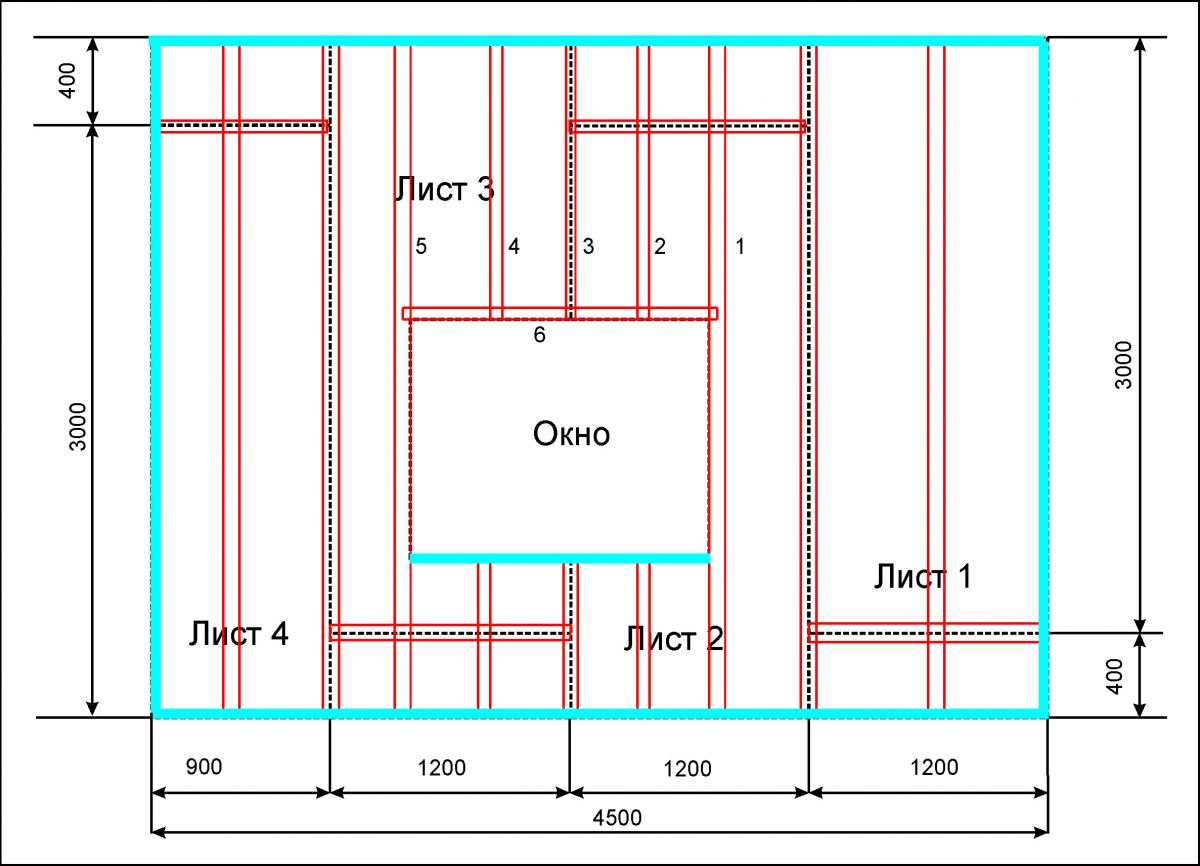 Scheme of laying gypsum board on a profile.The total length of the rack profile should be 10 cm less than the height of the room. During the cladding work on the profile on the ceiling surface, it is recommended to initially fix it to the wall using a special tape for sealing with straight hangers. The step for fixing the hangers must be no less than 1.5 m, but no more than three units per profile element. Attachment of the extreme hangers from below and above occurs at an interval of no more than 1.5 cm from the ceiling. Return to the table of contents</a>
Recommendations of the master
If you want to produce a more rigidfastening of the frame, it is best not to use straight hangers. They can be replaced with profile trimmings bent in the shape of the letter "G". If the customer wishes, material for thermal and sound insulation can be placed in the frame cavity, which will make the wall more functionally saturated. If it is necessary to lay power transmission lines or other types of it through the place of fastening of the frame, it is worth performing work only on the base surfaces. It is prohibited to lay cables inside the frame along the profile of the rack, since the cable can be damaged later when screwing in the screw. Calculation of profile for installation.At the same time as installing the frame, it is recommended to attach the door frames to the facing material. For this purpose, reinforced profiles for the support of the rack are fixed on both sides. Such reinforcement is possible due to the use of a special profile, its auxiliary analogue or a wooden block, which in size corresponds to the dimensions on the inner side of the rack profile. And only after performing such construction manipulations, experts recommend proceeding to attach the frame to the racks, install a lintel based on the guide profile above the opening and fix them with screws and install an intermediate rack above the frame.
In the process of sealing the resulting seamsIt is recommended to use reinforcing tape between individual sheets of plasterboard. It can be used to significantly strengthen and seal the seam. If the tape does not cope well with the functions assigned to it, cracks will form at the seams. In this case, even the use of modern high-quality putties cannot always correct the situation. That is why the use of reinforcing tape is considered a mandatory operation when sealing the seams between sheets of plasterboard, especially if they have a thin, straight or cut edge. Return to contents</a>
Varieties of reinforcing ribbons
Modern construction base of materials andraw materials provides a unique opportunity to choose a variety of tapes for reinforcement. There are lavsan, polypropylene, fiberglass, paper and self-adhesive tapes in the form of a mesh. Naturally, they have different structures, so their reinforcing characteristics are different. For example, lavsan and polypropylene tapes begin to stretch easily under load. Therefore, during the stretching load, the latter does not withstand, and all the reinforcement lies on the thinnest layer of putty. The latter begins to crack, while the lavsan tape can remain completely intact. It is clear that the reliability of such a seam leaves much to be desired. Moreover, the situation will be aggravated if the thickness and density of the tape itself is small.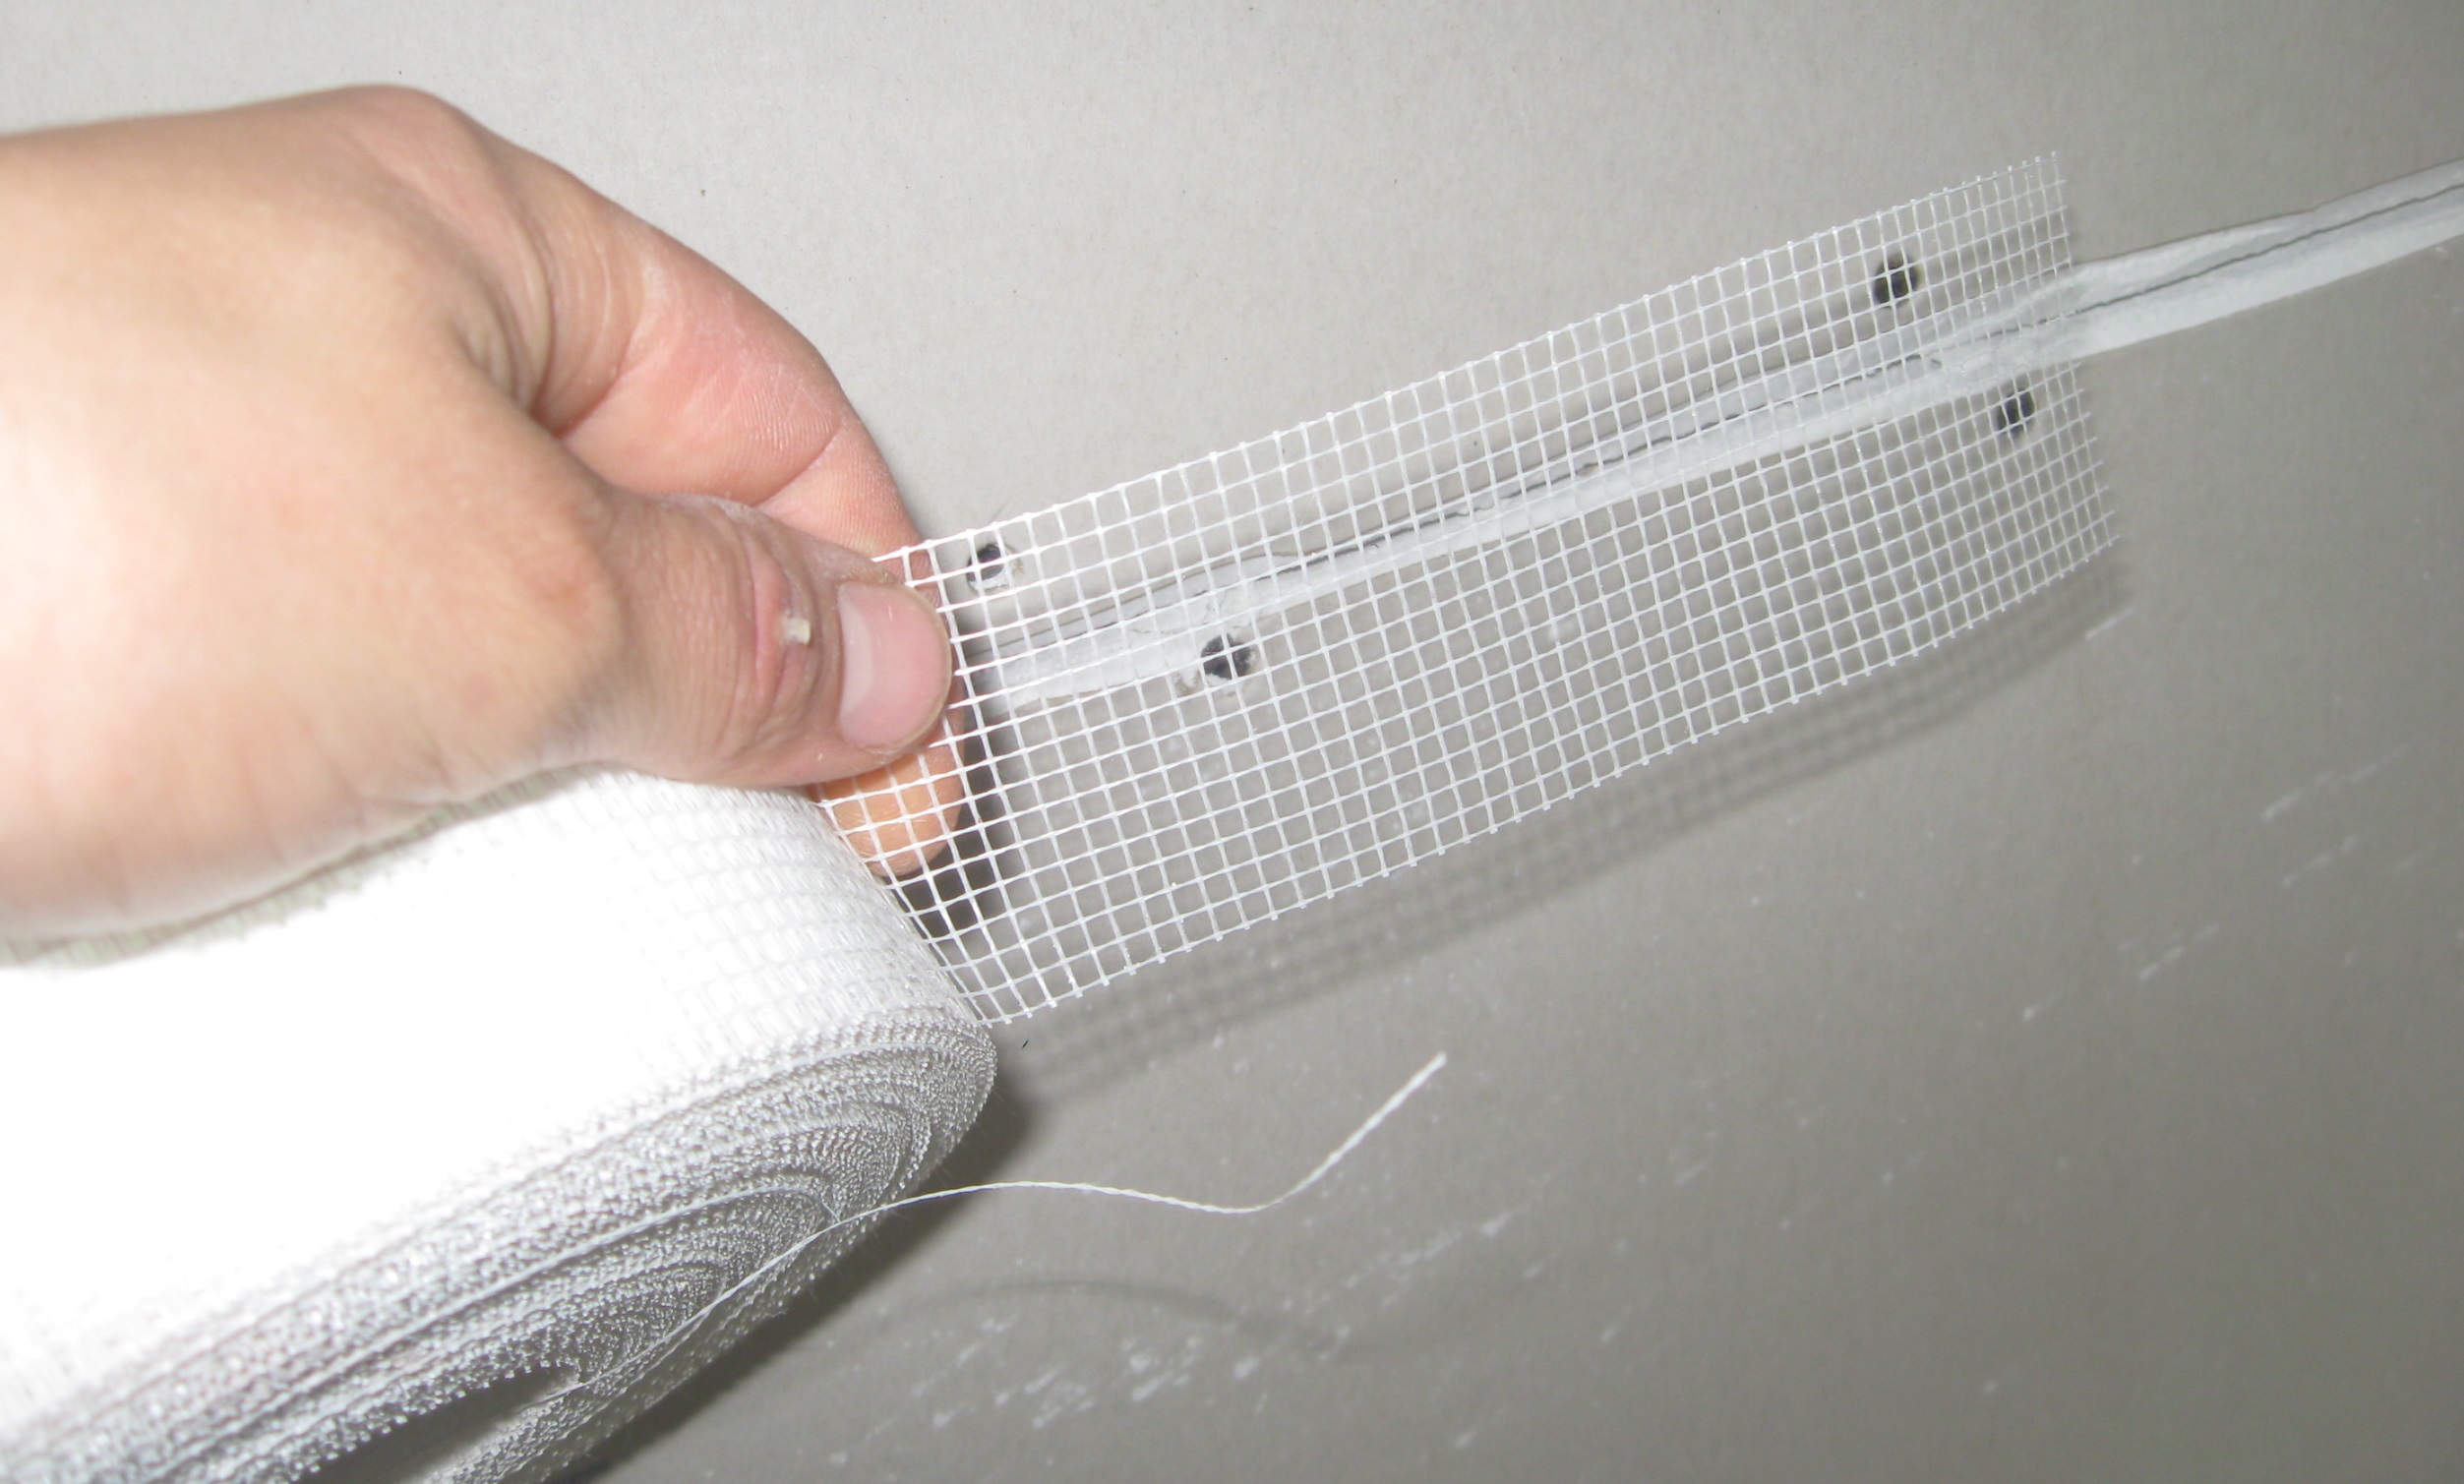 To hide the seams, it is appliedreinforcing mesh and putty. Fiberglass tape, unlike the above-mentioned analogs, does not stretch. But its strength characteristics are also low. Therefore, the seam will not be of high quality. Particular attention should be paid to the use of self-adhesive tape. The experiments have proven that there is no huge difference between a seam sealed with this tape and a completely untreated one. And the strength characteristics of self-adhesive tape for tearing are minimal. But reinforcement of the putty does not occur for other reasons. So, the location of the self-adhesive tape is not at the top, but at the bottom of the putty and borders on the surface of the cardboard. Therefore, the most important and requiring reinforcement putty place is completely unprotected. In addition, the longitudinal threads of the mesh are deformed during stretching and do not hold the seam at all. Experimental work has proven that paper tape is considered the most suitable for reinforcement. It is this that allows you to give high strength to the seam between the sheets of drywall. This tape is not subject to stretching and is considered highly tear-resistant. If we take into account the strength characteristics of the plasterboard seam, it is several times more effective than its analogues. It is not for nothing that professional construction companies use only paper tape to reinforce seams. It is recommended to use the paper tape that shows a high level of strength and less thickness. It is worth choosing a tape whose surface is not perfectly smooth, but even rough. Then you can achieve the best adhesion of the putty to the surface of the tape and eliminate the possibility of peeling. The paper tape should have small holes. In this case, the air flow will pass through it and prevent the formation of bubbles.</ ul>


