Vinyl wallpaper is in demand among those who want itto do cosmetic repairs in their apartments. This popularity is explained by the fact that vinyl perfectly imitates various textures and patterns, and the wallpaper is strong and durable. People who have decided to do cosmetic repairs on their own for the first time should first learn how to do it correctly. Tips and recommendations will help to avoid the traditional mistakes of novice finishing masters. Vinyl wallpaper is durable and long lasting, perfectimitate colors and textures. Vinyl wallpaper can be textured or smooth. This is a two-layer wallpaper consisting of a base, which can be non-woven or paper, and a vinyl coating. To give the pattern a texture, the coating is filled with foamed vinyl, which has a special density and strength. With silk-screen printing, the pattern is smooth and shiny. The service life of properly pasted wallpaper is at least 10 years. They are easy to care for and are used to decorate any room. Among the disadvantages of this modern coating can be called its chemical base, which in small doses releases harmful volatile substances, poor air permeability. The manufacturer informs where exactly its products are allowed to be pasted. If the technology for pasting wallpaper is violated, mold and mildew will form under them.
Features of vinyl wallpaper
 For rooms with high humidityit is necessary to use foamed vinyl. Foamed vinyl is more suitable for rooms with high humidity. Such wallpaper has a relief pattern and a low density of the top layer. They have good air permeability and the ability to mask the flaws of uneven walls. Wallpapering is not difficult. Silk-screen printing is especially beautiful. It imitates the luxury of textiles and is much cheaper, does not fade and is used for a long time. If you need to glue wallpaper with silk-screen printing, then glue for heavy wallpaper is purchased for them. This type of vinyl wallpaper is better suited for rooms. Before using them, the walls must be leveled. If there are any unevenness on the surface, then silk-screen printing will emphasize them. The glue for working with vinyl wallpaper is chosen from those made specifically for them by the manufacturer. You can choose a universal composition that allows you to glue vinyl wallpaper on any basis. If you cannot find this on sale, you need to buy special glue for a paper or non-woven base. Other types of wallpaper glue will not work due to the specific material, the work will be done poorly. Before gluing vinyl wallpaper, you need to turn off the electricity supply to the room. Switches and sockets in the room should be removed during wallpapering. If you manage to remove the baseboard, the work will look very neat. Wallpapering technology requires that the surface being pasted is dry. When working, you cannot open windows or turn on a fan, air conditioner or convector. The main stages of the work are preparatory work, gluing wallpaper to the wall, and the final stage. The quality of the work will depend on how responsibly all stages are performed. Return to contents</a>
Tools for pasting walls
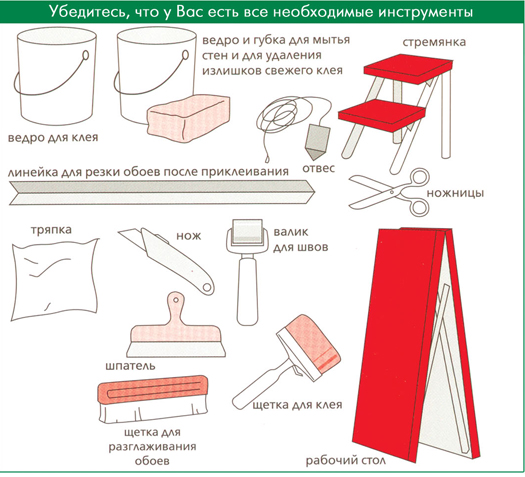 Wallpapering Tools To properly hang vinyl wallpaper, you will need the following tools:
- fur roller for priming walls;
- Brush for applying glue to the canvas;
- rubber roller for work with seams;
- roulette;
- level;
- rags to remove excess glue;
- stationery knife for cutting canvases;
- Knife Sharpener.
Return to Contents</a>
Getting ready for wallpapering with vinyl wallpaper
Wallpaper must be pasted correctly, otherwise it will become coveredmold or quickly fall off the wall due to violations of technology. First, you need to clean the wall from old materials. It is cleaned with spatulas and sandpaper. The finished wall is leveled with putty, allowed to dry and processed again with coarse-grained sandpaper. After the wall has completely dried, it is treated with a primer for antifungal protection. After a few hours, you can start pasting the walls. Before pasting vinyl wallpaper, dilute the glue and let it swell. Do this according to the instructions. If you have pictures on your wallpaper, thenmust be adjusted to each other. Then proceed to cutting the sheets of the required length. Using a tape measure, measure the height of the walls, add 10 cm to the resulting figure and begin cutting the material. If there is a pattern on the wallpaper, then the sheets are additionally adjusted so that the pattern matches. Do not make a stack of more than 10 strips. Usually, one roll of wallpaper is cut, and when the prepared sheets run out, a new one is started. If a non-woven base is used, then you need to know how to properly glue vinyl wallpaper on non-woven fabric. Such wallpaper is not treated with glue. The glue that was applied to the wall is enough for them. This base does not change the size of the canvas, it will be easy to work. Sheets of paper-based wallpaper are laid face down. First, the walls are covered with a thin layer of glue. This will improve the adhesion of the sheets to the wall. After treating the wall with glue using a roller, begin to apply glue to the back of the wallpaper. A perfectly done job will not have traces of glue on the front side. Any excess glue that accidentally gets on the paper is immediately removed with a clean cloth. The middle of the sheet is covered with a roller, and the edges and corners are carefully processed with a brush. The prepared paper-based sheet cannot be glued to the wall immediately. You need to wait until the paper is saturated with the moisture of the adhesive. To do this, fold the sheet in half. The packaging tells you how to glue the wallpaper. The duration of this process depends on the density of the material used. The denser it is, the more time it will take. Paper-based wallpaper tends to stretch slightly when it swells. To ensure that the work looks perfect, the holding time is observed on each strip, making sure to wait the right amount of time. Return to contents</a>
How to properly glue wallpaper
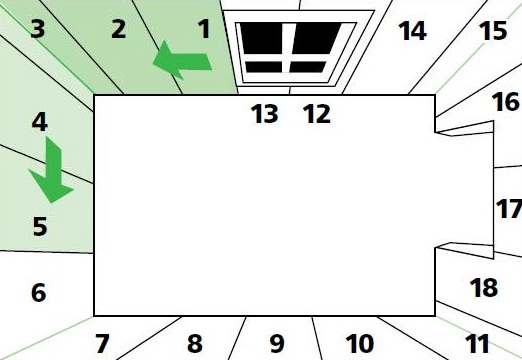 Order of wallpapering.Start working from the corner closest to the window. If you have two corners adjacent to the window, you will have to start pasting from both corners, connecting the work near the doorway. The strips are pasted strictly vertically. To do this, use a pre-prepared level or plumb line. When pasting corners, it is easiest to use a cut strip. Then the corner will look nice, and not be taken in folds. To make the corner correctly, the first strip should overlap it by 2 cm. The same overlap is made on the adjacent side. To ensure that the wallpaper sticks well, you need to press it tightly, making sure that the glued material touches the wall in all places. Remove the sealing line. Carefully cut off the top layer and remove the excess, getting a correctly formed joint. The excess wallpaper is overlapped onto the ceiling and floor, so that it can then be aligned along the general line. When processing a doorway, first measure the remaining width, cut out a strip of the required size, and only then glue it into place.
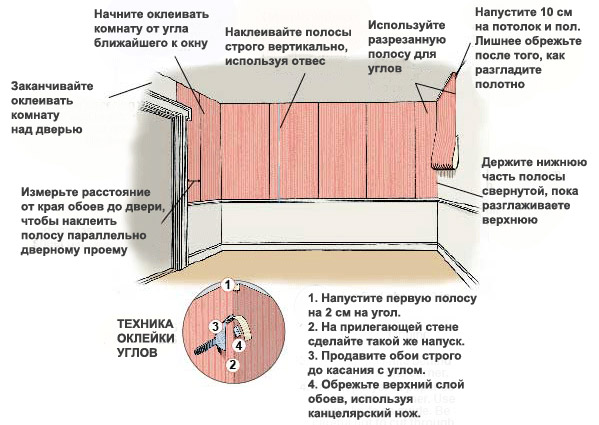 Correct wallpapering of walls.When pasting the canvas on the wall, the canvas is straightened gradually. The bottom is kept rolled until the top is completely leveled. It must be smoothed out well with a clean rag, all air bubbles must be removed, and only then the lower part of the canvas can be worked on. Vinyl wallpaper is glued end to end. The material protruding from the top and bottom is cut with a sharp wallpaper knife. It quickly becomes dull, and then the cutting lines are untidy. Therefore, a knife sharpener is needed so that the canvas is not spoiled. The last stage of the work involves aligning the edges along the ceiling line and the baseboard line. If the baseboard was not removed before pasting the vinyl wallpaper, then the lower edge of the wallpaper is cut after pasting the wallpaper along its upper line. The holes for the sockets and switches are cut after the glue has dried, then the sockets and switches themselves are installed.


