If you decide to make repairs yourself inroom, hallway or kitchen, then most likely you will have to face a problem like. Of course, you can turn to the masters for advice or help, but most people cope with this task on their own. Wallpapering by professionals has several downsides.  Wallpaper gluing is done only on directwalls. First, you will have to spend a considerable amount of money from the family budget to pay for the job. Secondly, some time in your house there will be strangers, and this is not entirely convenient. The decision to glue the wallpaper with your own hands is correct, because there is nothing complicated in this. Before you start working, you need to carefully study all the nuances of the upcoming case. Then you will succeed.
Preparing the walls for the upcoming work
The average inhabitant of our countryIt is necessary to deal with repair not in new buildings, but in old Soviet houses. In them it is quite difficult to find even walls, therefore it is necessary to begin to glue the wallpaper from the preparation of the walls. This lesson can last a long time, but it will help achieve the desired effect. 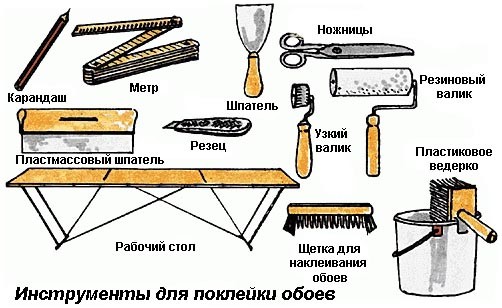 Tools for gluing wallpaper. First we shoot the old wallpaper. It will help them to soften and quickly remove the ordinary solution with soap. For greater efficiency, you can add a bit of wallpaper glue to it. If the old coating has a very dense structure, or it was washable, then small incisions need to be made, and then apply a soapy liquid. Then you should wait for a while and remove the remnants using a spatula. Sometimes you can face a situation where the wallpaper layer is too thick and very well adhered. In such cases, you will have to repeat the procedure repeatedly. If your family budget can afford it, then buy a special solution in the store to remove old wallpaper. It is more effective than soapy liquid. If there is enamel or oil paint on your walls, then it should also be removed. We remove the peeling coating in large pieces, and remove the remainders using a chisel or chisel. Whitewash or aqueous emulsion is well removed with a spatula after wetting with soap-based solution. The final stage of preparation of walls for gluing wallpapers will be surface leveling. All cracks and irregularities should be removed. The wall is plastered or shpaklyuem depending on its condition. If in some places the coating crumbles, it is recommended to treat it with a special primer. The wall must be flat, clean and free from grease. Back to contents</a>
How to start to glue wallpaper?
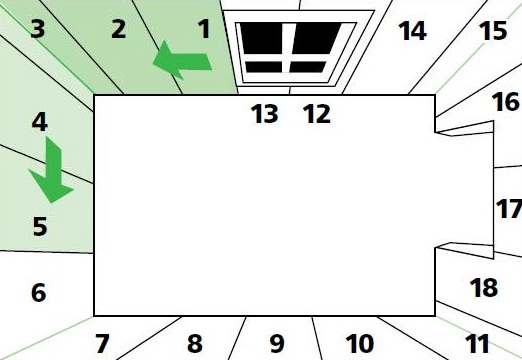 Ordering when pasting walls with wallpaper If youhave got monophonic tapestries, then you will not need to monitor the coincidence of the image. You just need to cut the strips according to the size of the wall. Wallpapers with a pattern require a slightly different approach to measurement. To begin with, the top and bottom of the image are determined. Near the first measured strip the row should be placed second, carefully noting all the coincidences of the patterns. This way you need to properly adjust each painting. Then you can start to glue the wallpaper. The process of laying tapestries on the walls occurs in several stages:
Back to contents</a>
How to glue the joints of wallpaper?
In this case it is difficult to overestimate the valuepractice. Experts connect the joints automatically, without giving them special attention. But the newcomer will have to try. Start to glue the wallpaper you need from the joints, trying to fit each strip as close as possible. 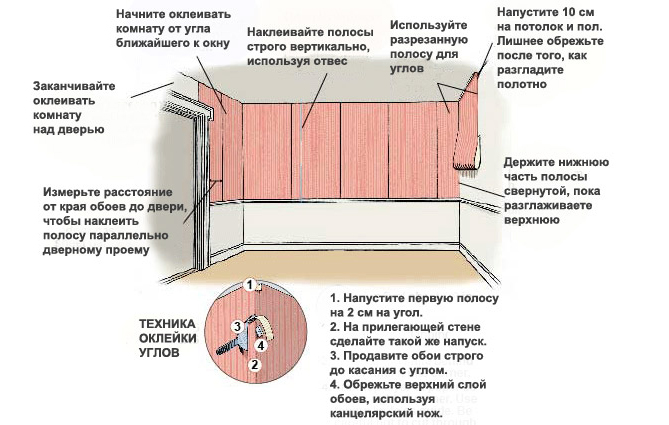 Scheme wallpapering the butt. If you can not do everything perfectly, then you can remove the gap. When straightening the fabric, there is no need to immediately remove all the glue. After all, its removal will not allow the wallpaper to slide along the wall. This will lead to a further divergence of the joints. After the canvas is fully expanded, you can glue the joints. They are pulled with the help of palms or a plastic spatula. The glue is squeezed out towards the gap. We need to do everything as accurately as possible, because there is a risk not only to tear the wallpaper, but also to stretch them. After drying, trellises have the property of returning to their previous position. This applies to the stretched fabric. Specialists recommend using a special adhesive for joints. After all, the usual will not help to avoid their peeling off. It can be purchased at any construction store. Back to contents</a>
Features of gluing different types of trellis
All the wallpaper that are available for sale, are divided into three main types: 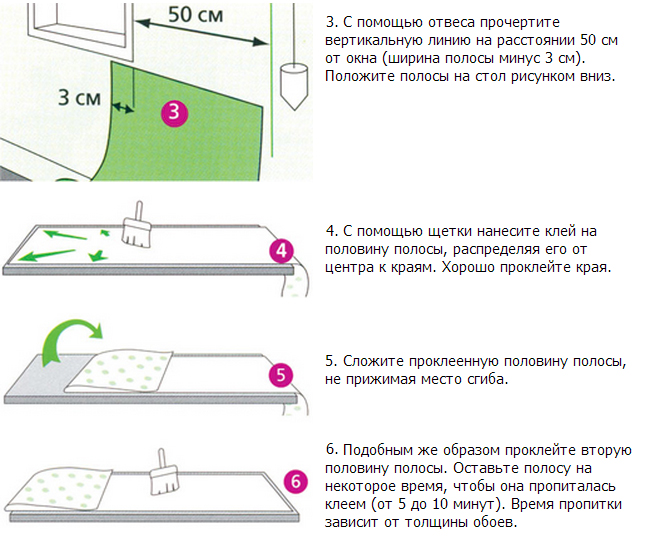 Scheme sticking flizeline wallpaper on the walls.
- paper;
- non-woven fleece;
- vinyl.
The latter can be on a non-woven basis, andon paper. Each type of tapestry has its own glue. About its properties can be read on the packaging or ask advice from the seller in the store. Paper wallpapers instantly get wet. It is recommended to glue them very quickly. First you need to spread the canvas itself, and then immediately the wall. After that, you must immediately glue the wallpaper. Overexposed trellises quickly soak and can tear. Wallpaper from nonwoven does not stretch and do not get wet. Such wallpaper is very easy to glue, because you have to smear only the wall. All trellises, which can be painted, are fabricated on the basis of nonwoven. Such wallpaper does not shrink when dried and glides well on the adhesive surface. The properties of vinyl tapestries depend on their foundation. Glue them is also recommended according to the type of material.


