Non-woven wallpaper is one of the most popular and versatile finishing materials for walls. This is due to its wide range and excellent quality. It should be remembered that non-woven wallpapermask the imperfections of the walls. In addition, meter-long wallpaper is much faster to hang than standard-width wallpaper. Non-woven wallpaper can be on a non-woven base or made entirely of non-woven fabric.
Characteristics of non-woven wallpaper
The composition of this material is fabric and paper fibers impregnated with special binders.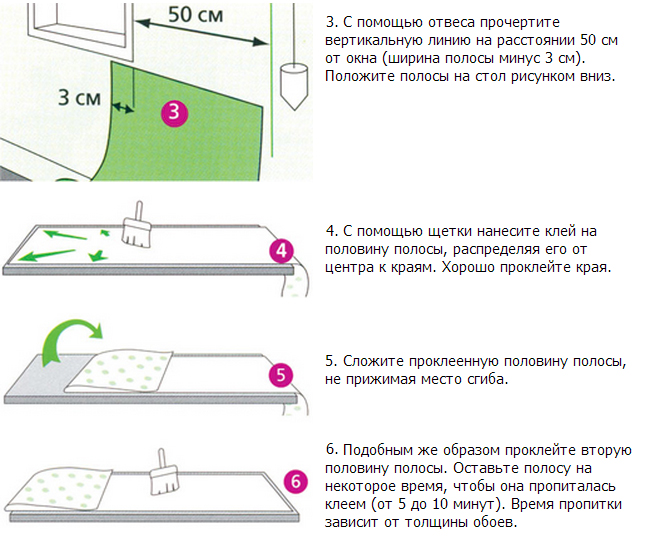 Scheme for gluing non-woven wallpaper to walls.Non-woven fabric is durable and easy to use. It has long been used in the textile industry: added to fabric to give strength and volume. These meter-long wallpapers are presented in a wide range of colors, textures and densities. quickly and easily. They do not tear, do not stretch, do not shrink after applying glue. This finishing material perfectly masks minor defects and cracks on the walls. Non-woven wallpaper does not wear out and retains its original beautiful appearance for a very long time. They lend themselves well to painting without losing their relief structure and quality. The upper part of the wallpaper is a vinyl coating. This gives the material strength and lightness, which cannot be said about paper wallpaper. The variety of textures of this finishing material allows you to imitate any type of surface: plaster, wood, marble, stone. The multi-layered non-woven fabric allows you to create the illusion of a three-dimensional image. Thanks to such special effects, the room can be visually enlarged.
 Calculation of the number of wallpaper rolls.How to glue non-woven wallpaper? This material is so versatile that it can be applied to any surface: concrete panels, plasterboard, chipboard sheets, plaster, wood, paper. But if the meter-long wallpaper is thin enough, then it is preferable to glue it to a flat and smooth surface. If it is a concrete base, then it is necessary to fill all the cracks and unevenness. If the wallpaper is planned to be light-colored, then the base must be of a single color. For example, if the wallpaper is to be glued to plasterboard, then it is necessary to first fill the joints of the sheets, and then apply one layer of putty to the entire surface so that it becomes uniform. Caring for non-woven coating is very simple: any dirt can be wiped with a damp cloth using a cleaning solution. In the case of paper wallpaper, this cannot be done: the dirty paper coating can only be replaced. Return to the table of contents</a>
Preparation of the surface for pasting with a meter wallpaper
 Scheme of applying glue to wallpaper. For work you will need the following tools:
- laser level;
- tape measure and pencil;
- cushion with long nap;
- plastic and metal spatulas;
- mounting knife;
- two containers: for glue and water;
- soft sponge.
Preparation of walls begins with dismantling the oldcoatings. Old paper wallpaper is best removed with a spatula, after wetting the walls and leaving them for a few minutes. If the walls are painted, you will have to work hard: old paint is difficult to remove with a spatula and sandpaper. The best option for this is to use a drill with an attachment. A metal brush is suitable as an attachment. When the base for the wallpaper is cleaned, it must be primed. This is done for good adhesion of the finishing material to the walls. Next, you need to mark out so that the sheets are evenly spaced. It should be taken into account that non-woven wallpaper is glued end to end, not overlapping.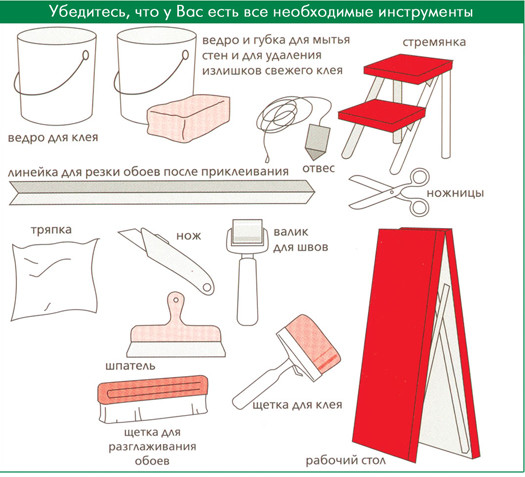 Tools for gluing non-woven wallpaper.Using a level, vertical lines are marked on the walls with a step of one meter. But the width of this wallpaper is slightly larger, 1.06 m. This reserve is needed for possible deformation, shrinkage or edge correction. Before pasting, the wallpaper must be cut for all the walls at once. If the wallpaper has an offset pattern, then the material must be deliberately purchased with a reserve. If the coloring is uniform, then there will be no difficulties with joining the pattern. If the preliminary repair was carried out according to all the rules: the walls and floor, ceiling are leveled, then all the wallpaper strips will be the same length. If cosmetic repairs were carried out without leveling the surfaces, then, most likely, the height of the walls in different areas will be different. This means that the lengths of the strips will also be different. The roll is cut on a clean floor, placing the wallpaper face down. The required length of the strip is measured, a mark is made and cut with a mounting knife. When combining patterns, the first strip should be applied to the unrolled roll at the place where the joint of the image will be. The joint of the pattern will be the beginning of the length of the second strip. In this case, part of the wallpaper goes to waste. However, large pieces of material can be useful for pasting in non-critical places: behind a radiator, cornice, curtain. The glue should be for non-woven wallpaper. The technology for its preparation is simple. According to the instructions, the dry composition is poured in a thin stream into water until the required consistency is obtained. Having removed the lumps from the composition, you can begin pasting. Return to the table of contents</a>
How to glue non-woven wallpaper: step by step instructions
 Scheme of smoothing wallpaper with a rubber spatula. The order of work is as follows:
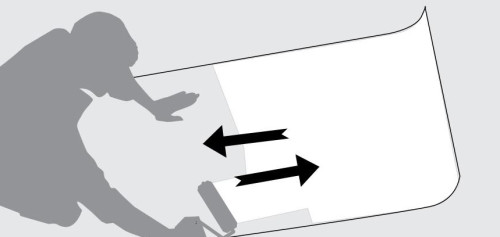
It is important to note here that the adhesive compositionshould be applied to the wall, not to the non-woven material. For better adhesion of the edges, the glue should be applied to a larger area than the width of the strip. The glue is applied and evenly distributed in a thin layer using a roller. It is the first strip that determines the quality of the wallpapering of the room. The adjacent canvases will be aligned relative to it. Therefore, special attention should be paid to the first strip. When the canvas is applied to the surface with glue, it is necessary to smooth the sheet using a flat plastic spatula. An additional adhesive composition can be applied to the edges of the wallpaper for better adhesion. The protruding glue should be removed with a damp sponge. If the wallpaper has a deep texture, it is better to use a roller for smoothing. The appearance of air bubbles should be avoided. Their appearance indicates poor smoothing of the canvases. The skirting board will cover 3-4 cm of wallpaper in height, so the excess remainder of the canvas should be cut off. The same should be done under the ceiling. In many cases, wallpaper is glued first and then, trimming the upper edges at the joint with the baseboard. To do this, place a wide spatula between the wall and the edge of the baseboard and run a painting knife along the joint. The next piece of canvas is glued end-to-end to the first strip. Non-woven wallpaper does not shrink, so it should not be glued with an overlap: the joints will not come apart. The open canvas is placed vertically, simultaneously combining it with the first strip. The joints should be carefully smoothed with a roller, and excess glue should be removed with a sponge soaked in water. The second strip is trimmed at the top and bottom in the same way. For reliable fastening, the edges should be additionally greased with glue and pressed down with a flat spatula. The remaining strips are glued in the same sequence as the first strips. It is best to start gluing from the corner of the wall where the window is located and move clockwise. Thus, pasting a room with non-woven wallpaper does not require special skills. If you follow the exact instructions and do the job well, then the pasted room will please the residents for a very long time.


