If there was a need to make repairs inold apartment, it is likely that you will see whitewashed walls. The fact is that even 25-30 years ago it was one of the most popular ways of finishing walls and ceilings - simple in execution and low-cost by means. But today the choice of quality finishing materials, at a cost equal to the cost of whitewashing, is quite large, and few will want to bother with whitewashing every 2-3 years if there is an opportunity to paste wallpaper on the walls for ten years and forget about the need for their repair for ten years.  Wallpaper must be glued to the preparedprimed surface. But it is well known that the technology of wallpaper stickers provides for preparatory work. First of all, this is cleaning the surface of the walls from the old coating, as well as its priming and a number of other works. Without such training, it is impossible to guarantee that they will serve for a long time and reliably.
How to make repairs easier
In the case of whitewashed walls, such away means piles of garbage and dust clouds all over the apartment. Therefore, many who are faced with this situation, it is quite natural to desire to ease their work. As a result of this desire, the question arises whether it is possible to glue the wallpaper without removing the old lime. To give an unambiguous answer to this question is either positive or negative. The most accurate is the statement: with a certain concatenation of favorable circumstances, you can glue the wallpaper on the lime, but in this case there is a big risk of wasting time and materials.  Wall priming scheme.First of all, you need to check how the whitewash adheres to the wall. If it begins to separate in layers, then there is no alternative - you need to scrape off all the whitewash. So, first you need to cover the floor in the room with at least old newspapers. The applied whitewash is soaked in warm water and then scraped off with a scraper or stiff brush. It is necessary to soak small sections of the wall, since the lime dries quickly, it is impossible to remove large areas of whitewash. After complete removal of the old layer of lime, the surface of the wall must be putty and primed in 2-3 layers. In this case, a prerequisite is to wait for the previous layer to dry, and only then apply the next one. After the putty and primer are completely dry, you can start gluing the wallpaper. In the same case, if the whitewash adheres tightly, does not exfoliate and does not have large chips and cracks, you can take a chance and try to glue the wallpaper directly onto the lime. But this must be done wisely, very patiently and carefully. Back to the table of contents</a>
Correct work algorithm
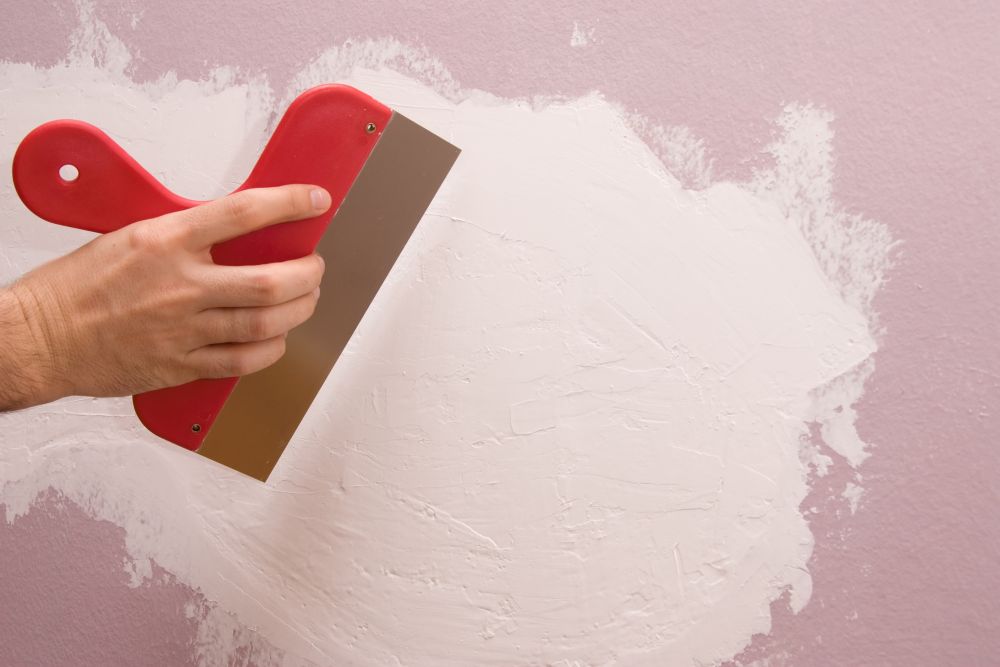 Before gluing the wallpaper, it is necessary to putty andsand the walls to a perfectly flat surface. The main condition for high-quality gluing any wallpaper is the presence of a reliable base. In the case of a whitewash applied on the walls, it is difficult to achieve this condition, because even if the lime is kept firmly in the usual state, after the wallpaper paste applied to it, it can soften and begin to peel off or break through the surface of the wallpaper, spoiling their appearance. Therefore, before you glue the wallpaper, you need to painstakingly prepare the surface of the walls for pasting, maximally strengthening and securing it. If there are appreciable cavities on whitewashed walls, they must first be puttied, then let the putty dry and walk along it with sandpaper. Do it better in a respirator, since dust usually from such work is very much. First, the walls directly on top of the whitewash should be primed with several layers of high-quality primer of deep penetration, which also has water-repellent properties. Primer is better to take acrylic, it most fully meets all the requirements in this situation requirements.
  Preparing the walls for wallpapering. The primer will reliably bind the whitewash layer and improve the adhesion of the lime to the wall, in addition its water-repellent properties will protect the lime from excess moisture and will not allow the formation of prerequisites for mold and fungus. Primer is applied in 2-3 layers, making a break after applying each layer in 1-1.5 days to dry it. For application, you can use a roller, but in the case of lime, it is best to use a paint brush. This will allow more thoroughly and evenly to spread the whole surface of the wall with a primer. After the primer has dried, it is necessary to fix it additionally, having smeared the walls with a weak solution of wallpaper paste. To do this, the wallpaper paste must be diluted with water and this mixture should be passed over the applied primer. This not only will additionally protect the wall surface. The adhesive glue as a heavier component of this mixture will settle in small cracks and unevennesses, leveling them and creating a smooth base for gluing the wallpaper. Back to contents</a>
Ways to wallpaper the wallpaper on the lime
In order not to waste time and materials for nothing, firstit is desirable to make a test paste, i.e. Paste one strip of wallpaper on the wall and wait until it completely dries. If the strip is kept poorly or there are stains on it, then further staining over the whitewash is meaningless, you will have to remove it from the walls. If the strip on the wall sits firmly, the surface of the wallpaper remains clean, then you can continue to work. Guarantees that elsewhere lime does not begin to exfoliate or soften, you will not be given, but the overall chances for a successful outcome of the planned repair are still quite high. 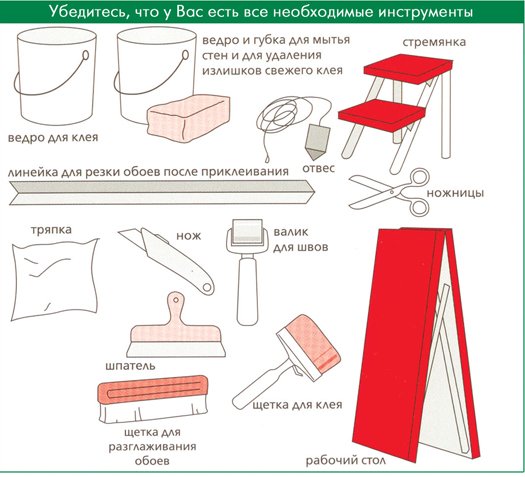 Tools and materials for wallpapering. For gluing on the lime you will need a usual set of tools for the hangers:
- meter ruler or tape measure with steel tape;
- pencil;
- scissors;
- a bucket for preparation of a glutinous solution;
- mixer;
- paint brush;
- rubber spatula or wallpaper brush;
- ladder;
- knife (kitchen or perforated, but necessarily very sharp).
Before you glue the wallpaper, you need to take care ofthe necessary microclimate in the room. To do this, if necessary, lower the temperature in the room to 17-18º, and also eliminate all sources of draft, securely closing all doors, windows and windows. Usually wallpaper stripes are glued to the surface by a buttock method. It also fits for the whitewashed calcareous surface. Rolls of wallpaper are cut into strips along the length of the wall plus 5-10 cm of stock each. If you want to combine the drawing on the wallpaper, then it is better to make a bigger stock - in 30-40 cm, so that you can easily put together the drawing applied to adjacent strips. 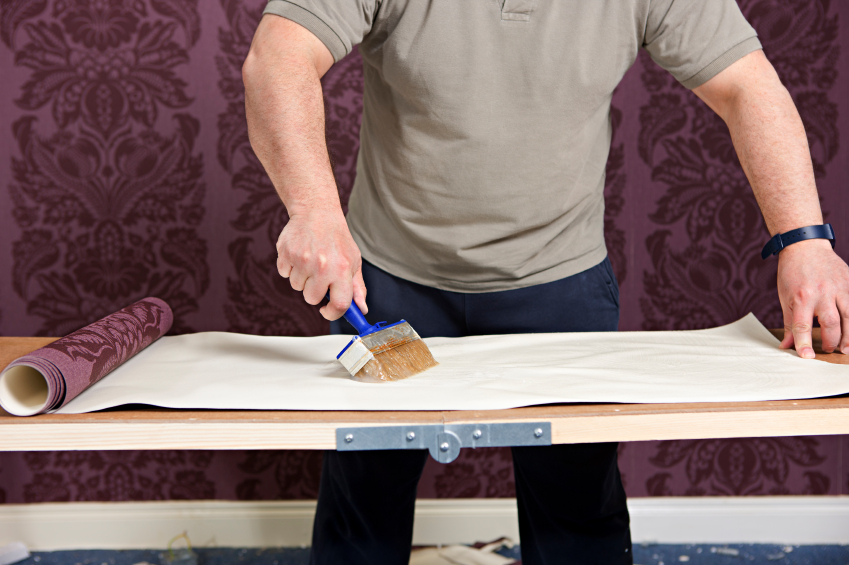 Wallpaper lubricated with glue in a horizontal position andleave for impregnation for 3-5 minutes. Cutting the stripes, you need to spread their backs with glue. Especially carefully it is necessary to smear the edges of the stripes, since badly smeared edges will necessarily lag behind the wall. Folding up the sheets with glue two times with the side facing inwards, you need to leave them for a few minutes (from 5 to 8, unless otherwise indicated in the instructions for preparing the glue), so that the glue is properly absorbed into the fabric. At this time, glue the surface to be glued. Having finished with the surface, you can proceed directly to pasting. The folded strip is straightened, once again smeared with glue and immediately glued to the wall. Stick a strip of wallpaper, starting from the top and moving down to the floor. Rubber spatula or wallpaper brush level the surface, squeezing out from under it air bubbles and removing wrinkles. To do this, the spatula or brush is pressed against the center of the strip and moved towards the edges. The excess adhesive should be carefully peeled off with a rag. After gluing the strip, you must once again walk across its entire width with a spatula or brush, but already in the direction from the ceiling to the floor. And only after that you can proceed to gluing the second strip, having done with it all the same as with the first, and not forgetting to make sure that the pattern printed on the strip coincides. After the second lane, it is the turn of the next, so, moving around the perimeter of the room, past the entire room. After the end of the gluing of each wall, the pasted wallpaper should be adjusted to the desired size, carefully cutting off from them in the upper corner and all excess tolerances at the plinth. Wait until you completely paste the wallpaper in the room, it is not worth it, since you need to cut off the surplus before the wallpaper of the wallpaper is dry. In the very gluing of wallpaper on the lime is not anything complicated, the technique of this process does not differ from the usual pasting. But still remember that by doing this, you are much more likely to "hope" than to the reliability of the glue and your own skill. Good luck!


