Anyone who has decided to renovate their home,faces the problem of wall finishing. Often, plywood or chipboard are used to align walls or build partitions, and then they encounter some difficulties when gluing wallpaper to such a surface. Knowing some rules, you can easily cope with this problem. The wallpaper is coated with glue in a horizontal position and left to soak for 3-5 minutes.
Surface preparation
Return to Contents</a>Preparatory work Scheme for gluing wallpaper to walls.How to glue wallpaper as quickly and efficiently as possible? Before you start gluing wallpaper, you need to stock up on everything you need. First, buy rolls, and then, based on their quality, buy the necessary materials. Before gluing, prepare the necessary tools:
- roller and brush for glue;
- scissors;
- Ruler;
- pencil;
- a knife for paper;
- soft rags;
- container for glue.
For chipboard it is better to choose relief vinyl wallpaperor non-woven, which will help hide unevenness at the joints and will hold its shape with slight deformation in the future. Colored silk-screen printing is also a good choice, which will also hide the unevenness of the wall.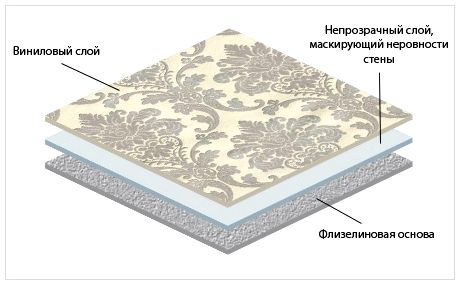 Opaque base of non-woven wallpaperallows you to hide all the unevenness of the wall. You need to start from the corner that is closest to the window in the direction of the door. Before gluing the first strip, use a plumb line to draw a vertical line on the wall with a pencil. Measure the width of the canvas from this line and draw a second line. This is necessary so that the first strip of wallpaper is glued as evenly as possible. In the future, we will focus on this strip when gluing the rest. If the pattern does not require adjustment, you can immediately cut all the strips of the required length. If the pattern requires mandatory selection, then the strips must be cut gradually. The strip of wallpaper must be measured with an allowance of 10 cm for the ceiling and floor. When gluing, the excess overlap at the top and bottom is cut off with a paper knife. Glue must be selected according to the type of wallpaper and must be diluted strictly according to the instructions. If the wallpaper is on a paper backing, then the glue is applied to the back of the strip and to the wall. And if the wallpaper is on a non-woven or textile backing, then the glue is applied only to the wall. The glue is applied slowly with a roller or soft brush along the entire length of the sheet, then the canvas is folded with the coated surface inward and left for approximately 15 minutes. While the canvas is soaking, we coat the wall section with glue. Return to contents</a>
Rules for gluing the canvas
We start gluing from top to bottom, graduallycarefully smoothing the canvas with a soft cloth to avoid bubbles and removing excess glue. While you smooth the top part of the wallpaper, it is better to keep the bottom part rolled up, gradually straightening it out. Door and window openings should be pasted with wallpaper last.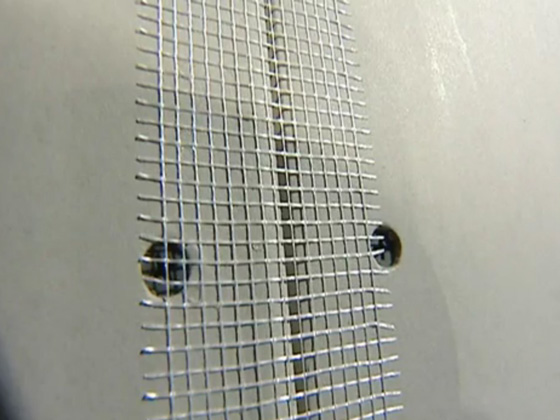 The joints are filled with puttymesh-serpyanka, after which the boards are covered with oil paint. Thick wallpaper is glued end to end, and thinner ones - overlapping. To carefully glue the canvas in the corner, you need to calculate so that it goes onto the other wall by at least 15 centimeters. And very carefully smooth out the canvas so that it does not tear. If possible, bamboo canvases can be glued to chipboard boards - this is a very beautiful, durable and environmentally friendly material. To do this, you need to buy special decorative wallpaper nails. Cut strips of the desired length, apply special glue to them and leave for some time for impregnation, without folding, for about 10 minutes. When gluing, use a plastic spatula, excess glue should be immediately removed with a damp soft cloth, in no case should you rub hard on the wall. Bamboo sheets are very fragile, so it is better to decorate the corners with decorative moldings. So, now you know how to glue wallpaper on chipboard. If you want, it is not at all difficult to prepare the walls from chipboard and paste them with sheets correctly yourself. It will only take a little patience and time, and you will get excellent results. In addition, doing this work yourself will significantly save your money.


