Plasterboard wall covering is goodalternative to "wet" plaster. It is this that helps to avoid dirt that occurs when using various plaster solutions. In addition, plastering requires certain professional skills, and sometimes even specialists are unable to make a perfectly smooth wall surface. But all this can be corrected with the help of plasterboard. How to cover walls with plasterboard?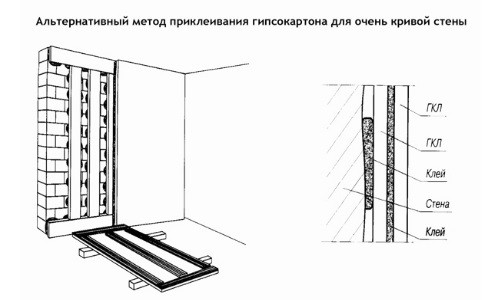 Scheme of leveling walls with plasterboard.
Types of drywall
Gypsum plasterboard sheets have a rectangular shape and, depending on additives and various additives, are divided into two types:
- normal;
- waterproof.
According to the method of application, the material can be:
- ceiling (9,5 mm);
- arched (6.5 mm);
- wall (12.5 mm).
Unlike simple plasterboard, it is moisture resistanthas a green color. It is used in rooms with high humidity. During the production of moisture-resistant material, water-repellent agents and antifungal additives are added to its mass. After installing plasterboard sheets in a room with high humidity, moisture-resistant coatings are applied to them, which include all kinds of primers, paints and ceramic tiles. Sometimes there is a fire-resistant one, which is painted red. It is used in fire-hazardous rooms. It differs from other types by the presence of special reinforcing fillers. Return to contents</a>
Advantages of wall plastering with plasterboard
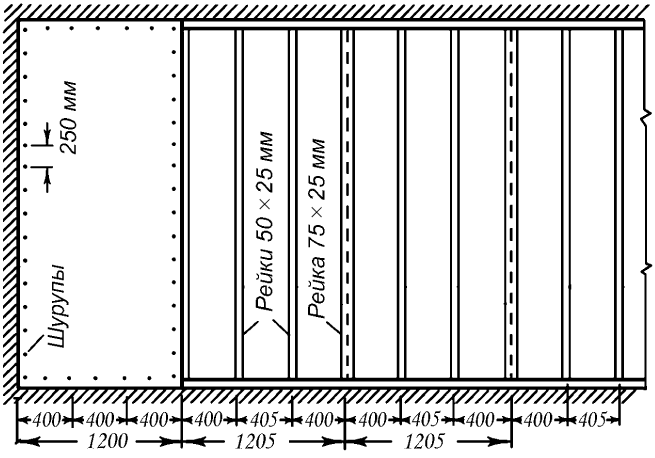 Scheme of plasterboard cladding on a wooden frame. Plasterboard sheets for wall cladding have many positive qualities:
- fast installation;
- after installation, the surface has a smooth and flat plane;
- after a certain preparation, the walls and ceilings are ready for applying any decorative coatings;
- almost all engineering communications are easily concealed under drywall sheets.
The only drawback is fragility.The material is much weaker than brick, and if certain fastenings for hanging large objects (plasma screen, heating battery, wall cabinet, etc.) are not provided in advance, then their fixation on the walls will be difficult. Return to contents</a>
Materials and tools necessary for wall plastering with plasterboard
The walls are covered with plasterboardusing a frame assembled from metal profiles. Sometimes a frameless system of fixing sheets to the walls with glue is used. This method is the cheapest, but is suitable for small unevenness of the main walls. To cover the walls with plasterboard, in addition to the sheets themselves, you need to calculate and prepare a certain number of metal profiles, which are divided into:
- wall profiles (CD 60, dimensions 60 × 27 mm);
- guide profiles (UD 27, dimensions 28 × 27 mm);
- universal perforated suspensions (butterflies).
The length of the wall profiles is selected depending on the ceiling height.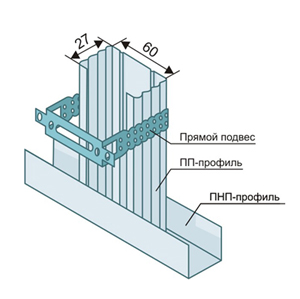 Profile fastening scheme. They are sold in standard lengths from 2 to 6 m. You will also need some tools:
- perforator;
- cordless screwdriver;
- screwdriver;
- knife for cutting gipsokartonnyh sheets;
- scissors for cutting metal;
- roulette;
- pencil;
- a three-meter rule with a level;
- water level.
Return to Contents</a>
Marking of walls for wall and ceiling plastering with plasterboard
First, you should determine using a plumb linethe curvature of the walls and, having chosen the most convex point in the room, select it as a basis. Then, along the wall, fix the UD 27 guide profile to the floor using screws or dowels. Before fixing it, lay a special rubber band under it, which will protect the assembled frame from vibration. Using the same plumb line, you need to transfer the direction of the guide profile fixed to the floor to the ceiling and put a mark on it with a pencil. Marks are made at the beginning of the guide profile and at the end. After this, use a cord to beat off a straight line between the marks. The guide profile should be fixed along the line obtained on the ceiling. This procedure should be done with all the walls of the room, otherwise the wall paneling with plasterboard may be incorrect. After installing the guide profiles, markings are made for the installation of CD 60 wall profiles. Markings should be started from any corner of the room, stepping back from the wall by about 40 cm, along the lower guide profile UD 27. The profile posts should be located at a distance of 400 mm from each other in the centers. Return to the table of contents</a>
Fastening of suspensions and profiles
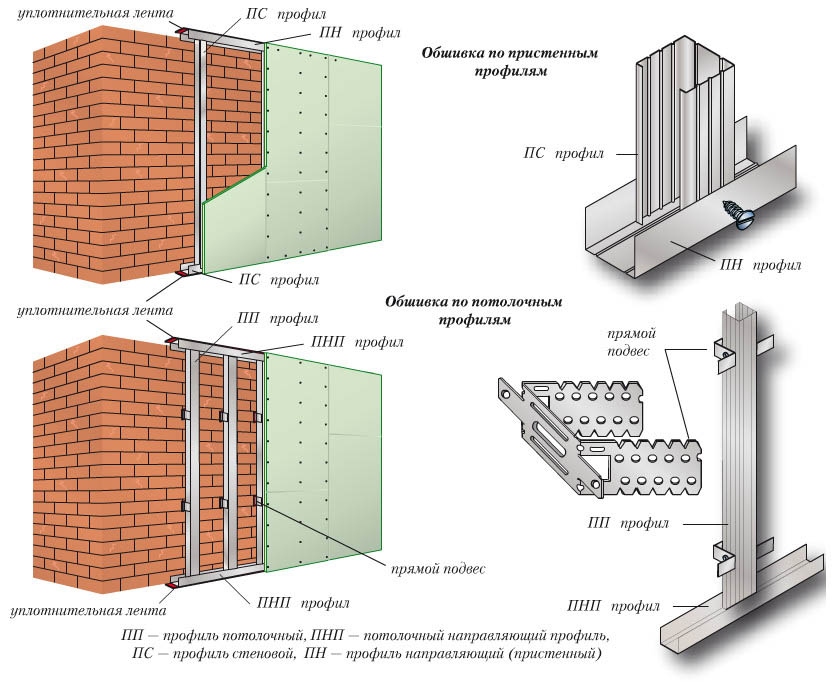 Scheme of wall covering with plasterboard onmetal frame. Universal hangers (butterflies) are attached along the beaten lines; the line should go through the center. The butterfly is attached using dowels, which are inserted into the holes drilled with a hammer drill. The distance between them vertically should not exceed 80 cm. If this distance is less, it is even better. Since the upper and lower guide profiles and hangers are already fixed, you can start installing the CD 60 profiles. In order to properly cover all the ceilings with plasterboard, the profile should enter its ends into the ceiling and lower profiles. If it is longer than the distance between them, it should be trimmed with metal cutting scissors. After it is installed in the guide profiles, it should be fixed according to the marks that were previously marked on the guides. It should be located strictly in the center of the CD 60 profile. The outer profiles located near the opposite walls are attached to the hangers first. They are set strictly vertically, after which a fishing line is pulled between them, which will help maintain a level surface. To be on the safe side, you can pull two or even three fishing lines. The fastening of the profiles during the sheathing of the walls with plasterboard is carried out with special self-tapping screws for metal, the length of which is 4 mm. They are called fleas, seeds, etc. among builders. The fastening of the profiles to the universal hangers is carried out with 4-millimeter self-tapping screws for metal. Sheathing the walls with plasterboard consists of giving rigidity to the frame. To do this, approximately at the height of the knee, hip and shoulder, you should install horizontally CD 60 profiles between the racks. The height dimensions are set according to the average height of a person. Return to the table of contents</a>
Sheathing of walls and ceilings
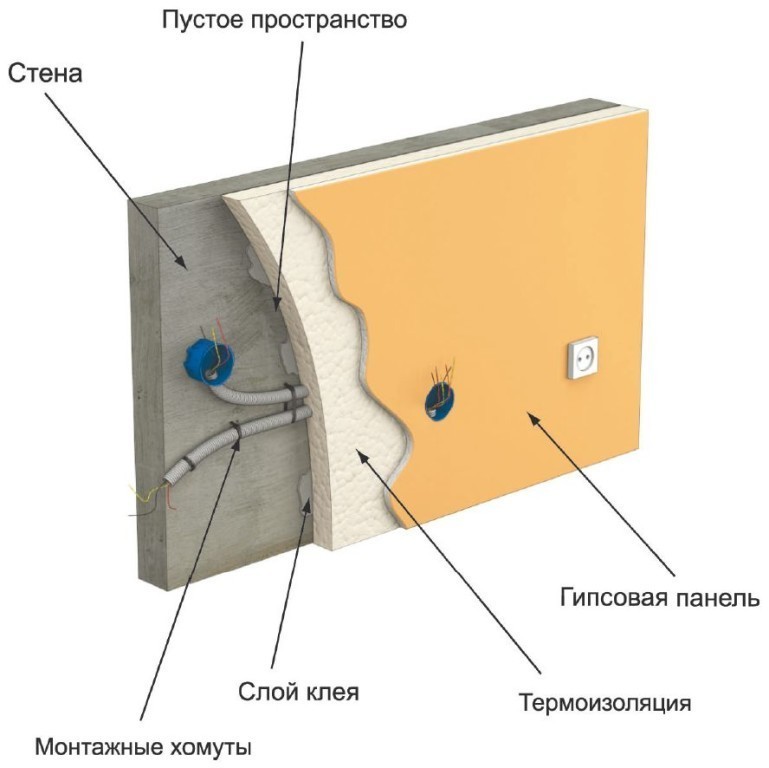 Wiring installation diagram for plasterboard.The plasterboard sheets are attached to the profiles using special self-tapping screws every 200-250 mm. The screw heads should be deepened into the sheet body by about 1 mm. This should be observed for high-quality finishing of the plasterboard wall surface. Since the sheet has a standard width of 120 mm, its edges should be exactly in the center of the profile racks of the assembled frame. This is provided that they were marked correctly. The first sheet is installed in the center of the first rack, which was fixed at a distance of 30-40 mm, after which further assembly of sheets continues. An insert cut from plasterboard is attached between the first sheet and the wall. It is attached to the corner profile and the first CD 60 profile rack. After that, the UD 27 guide profile is vertically attached to it (in the corner) with long self-tapping screws. Thus, it becomes possible to tie the corner of the room. The corner edge of the sheet is fixed to the UD 27 profile, and the center and the other edge to the CD 60 posts. If necessary, sheets can be joined with cut edges at the ends. The space formed between the wall and the sheets is filled with mineral wool. It additionally performs the function of sound insulation and insulation. Here was described in detail how to sheathe walls with plasterboard. Now everyone who does everything according to the instructions will be able to get an excellent result.</ ul>


