Wallpapering is the most popular anda simple type of wall decoration. The technique for performing this type of decoration cannot be called intricate. Therefore, even a non-professional can easily do wallpapering in an apartment. However, high-quality wallpapering requires following certain rules and nuances during the process. Scheme for gluing wallpaper on the wall.
Choosing wallpaper and preparing the necessary tools
In the modern construction market, wallpaper for wallsof any type of premises are presented in such a rich assortment that it is difficult to choose just one. Therefore, to begin with, it is worth deciding on priorities and choosing the most suitable material for finishing your home. It is better to paste over the kitchen and hallway with the most durable and wear-resistant wallpaper. Dense moisture-resistant vinyl, the so-called washable wallpaper, suitable for wiping with a damp sponge or cloth, is suitable here.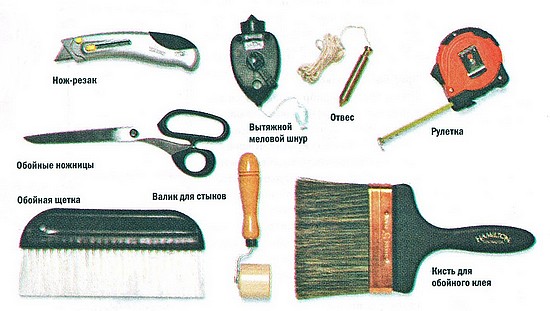 Wallpaper pasting tools.The bedroom can be decorated with any type of wallpaper in accordance with the design of the room. It is better to cover the children's room with inexpensive, environmentally friendly paper wallpaper, and here you can experiment with combining different colors. Expensive textile wallpaper or silk-screen printing will suit the living room. Pasting the walls with wallpaper requires the preparation of improvised materials and tools, which should also be purchased in advance. Here is a list:
- wallpaper paste and container for its dilution;
- putty and a narrow spatula;
- sandpaper and holder for it;
- a large ruler and a plumb line;
- knife or scissors for trimming edges;
- a wallpaper brush or roller of rubber;
- sponge or rag for wiping.
When everything is ready for repair, you can proceed directly to the process. Let's consider the sequence of stages of pasting the walls with your own hands. Return to the table of contents</a>
Alignment and marking of walls
 Preparing walls for wallpapering.The first step is to clean the walls of old wallpaper, if any. To do this, wet them with a damp sponge or roller and scrape them off the wall with a spatula. Then, using acrylic putty and a spatula, carefully level all the recesses and potholes on the walls, having previously removed any nails, screws, and hooks sticking out of the wall. After drying, the putty layer must be sanded using sandpaper secured in a special holder. Then apply a layer of primer. This will strengthen the putty and increase the degree of adhesion of the wallpaper to the wall. Now you can move on to marking the wall. To do this, in the corner next to the window, draw a strictly vertical line with a pencil using a plumb line or level; it will help you glue the first strip of wallpaper evenly. Then we decide on the upper and lower edges, measure the distance between them, add 5-7 spare centimeters to this number. This will be the length of the wallpaper. Preparation and marking of the walls is complete, you can move on to the next stage. Return to the table of contents</a>
Cutting the wallpaper and preparing the glue
The usual length of a roll is a little more than 10meters. If the wallpaper pattern does not require adjustment, one roll will produce 4 sheets, and taking into account the adjustment of the pattern, only 3 sheets will be produced. The remaining large pieces are usually used when pasting walls above window and door openings. Table for calculating the amount of wallpaper.Let's start cutting. Lay the roll out on the floor with the pattern facing up, measure out the required length (don't forget about the spare 5-7 cm), make notches along the edges, bend the canvas along these notches and go along the fold line with a knife. The first canvas is ready. Roll out another roll next to it, adjust the pattern, usually the pattern shift is from 15 to 50 cm. Cut out the second canvas to the size of the first. Measure and cut out the next 5-6 canvases in a similar way. After cutting the wallpaper, prepare the glue. The modern market offers a wide variety of glues: colored, colorless, for heavy vinyl and thin wallpaper. Having chosen the right glue, dilute it according to the instructions. Usually this is not a very complicated process. Pour the adhesive powder into a container with warm water in a thin stream, constantly stirring it and not allowing lumps to form. Then let the glue swell, hold it for a few minutes and stir vigorously again. Now the glue is ready to be applied to the wallpaper. Let's move on to the next step. Return to the table of contents</a>
Application of glue and the beginning of pasting
First of all, the ready glue is applied with a rolleror with a brush on the wall surface as an additional primer. Then we turn the prepared canvases face down and begin to apply glue evenly and thickly along the entire length, carefully coating the corners and edges. It is very convenient to use colored glue, when applying it, you can clearly see where the uncoated areas remain, and after drying it becomes discolored. The correct order for wallpapering a room.When the canvas is completely covered with glue, fold it "accordion-style" with the adhesive side inward, without pressing along the fold. Keep the wallpaper for the time indicated on the glue package, usually 5-7 minutes. In this case, you should follow the instructions exactly, since thick, under-cured wallpaper can peel off, and thin, over-cured wallpaper can swell and creep. When the glue has been absorbed, take the canvas by the top edge, climb onto a stepladder or chair, apply it to the very ceiling, carefully unfold it, simultaneously directing the edge of the canvas exactly along the marked vertical line. After making sure that the edge of the wallpaper coincides with the control line along its entire length, you can smooth the canvas using a special wallpaper brush or rubber roller. Carefully straighten the canvas, starting from the top and gradually running the brush down and to the sides, trying to expel the air remaining under the wallpaper and smoothing out the folds that have appeared. Remove any glue that gets on the front side of the wallpaper with a rag or sponge so that no stains remain after drying. Immediately after pasting the first strip, use a knife to cut off the excess wallpaper at the top along the marked line and at the bottom along the baseboard line. Similarly, paste the second and subsequent strips of wallpaper end-to-end to the previous one, trying to fit the edges of the strips well, leaving no gaps or cracks and not forgetting to carefully match the wallpaper pattern. When one wall is pasted, carefully coat all the edges of the strips with a thin brush, as they most often come off. Return to contents</a>
Sealing of corners, door and window openings
The most difficult part is gluingcorners. But if the first strip and all subsequent ones are pasted evenly, then it will not be so difficult to paste even a not quite even corner correctly. So, we paste the inner corner of the room. To do this, you need to measure the distance from the edge of the last pasted strip to the corner in its upper, middle and lower parts. Then add 1 cm to the largest of these distances and cut out a strip of wallpaper with this width. Thus, after pasting on the wall, this strip will slightly overlap the corner.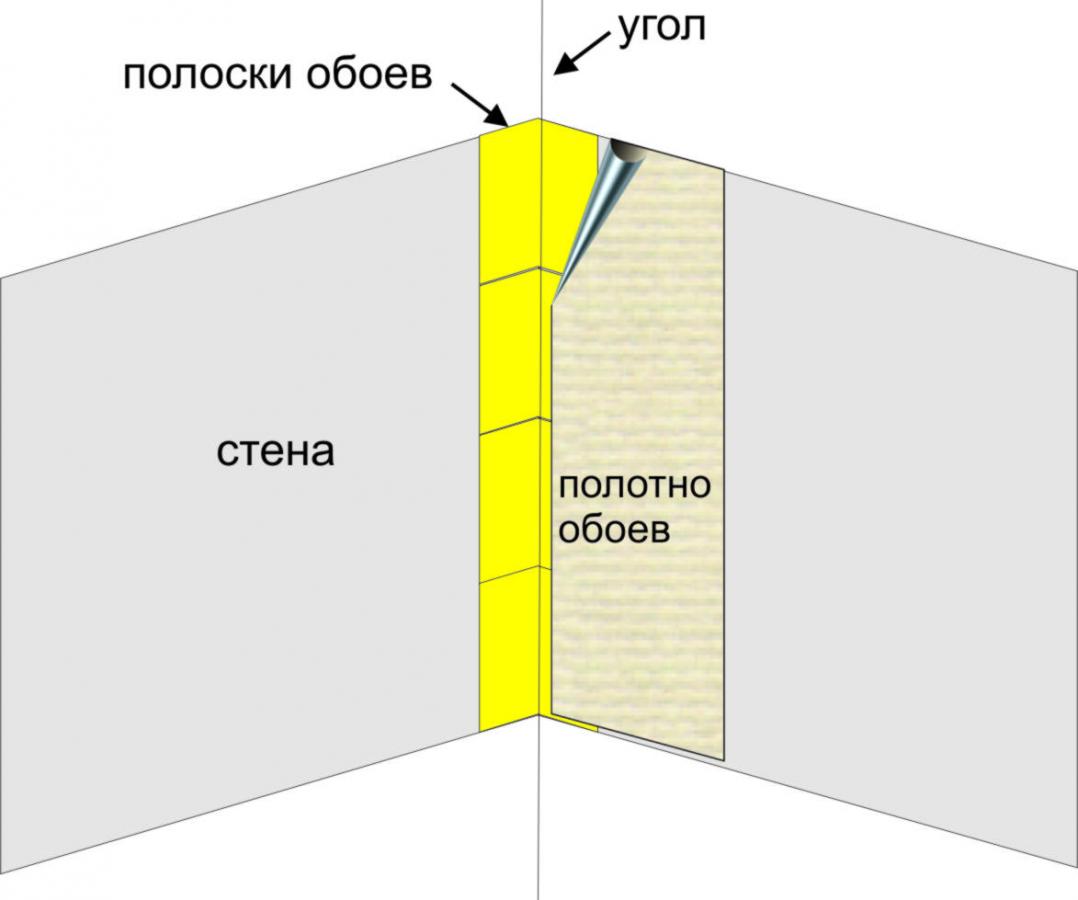 Scheme for gluing wallpaper in corners.Next, draw a strictly vertical line on the next wall that has not yet been papered, stepping back from the corner a segment equal to the width of the second strip remaining after cutting out the first. After marking, stick the second strip exactly along this line and smooth it out with a wallpaper brush. You can use the same pattern to paper the outer corners. Papering the doorways is done in the following order:
We cover the window openings using the same pattern asand doors, pasting the wallpaper overlapping the corner of the opening and cutting out the excess parts along the fold line. After finishing pasting the walls, it is necessary to close the windows and doors in the room for 1-2 days so that the walls dry well. Using this technology, you can independently and without great expense paste the walls of your apartment.


