The plasterboard ceiling is quitea strong and reliable design. However, for various reasons, defects may appear on it that spoil the appearance. You can repair plasterboard ceilings yourself. A small hole in drywall can be patchedindependently, major damage is usually not repaired, but the entire sheet of plasterboard is replaced. Such ceilings are simple in their design. Before starting to repair plasterboard ceilings, you should assess its necessity. Sometimes it is easier to dismantle the damaged ceiling and install a new one.
Features of the plasterboard ceiling construction
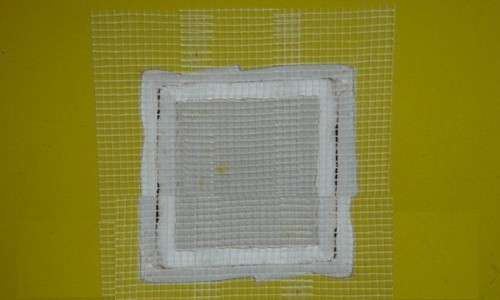
 The process of patching a hole in drywall.The most common design of a plasterboard ceiling is based on the creation of a suspended ceiling covered with plasterboard sheets. The basis of such a ceiling is a frame made of metal profiles. The frame is made as follows. Along the entire perimeter of the room, at a distance of 5-10 cm from the ceiling, guide profiles (U-shaped profile) are fixed. Fastening to the wall - screws screwed into dowels. The ends of the ceiling profiles (C-shaped profile) are fixed in these profiles. The profiles are located in the longitudinal and transverse directions, forming a checkered structure. The installation step of the profiles in both directions is 40-60 cm. In order to prevent sagging of the ceiling profiles, they must be fixed to the ceiling using hangers. Fastening the hanger - a screw screwed into a dowel. The distance between the hangers should not exceed 60 cm. At the intersection points, the profiles are connected to each other with a "crab" fastener. Sheets of plasterboard brand GKL with a thickness of 9 or 12.5 mm are installed on top of the frame. The sheets are fixed to the profiles with self-tapping screws. The distance between the screws is about 30 cm. The joints of the sheets and the places where the screws are screwed in are covered with putty. The finishing putty and outer coating are applied over the plasterboard ceiling. The electrical wiring of the lamps is fixed inside the frame. The wires of the built-in lamps are collected in a bundle and placed in a corrugated hose. With a two-level or multi-level ceiling design, the number of levels of the ceiling profiles corresponds to the number of ceiling levels. The guide profiles, accordingly, are fixed in parallel in several rows. Return to the table of contents</a>
Types of possible damage
 A crack in a plasterboard ceiling can be easily repairedputty The most common damage to a suspended ceiling is cracking of the plasterboard. Such cracks can be of different sizes. Their main location is in the area of the joint of the plasterboard sheets and in the places of their attachment to the frame. However, cracks can also develop on the surface of the sheet. Most often, such damage is caused by violations of the technology of installing the ceiling, in particular, improper fastening. Local non-observance of the horizontal surface has a significant impact on cracking of plasterboard ceilings. Cracks on the surface of the ceiling can also be caused by aging of the material, especially in the heating zone from a fairly powerful lighting device. Obvious defects include delamination of sheets. Local sagging of the plasterboard may be observed. This damage can be a consequence of installing a suspension with a greatly increased step or destruction of the suspension during the operation of the ceiling. One of the most dangerous causes of damage to the ceiling is its flooding. Long-term exposure to water leads to visible deformation of the plasterboard. Moreover, such deformation can affect both the outer cardboard layer and the entire volume of the sheet. Such gradual warping of the material can be observed in the bathroom if ordinary, and not moisture-resistant, plasterboard is used. Return to contents</a>
Minor ceiling repairs by own hands
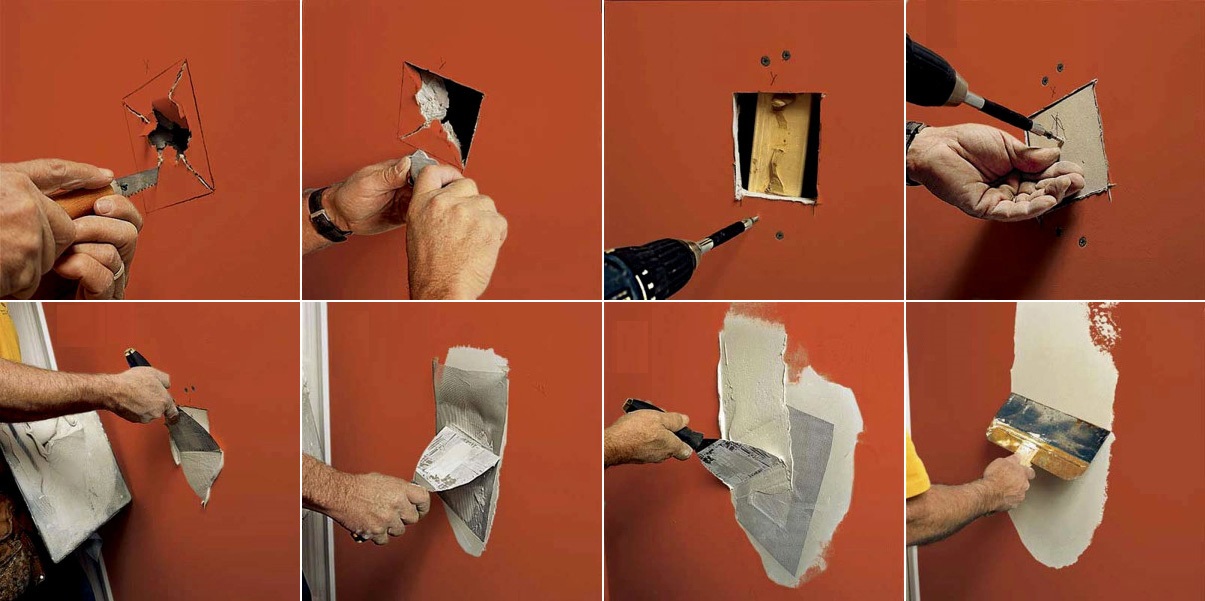
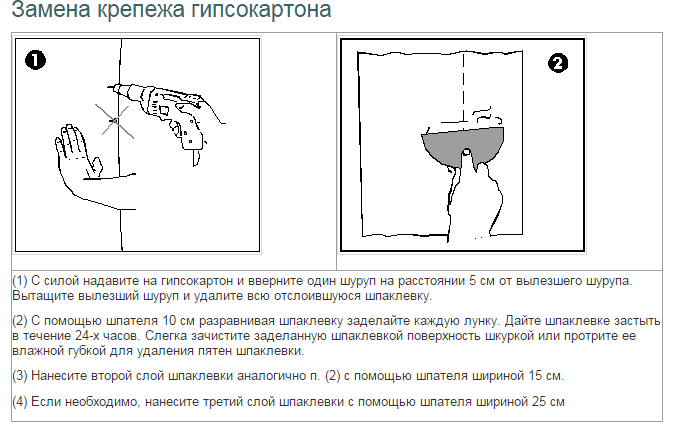
 Patching small holes in drywall.If during installation of plasterboard sheets a hole for a screw was not drilled in advance and it was screwed in under a decent load, then cracking of the material in the fastening area is inevitable. In this case, at a distance of 3-5 cm from this place, a hole is drilled in the plasterboard for a new screw, a chamfer is removed under the screw head. A new self-tapping screw is screwed in. The old screw is unscrewed with a screwdriver. The place of its fastening, including the entire cracking area, is carefully sanded with sandpaper. The hole and the adjacent area are filled with putty. After drying, this place is rubbed down and sanded. Such minor repairs are carried out on all identified fastening areas. Minor cracking can be observed in the area of the joint of the sheets. To carry out repairs, it is necessary to remove the mounting mesh and the old putty. Then, using a grinder, the entire seam between the sheets is processed. The first layer of putty is applied to fill the gap between the sheets. A new strip of paint mesh is installed in the distance of the seam. After the first layer has dried, the finishing putty is applied. If larger cracks appear both in the area where the sheets meet and along the plane of the sheet, the work becomes a little more complicated. First, the crack is widened with a knife or an awl so that the solution enters the crack deeper and is more securely fixed in it. The crack can be widened to 2-3 mm. In this case, it is necessary to strive for the crack to have a triangular shape in cross-section. Then, a primer is applied to the widened cracks with a thin paint brush. After this, a layer of putty is applied, which is rubbed and sanded after hardening. Return to the table of contents</a>
Repair of the ceiling with partial dismantling
 Removing bubbles from plasterboard jointssheets. In case of noticeable deformation or destruction of sheets, it is necessary to repair plasterboard ceilings, at least with partial dismantling of the structure. The damaged plasterboard sheet is removed by unscrewing the screws with a screwdriver. The frame, which was located under the damaged sheet, is carefully inspected and measured. If the frame is in perfect order and only the plasterboard is damaged, then it is not repaired, but simply replaced with a new one of the same dimensions (when replacing, it is especially necessary to check the conformity of the sheet thickness). The new sheet is carefully attached with self-tapping screws to the frame of the suspended ceiling. Certain difficulties may arise if the deformation of the plasterboard was caused by flooding. In this case, traces of mold or mildew could appear on the surface of the ceiling due to prolonged exposure to moisture. It is necessary to assess the condition of the main ceiling and, if necessary, treat it. The damaged surface should be cleaned and then treated with a solution of copper sulfate. After complete drying, a layer of plaster should be applied. Only after this is the new sheet of plasterboard secured.
 Replacing drywall fasteners.If after removing the plasterboard you notice damage or incorrect installation of the frame, you need to repair it. The most typical type of damage to the frame is the destruction or absence of the hanger. In this case, the damaged hanger is removed and a new hanger is attached to the dowel in its place. If the place where the dowel is attached is damaged (for example, due to moisture), the hanger is removed from the ceiling profile. The damaged area in the ceiling is filled with putty. It is advisable to prepare a new place for the hanger 4-5 cm to the side of the previous attachment point. A new hole is drilled using a hammer drill or an electric drill and a dowel is attached to it. The hanger (new or old) is attached to the new dowel. The ceiling profile is attached to the hanger. You should do the same if for some reason the hanger was not installed earlier during the installation of the frame. After installing the hanger, a sheet of plasterboard is attached. If damage to the ceiling profile is detected, or if the installation pitch of the profiles does not comply with the standards, the ceiling profiles are dismantled. They are carefully inspected from below and repaired, if possible. Repair usually involves cutting out the damaged area and joining the profiles. The profiles are joined using a standard U-shaped fastener or a metal strip. The main thing is that the ceiling profile retains its rigidity along its entire length. Return to contents</a>
Required Tools
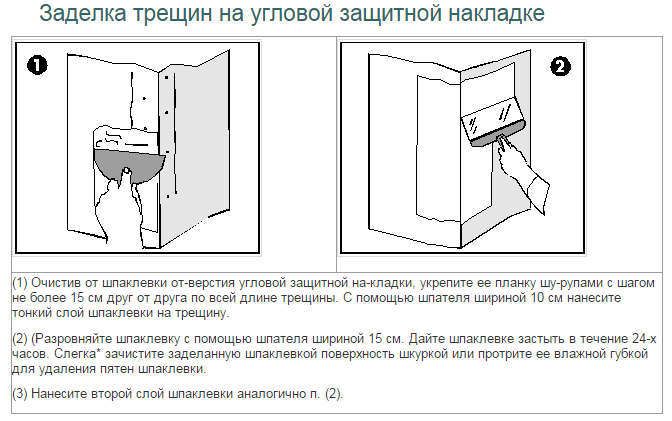
If you need to repair the plasterboard covering yourself, you should prepare the necessary tools: Sealing cracks in corner trim.
- Bulgarian;
- perforator;
- Grinder;
- electric drill;
- hacksaw;
- hacksaw for metal;
- jig saw electric;
- scissors for metal;
- a hammer;
- knife;
- awl;
- screwdriver;
- pliers;
- vise;
- roulette;
- the meter line;
- construction level;
- paint brush;
- roller;
- abrasive sandpaper;
- grid grinding;
- putty knife.
The plasterboard ceiling creates a unique lookinterior. If any circumstances have led to its damage, then you should not be upset. Repairing a plasterboard ceiling is a fairly simple and affordable undertaking.


