Non-woven wallpaper can be of two types:with a pattern and for painting. Such products can easily mask the flaws of the walls that remain after repair work. Therefore, non-woven wallpaper is in great demand. To glue them, you do not need to have any special skills.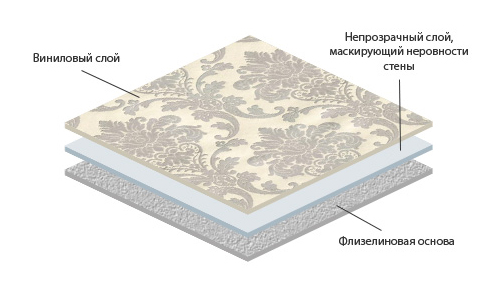 The structure of layers of non-woven wallpaper.It is important to know that the non-woven base can slide along the wall, so you can do the pasting without outside help. If you choose paintable wallpaper, you can easily change the color scheme of the interior. In this case, the room will always seem fresh. Today, wide wallpapers are rarely used, but you can find a large amount of this material on sale. Such wallpapers have some advantages:
- wallpaper large width can greatly simplify the process of gluing;
- in this case there will be a minimum number of seams, which spoil the appearance of the room.
Necessary preliminary work
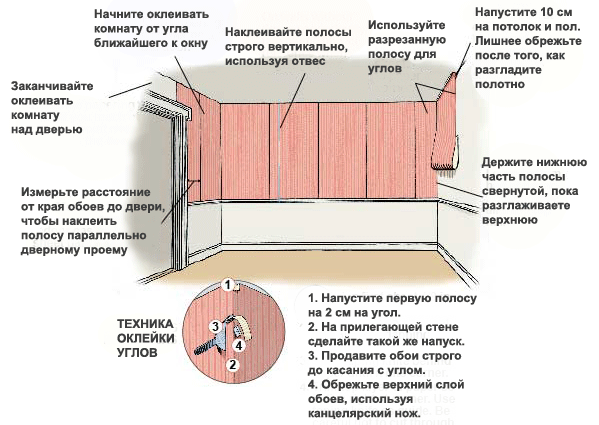 Scheme for gluing non-woven wallpaper.In order for the pasting to be done qualitatively, it is necessary to perform some preparatory work. First of all, it is necessary to calculate with maximum accuracy the number of rolls of material that will be needed to wallpaper the room. To do this, it will be necessary to measure the width and height of the room on each side separately. In the process of calculating the required number of rolls, it will be necessary to add a few centimeters to the length of the canvas on each side as a reserve. For clarity, you can draw a diagram on paper. In the process of choosing non-woven wallpaper, it will be necessary to pay attention to the batch number, which is indicated on the packaging. It should be the same on all rolls. If there is a pattern, it should also be identical. In order for the wallpaper to lay correctly on the wall, it will be necessary to prepare the room. The walls must be carefully leveled. This is especially important to do if you plan to paste wide wallpaper that will not lay correctly on uneven walls. If the surface is not leveled, this will subsequently affect the quality of the joints.
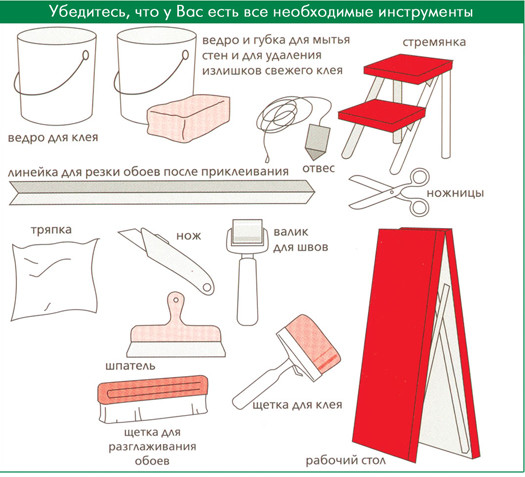 Tools for .Sockets and switches will need to be dismantled. Wires will need to be insulated so that the adhesive mixture does not get inside the boxes. All walls will need to be carefully treated with a primer mixture, then dried. To glue non-woven wallpaper, you will need to prepare the following elements:
Return to Contents</a>
Technology of gluing flizeline wallpaper by own hands
First of all, you will need to do some marking.walls. Non-woven wallpaper has an excellent edge and is pasted end-to-end. The marking should start from the corner of the room. In these places, the canvas will be pasted with an overlap so that they can be processed correctly. If you plan to paste a material 1.06 m wide, then 1 m will need to be set aside in all directions from the corner. Using a plumb line or a building level and a simple pencil, you will need to mark a vertical line at the height of the builder. With a tape measure, you will need to mark 1.06 m from the drawn line. In this way, you will need to draw all the walls. Next, the floor is covered with polyethylene film. You will need to roll out the roll of wallpaper on it with the front side down. If there is a pattern on the material, it will be necessary to take it into account when cutting the canvas.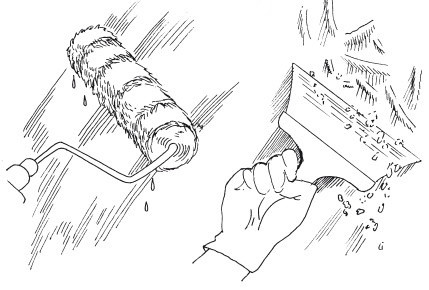 Scheme of preparing a wall for wallpapering.If there is no pattern, you will need to measure the height of the room with a tape measure in the place where the piece of wallpaper will be pasted, and you will need to add another 10 cm. The roll is folded onto the unrolled part so that the edges coincide. In this case, you will get an even fold. You will need to run your hand along the fold, and then cut it with a construction knife. In this case, you can also use a new stationery knife. In this way, wallpaper is prepared for the entire room. The sheets will need to be rolled into loose rolls so that the front side is on the inside. Thanks to the non-woven base, there should be no problems in this case. Next, you will need to dilute the adhesive mixture according to the instructions. Only adhesive solution for non-woven wallpaper is allowed to be used. Water is poured into a prepared container, after which glue is poured in a thin stream. During the preparation of the mixture, it must be constantly stirred to prevent the formation of lumps that can interfere with high-quality pasting of the wallpaper. The adhesive solution should stand for a while to swell. A plastic mesh can be installed in the container to remove excess glue. The roller will need to be immersed in a container with the solution, then run it along the mesh. Next, you need to spread glue on the wall to glue one sheet. The sheet should be glued starting from the top. You need to take the outer part of the sheet, then apply it to the wall. The roll slowly goes down, in the process you need to smooth the wallpaper from the middle to the edges with a brush. In this case, you can also use a plastic spatula, but all actions must be performed carefully, as the wallpaper can be damaged.
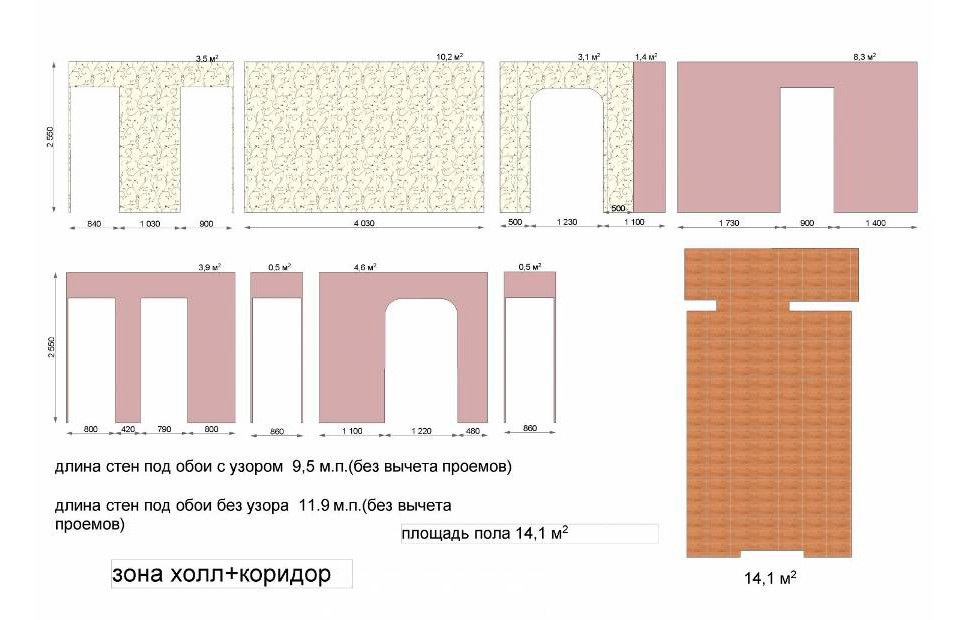 Scheme for calculating wallpaper for a room.When gluing non-woven wallpaper, make sure it fits tightly to the wall. No bubbles or folds are allowed. After gluing two sheets, roll the seams of the material with a roller. The piece of wallpaper that remains at the bottom will need to be carefully cut off. This should be done after the wallpaper has dried. It is necessary to calculate everything so that the baseboard installed later can cover the lower part of the wallpaper. A border of the required thickness can be installed at the top of the wall. Return to contents</a>
How to glue non-woven wallpaper on the corners
The first thing you need to do is prepare the corner.premises. This should be done while the walls are being puttyed. The corners are equipped with plastic devices that are attached to the walls with putty. The entire product must dry completely, only after that can you start gluing the non-woven wallpaper. During the gluing of the corner, the wall and the plastic corner must be carefully coated with an adhesive mixture. The sheets will be placed with an overlap; it is not recommended to glue the whole sheet to the corner. In most cases, the corners in the rooms are not ideal, which may cause defects: the corners of the material will wrinkle, the strip will become skewed. To avoid this, you need to glue the corners correctly. The sheet should be glued in such a way that there is a small overlap on the wall that is located next to it. The next strip is glued to the other wall, it is glued to the corner with a small overlap. Then this "tail" is cut with a construction knife, you need to orient yourself along the vertical of the corner. As a result, up to 2 cm of the canvas from the adjacent wall will be glued under this canvas, the first canvas will rest against the corner with its edge. Return to the table of contents</a>
Sticky fleece wallpaper on the ceiling
It is quite rare to find a ceilinga structure without cracks or bulges. To solve this problem, you can glue the material on a non-woven base to the ceiling. As a result, all the defects will be hidden. Ceiling wallpaper on a non-woven base does not stretch. Bubbles will not form during the application of the adhesive mixture. The canvas is easy to lay out and straighten on the base. First of all, you need to apply the adhesive mixture to the ceiling structure. It should be noted that this solution can only be applied to a clean and dry base. After that, the structure is covered with a primer to improve the adhesion of the adhesive solution. In this case, you will not need to carefully fit the wallpaper end to end. However, there is some peculiarity. Wallpaper sheets are overlapped, and the joint line is aligned by cutting off the excess along the line of the previous one. If the technology is followed, you can get an even row of canvases. Then the material must be given time to dry. However, it should be remembered that fresh air will disrupt the process. Accordingly, all doors and windows in the room must be closed. When the wallpaper has dried, you can paint it. The first thing you need to do is decide on the color. Delicate tones are best suited for the ceiling structure. When choosing a shade, remember that it should match the color of the walls. You can use water-based latex paint for painting. It is applied with an ordinary roller. The mixture should be applied perpendicular to the window. There should be 2 layers of paint on the wallpaper. This way, you can exclude unpainted areas. Particular attention should be paid to painting the seams of the cornices. If you know the technology and follow the correct sequence of actions, you can qualitatively decorate the room so that it gets a new life and pleases you for a long period of time. When you get tired of the existing design of the room, you can buy paint of the color you like and repaint the wallpaper again if the corresponding material was previously glued. This is much easier and less expensive than doing new repairs with removing old wallpaper and pasting the walls with new ones. This way you can maintain the novelty and desired aura in the room.


