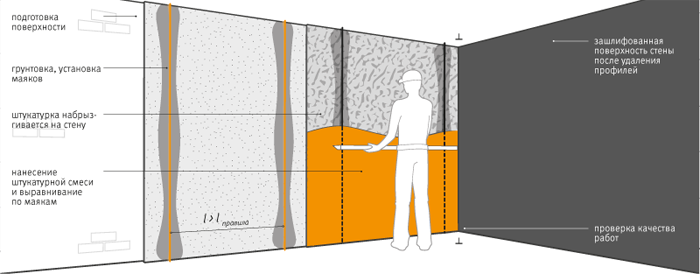
Proper preparation of walls for plaster of good quality is a guarantee that the plastering of walls will be reliable and even.  Scheme of preparation of the wall for applying plaster. To prepare the wall for plastering, you will need to purchase the following tools:
How to prepare the wall for plaster?
 Scheme of wall penetration before plastering. Before plastering the walls, you will need to remove the old layer of the decorative coating, if present. This will be necessary in order for the new coating layer to have a reliable connection with the base and be of good quality. If the base was painted, then before the work of other works, the old layer of paint should be removed. In order to remove the enamel, you will need to use a spatula, a metal brush and sandpaper with large grains. In this case, you can use a remedy for eliminating enamel. If the base is pasted with wallpaper, you will need to remove the old wallpaper with a spatula. In places where the wallpaper does not lag, you need to apply a solution to remove wallpaper. Before applying the solution you will need to read the instructions. If there is a layer of old plaster, then it is recommended to completely remove it, since in this case there is a possibility that the new finishing layer can begin to move away from the wall at the same time as the old one. This can be explained by the fact that earlier in the process of construction, primers were not used, and in plaster from sand and cement adhesion is not the best. Therefore, from walls of concrete plaster will need to be knocked down. It is necessary to pay attention to the places of joining wall panels to the outer wall.
  Scheme of priming the wall. In most cases, there is a gap in these seams, and plaster is only present from above. It is recommended to treat such places with construction foam before finishing. On the walls of plaster and brick it is also recommended to bring down the entire plaster layer for safety reasons. However, in this case, you can clean only those gaps where the plaster lags behind the wall. In order to check the strength of the old layer of plaster, you need to knock on the solution with a hammer. In problem areas, the building mix will ring. In places where the mixture is kept well, no sound will be heard. Back to contents</a> Cleaning the base and primer Beforeit is necessary to determine the placement of electrical wiring in the wall with a tester or a special detector. Before cleaning the base, you must disconnect the room from the power supply. After the old finishing layer is removed, all walls must be covered with a deep penetration primer. This needs to be done in order to be able to create a film to protect and improve the adhesion of the mortar to the substrate. Otherwise, the walls will absorb water from the plaster, while it will dry before it collects its strength. On smooth bases and gaps with potholes and significant differences it is necessary to fix the plaster grid. In most cases, the wall of bricks plaster will cling well, because such a grid can not be mounted. Back to contents</a> Preparation of walls for plastering: how to install beacons?
  Scheme of installation of lighthouses for plastering. The beacons are used as vertical guides, they specify the thickness of the layer for alignment. The constructions are beacon profiles in the form of the letter "T", which are made of galvanized metal. The thickness of the beacon rib should be approximately 6-9 mm. Beacons with ribs of great thickness are more rigid, they are easier to install. However, the consumption of the leveling solution will increase by about 1.5 times. Beacons are used to get a perfectly flat base. Mounting beacons for plastering is a very important process, from which the final result will depend to a large extent. For the installation of beacons, a large level of construction is needed. The length of the tool should be equal to the length of the beacons. You will also need to buy a nylon thread and the beacons themselves. Mounting beacons should start at opposite ends of the wall. From the angle, you should retreat 18-20 cm, then set the initial profile vertically, which will use the level. Further it is necessary to note its placement. The beacon is fixed to the wall with the help of a building compound: the mortar is applied to the prepared mark, after which the beacon is pressed against the wall, and it is necessary to control the vertical position of the structure.
 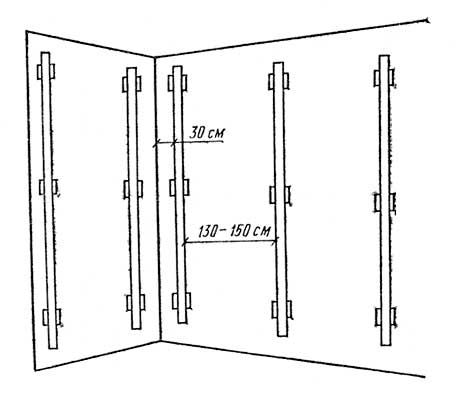 Layout of lighthouses. The same operation is repeated for the opposite node. Between several beacons you need to pull a nylon thread, which can give an idea of the future wall plane. If you do not use the thread, then the base of the wall can go in waves, resulting in a "belly". The thread must be tensioned as follows: between the beacon and the corner, you will need to drill a hole, and then insert the plug into it. In the dowel, you need to tighten the screw so that the hat of the latter is placed slightly above the level of the implied wall plane. In the same way, you need to screw the screw on the other side. Between them, you should pull the thread so that a gap of 1 mm appears between the thread and the distant beacons. You can pull 2 threads - at the top and bottom. The other beacons need to be put out the same way as the previous ones. However, in this case, in addition to the level, you will also need to use a thread for monitoring. As a result, all beacons must create the same gap with the thread, and the thread with the beacon is not allowed to touch, since this can lead to a deviation from the plane. The distance between nearby lights should be such that the rule can freely block it and do not come off. Mounting beacons should be carried out qualitatively, as this will depend on the plastering of walls on the beacons and the success of further finishing. Back to contents</a> Preparation of walls for plaster: preparation of mortar There are several methods for obtaining a ready-made plaster mixture:
 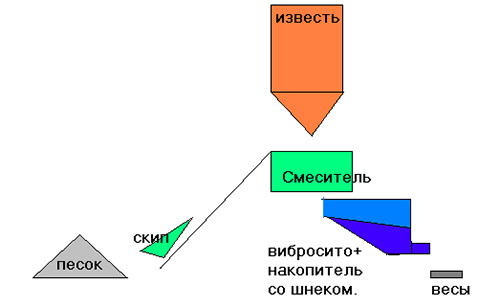 Scheme of making a calcareous dry plaster mixture.
In order to prepare the solution from the dry mixtureplaster, you need to prepare a container (for example, a bucket or a basin) and a construction mixer or electric drill with a special nozzle. The mixture should be placed in a container, then diluted with water. Water will give a solution of plasticity and contribute to its setting and solidification. Water should be taken in such quantity that the building mix has got a consistence of the test or sour cream. In this case, everything will depend on the layer of plaster to be applied. It is important to add the necessary amount of water to the dry mortar, since with too much or a small amount of water, the plaster will be unstable. Mix the plaster mortar with a construction mixer or electric drill with a special nozzle mounted on it. The solution must be allowed to stand a short amount of time, after which it must be stirred again. The mixing proportions and the method of preparation are in most cases indicated by the manufacturer on the packaging of the dry mortar. Back to contents</a>
How is the preparation of the walls for plaster made of wood?
 Scheme of the plaster wall. On smooth walls of wood, plaster will not hold, therefore it will be necessary to cover the wooden bases first of all with the following materials:
- reinforced mesh;
- shingles of wood;
- reed mat.
Дань - special рейки which are received frompieces of round pine forest. In most cases, the length of such rails is 1-2 m. Drill should be stuffed on the base with nails on one rack or ready flaps. A profiled drill consists of narrow rails of small thickness. The lath is packed at an angle of 45 ° with respect to the base of the floor. The pitch of the slats should be 45x45 mm. Planks need to be fastened with nails so that they do not fall off. The length of the nails should be approximately 30-40 mm. After the output drill is nailed, the nails will need to be pulled out. After that, the strike is pummeled to the strike. Before nailing the slats, it is recommended to moisten with water so that they do not crack. Nails need to be scored in staggered order with a small offset from the center. Outlet drill is made of racks of great thickness. The width of the elements is approximately 18-20 mm. Reiki of a small thickness crack when nailing. Reiki too wide can begin to swell from the water and crumple, which leads to rupture of the plaster. Outlet drill first thing should be nailed to all ends of the rails, while nails are driven at an angle of 45 °. The point of the nails is directed toward the end of the drill, so that the latter is stretched. In the future, the fastening of the drill with intermediate nails is carried out through several piercing rods on the walls. The ends of the racks are not allowed to be connected exactly to the back, as in the process of swelling they will tear the plaster. It is necessary to leave a distance of several millimeters. To the plastering of the walls it is possible to pass only after carrying out all the necessary preparatory work. </ ul>


