Unaffected by the septum kitchen andThe living room is an indispensable attribute of studio apartments. The lack of a wall between the living room and the kitchen is not only a tribute to fashion, but also helps to rationalize the use of the area of the room located under a single ceiling.  Figure 1. Finishing a doorway without a door. Dimensions of the arch must be combined with the volume of the room and the width of the walls in it. Nevertheless, the areas united by common walls have several different purposes, so these zones need at least a visual separation. It can be done by installing on the dividing line some kind of construction like a rack, to trim the walls, floor and ceiling on both sides of the visual boundary of the zones with different covers, but the best way of zoning is the arch device. It is the most stylish solution when dividing a common space. The arch creates a feeling that the apartment has 2 rooms, while being in each of the studio zones, you do not feel limited space.
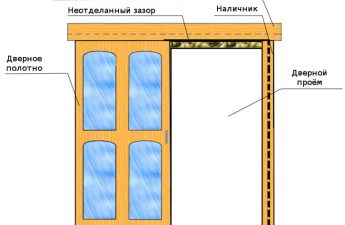
Best material for the arch - drywall
The easiest way is to draw a distinction between the kitchen andliving room arch plasterboard. This material is extremely easy to process and install and relatively cheap. In addition, gypsum plasterboard surfaces can be finished with a wide variety of facing materials. The arc from the GKL can be given a different configuration, which gives you the opportunity to fantasize over the design of the decorative partition. One of the options for distinguishing 2 zones of an apartment is shown in Fig. 1. Back to the table of contents</a>
Preparatory stage
Such designs are easily mounted on the ceiling and connect the opposite walls. In order to make an arch between the kitchen and the living room, you need to prepare the following materials and tools: 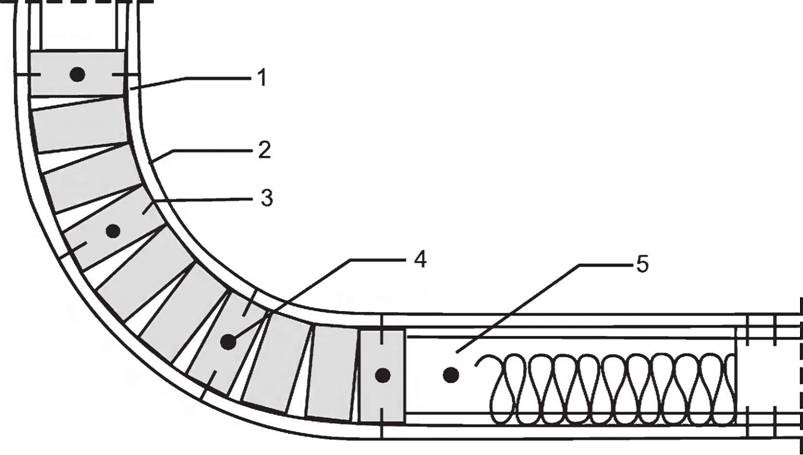 Figure 2. Bending of the guide profile: 1 - section on the profile, 2 - gypsum board, 3 - segment of the cut profile, 4 - dowel-nail, 5 - straight profile.
- drywall;
- UW- and CW-profiles;
- self-tapping screws 3,5х9,5 mm with press washers;
- self-tapping screws 3,5х45 mm;
- dowel-nails 6x60 mm;
- level;
- roulette;
- pencil;
- construction knife;
- a painting line;
- a piece of chalk;
- scissors for metal;
- impact drill;
- Screwdriver;
- sickle-wings;
- a primer;
- putty;
- roller or brush;
- spatulas.
First you need to decide which form will beThe arch at the exit to the living room, and measure the distance between the walls. It's better if you take a template for the side faces of the arch from the dimensions taken. It can be cut from plywood, radio card, paper, etc. With the help of a pattern, it will be easier for you to create 2 identical sidewalls of a decorative partition. This template is useful to you and when manufacturing a profile for a future arch. Beat the ceiling line between the zones on the ceiling. Using the level, put on the walls of the vertical. Along the lines to the surfaces will be attached UW-profiles. Before they are assembled, drill holes in the base of the profiles, the step of which should not exceed 30 cm. The number of holes on the wall slats depends on their length, but in any case they can not be less than 2. 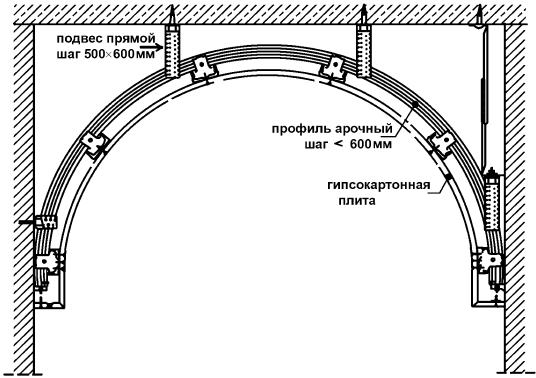 Scheme of mounting an arch of plasterboard. Press each guide to the appropriate plane and leave marks on it with a pencil. After that, in the ceiling and walls are drilled blind holes for dowel-nails. Insert the dowels into them, press the profiles to the ceiling and the walls and secure them. Strip the contact sides of the guides with screws. Perhaps you want the crossbeam of the arch to be as low as possible. In this case, you have to connect the walls of another guide, and between it and the ceiling profile, you need to insert CW-profiles at a distance of 60 cm from each other. They are attached to the guide screws with press washers. It should be said that the number of ceiling and wall guides will depend on the thickness of the arch. If it is wide, you will need to install 2 rows of profiles. For an arch 10 cm thick, the first row is sufficient (the profile width is 7.5 cm, the thickness of each sheet of gypsum board is 1.25 cm). Back to contents</a>
Installation of drywall
After mounting the frame, you can attach it insideit is wiring if you plan to install lighting fixtures in the arch. Now cut out the sheets of gypsum cardboard and fix them on the frame. When screwing the screws, place them 15 cm apart. Do not screw fasteners closer than 1 cm from the edge of the sheets. Position the angled screws 10 cm from the corners of the GCR. It remains to make the crossbar of the arch. Cut the profile as shown in Fig. 2, and screw it to the plasterboard so that the uncut base of the CW is located at the bottom, in the form of an arc and does not protrude beyond the edge of the gypsum boards. Of course, you remember that for a wide arch you need 2 rows of curved profile. Between them self-tapping screws are screwed from CW-profiles, reinforcing the structure. In their butt-end, incisions are made along the width of the base of the curved bar. Lateral antennae curl, and the remaining plates are pulled together with an arc of self-tapping screws. 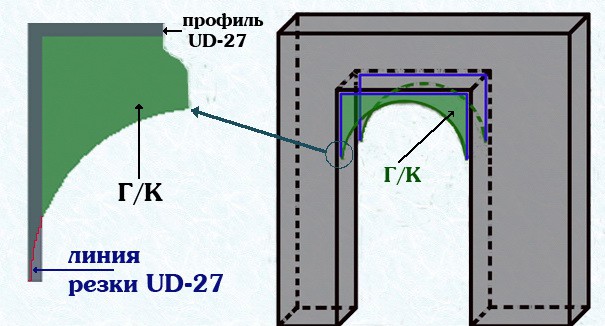 Scheme fixing the profile and plasterboard to the arch. Since the arc of the arch has a large radius, it is possible to bend the GCR for the arch without soaking it in water. The crossbar is manufactured as follows.
Back to contents</a>
Leveling of surfaces by puttying
It does not matter that, at first glance, the arch seemsstepped. All this is corrected by putty. First of all, the surface of the arch is treated with a primer. At the seams and joints glued sickle, then putty putty. It also closes holes in the places of screwing self-tapping screws and possible dents. After solidification of the first layer, the entire arch is shpatlyuetsya. After sanding it is ready for finishing. Having finished the work, feel free to invite friends to the renovated living room. </ ul>