Drywall is a modern, technologicalmaterial. Rare repairs do without its use. But he also has a significant drawback: the material is easily damaged by mechanical action. Many can make a hole in the drywall, but the process of its sealing causes difficulties. Accidentally breaking through the hole in the skin, do not despair. Its embedding will not cause any special difficulties. The necessity of restoring the surface can also arise after the excess hole in the drywall is executed.  Structure of drywall sheet.
Tools and materials
To seal the unforeseen damage you need a small set of tools from the arsenal of the finisher. List of tools:
- pencil;
- gon;
- strong knife;
- Hacksaw on the GCR;
- a hacksaw on wood;
- Screwdriver;
- crown for GCR;
- brush;
- putty knife;
- grinding grid holder.
List of materials: 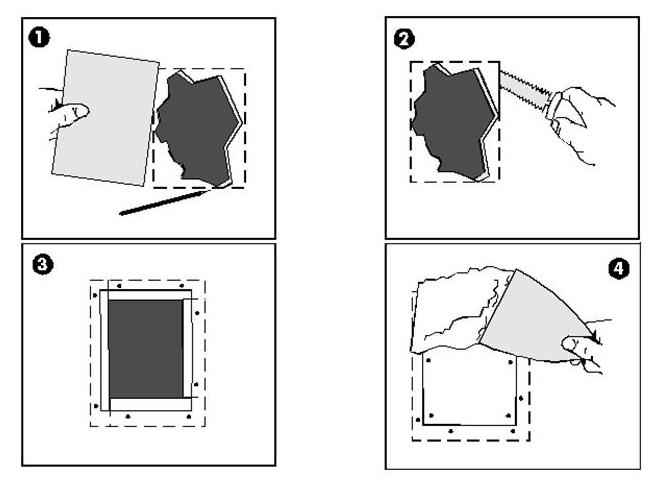 Scheme for fixing a hole in the wall of gypsum board.
- wire;
- panel material;
- self-tapping screws;
- paper;
- primer;
- cutting off the GCR;
- putty;
- ribbon-serpyanka;
- grinding mesh.
Back to contents</a>
Performance of works
Depending on the size of the hole and the availabletools and materials for embedding can be used in different ways. Small holes from unnecessary more dowels are eliminated by filling with putty. If the hole in the plasterboard is formed from the impact and has loose, cracked edges of uneven shape, to seal it you need to cut a larger hole with a clear, even edge. All damaged areas should be removed. Small round elements are cut out by a crown for podrozetnikov and dot fixtures. Larger sites are harder to cut out. On the wall is a correct geometric figure (rectangle is most convenient), the initial section of a straight line is pierced with a knife and dopilivaetsya hacksaw on gypsum cardboard or in its absence by the same knife. To seal a section with a diameter of up to 50 mm, it is enough to damp out of wet paper and kneaded putty of the appropriate size and fill it with a hole. The edges of the holes must be pre-primed. Using a spatula, the patch aligns flush with the plane. After hardening of this patch, it may be necessary to treat the surface of the patch with a finishing putty.  Schemes for repair holes in the GCR. To seal more damage, you have to use a patch from the remaining piece of GKL repair. Before you cut the hole, you need to prepare a piece of sheet size that overlaps the disturbed area. The cut covers the hole, and its contour is marked on the skin with a pencil. According to the outline you need to cut a hole in the plasterboard. At the edges of the hole and patch, a 2/3 of the thickness of the sheet is removed with a knife. The wooden strips are cut with a knife, longer than the hole size by 10-15 cm. The slats are inserted into the holes, their edges are fixed by screws on the gypsum board through it. The number of bars depends on the size of the damage. They are placed in a row with an indent from the edge of 2-3 cm and at a distance of 20-25 cm from each other. The patch is screwed by screws to the slats in the formed niche. Its perimeter is primed. The joint of the patch and the base sheet is glued to the sickle and filled with the seam filler with a spatula. For ceiling damage, another method is applicable. It is necessary to prepare a section of any shield material with a size slightly exceeding the dimensions of the window. This can be chipboard, fiberboard, OSB, laminate, MDF wall panels and similar materials. It is better to screw in several screws in advance so that their heads protrude from the material. Between them a piece of wire is intertwined. In the middle of the workpiece, two small holes are made along the diameter of the wire. A piece of wire is threaded through them. The resulting blank is inserted into the cut out window. With its oblong form, this should happen. The edges of the niches are primed. In the second shield element, which will be a formwork, it is also necessary to make a hole for passing the dangling ends of the wire. The ends are put into it, a portion of putty is applied to the surface of the lower element. The formwork is pressed against the ceiling and fixed in this position by tightening the wire. Excess putty is squeezed out on the sides and removed with a spatula. After solidification, the wire dissolves. The formwork is knocked aside. With any method of restoring the integrity of the sheathing of the unevenness on the surface of the frozen putty, they are sanded with a grinding net. After applying the finish coat, the repaired area is indistinguishable from the adjacent areas. Guess where there was a hole in the plasterboard, only one who could seal it can. </ ul>


