The coffee table is, undoubtedly, useful andconvenient thing. The market of furniture for today is full of offers of such tables from DSP, metal, glass and plastic. However very often the consumer searches for something especial and exclusive, refusing the standard options.  Zhkrnalny tables have quite high prices,but, unlike other furniture, it is quite easy to make them yourself. There is also a solution for such consumers: make. This is not only an entertaining and interesting process, but also savings, because furniture assembled from chipboard in any case will cost much less than a store product.
Preparatory work
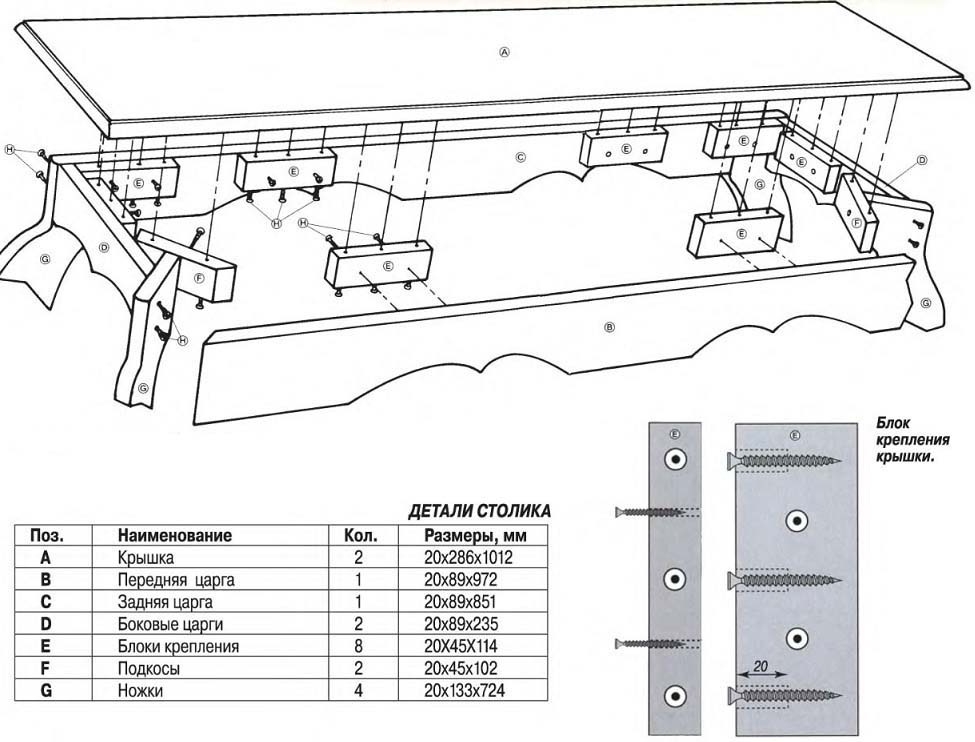
Before proceeding with the manufacturing processtable, you need to determine its appearance. After that, draw the drawings of each element and cut out the patterns. The diagram shows the corresponding parameters. Create the coffee table will help the following set of tools:  Scheme 1. The size of the coffee table.
- pencil and ruler;
- roulette;
- Screws;
- a hammer;
- screwdriver;
- Particleboard, it is possible to use laminated boards 16 mm thick;
- hacksaw or electric jigsaw;
- drill;
- a furniture pipe with a diameter of 30 mm;
- flanges under the pipe;
- insulating tape;
- sandpaper;
- washing;
- the overhead profile;
- glue;
- rubber wheels.
On the chipboard it is necessary to impose patterns, circlepencil on the contour and scratch with a nail, so that in the following the canvas does not split. At the bottom of the pattern of the tabletop, a contour of the legs is cut out, which must be transferred to the parts. Carrying out the central line, it is necessary to mark out 3 holes with a depth of 1.2 cm, and cut them with a drill (8 mm). To monitor this procedure, it is recommended to use electrical tape. On the outside of the canvas, it is also necessary to mark out the holes that will be required to support the shelves. To do this, measure 8 mm from the plane of the parts and the same distance from the beginning of the bend. The drawing will show clearly how this should be done. The ends are finished with a U-shaped profile, the texture of which must correspond to the plate. For working with chipboard it is recommended to use a patch profile that can cover every part on both sides without the grooves of fixing. The profile should also be glued on the legs. After that, each butt should be treated with sandpaper. The last parts are connected by means of a dowel with a shelf, which is then put on the profile and cut off from the other side. Back to contents</a>
Instructions for assembling the table
 Scheme 2. Assembling a coffee table. From the chipboard sheets, the table top and bottom shelf are cut out, after which the flanges are screwed to the first part. It is necessary to retreat from the smaller side of 7 cm and draw a parallel line. Similarly, you need to do from 2 sides of the countertop and shelves. This will allow you to get 4 points of intersection, which must be screwed on the flanges. After this, put the rubber wheels and insert the pipes into the prepared places, fixing them with bolts. Scheme 2 shows in detail the purpose of each structural element. To ensure that the coffee table has turned out to be stable, you need to connect adjacent supports with each other using a pipe and a joker. To give an attractive appearance, the shelf is installed. For such purposes, regular pipes are replaced with special parts, where appropriate fasteners are provided. After that, cut out the correct size of the glass and insert it into the mount. The final stage is the application of the finishing agent on the construction, but before it is necessary to remove the "old" coating with sandpaper and rinse. If the plates have been painted, varnish or paint should be removed mechanically, thermally or chemically. Back to contents</a>
Decorating and decorating the table
The ways of decorating tabletops are verydifferent. The simplest decoration of the table is finishing with wallpaper, border or printout of any image. The chosen method involves selecting a decor and fitting it to the size of the table top. Carefully the surface of the table is covered with a varnish in 1 layer, and the still-dried table top is decorated with decor. Each layer of varnish is recommended to dry for at least 24 hours, and the number of such layers depends on the desire of the master. However, the more layers of varnish are applied, the more effective the resulting image will be. The drawing on the chipboard sheets can look quite original, if not initially painted the countertop. For finishing it is recommended to sand the surface with sandpaper beforehand, first large, and after fine, so that the paint and the ground have a good grip as a result. If the primer is used in the finish, it is better to use artistic or acrylic, while the latter can also be painted. The finished drawing is varnished in 3 layers. </ ul>


