A modern universal material thatused by builders, became plasterboard. It is capable of solving any construction problems, one of which is the installation of a suspended ceiling. When renovating a building, a plasterboard ceiling will be an excellent solution. The result is an excellent smooth surface. Currently, it has become possible to implement an original design solution if it is made with backlighting. The plasterboard ceiling is attached to the lathing, allowing you to level the ceiling and hide the electrical wiring. To make such a ceiling, you need to have:
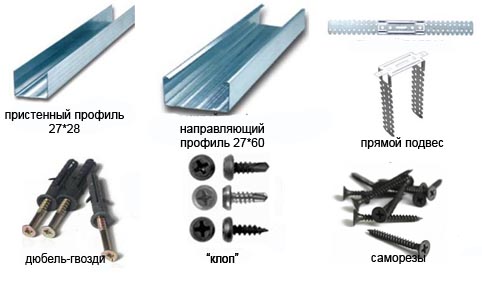
- profile;
- ceiling suspensions;
- dowels;
- Screws;
- LED Strip Light;
- Power Supply;
- wires;
- fixtures.
Several design features
Depending on the location and the lighting system used, plasterboard ceilings can be divided into several large groups:
 Plasterboard ceiling with lighting.The first group is quite simple. In this case, the lighting fixtures are built into the future plasterboard ceiling, for which special holes are made in advance. Sometimes the lamps are suspended directly from the ceiling. The designs of pendant lamps used for these ceilings must weigh less than 10 kg. This is due to the fact that the sheathing made of this material has a weak load-bearing capacity. The situation is completely different if the plasterboard ceilings have hidden lighting. In this case, the lighting devices are installed in special openings in the ceiling and directed at the ceiling. Reflected light creates a fantastic atmosphere in the house. Such lighting makes the room much more comfortable, design solutions become clearly visible, the building acquires a spectacular look and originality. Return to the table of contents</a>
LED backlight: features
To install such lighting, there isseveral ways. First of all, you need to have an LED strip. An excellent replacement for it will be built-in lighting fixtures. LED backlighting is a beautiful strip that performs many functions and is considered quite practical. The LED strip is mounted in grooves located throughout the room, or it is inserted into a plasterboard structure. Making sides is very difficult when the structure has a curvilinear appearance. Therefore, it is better to make it rectangular or square.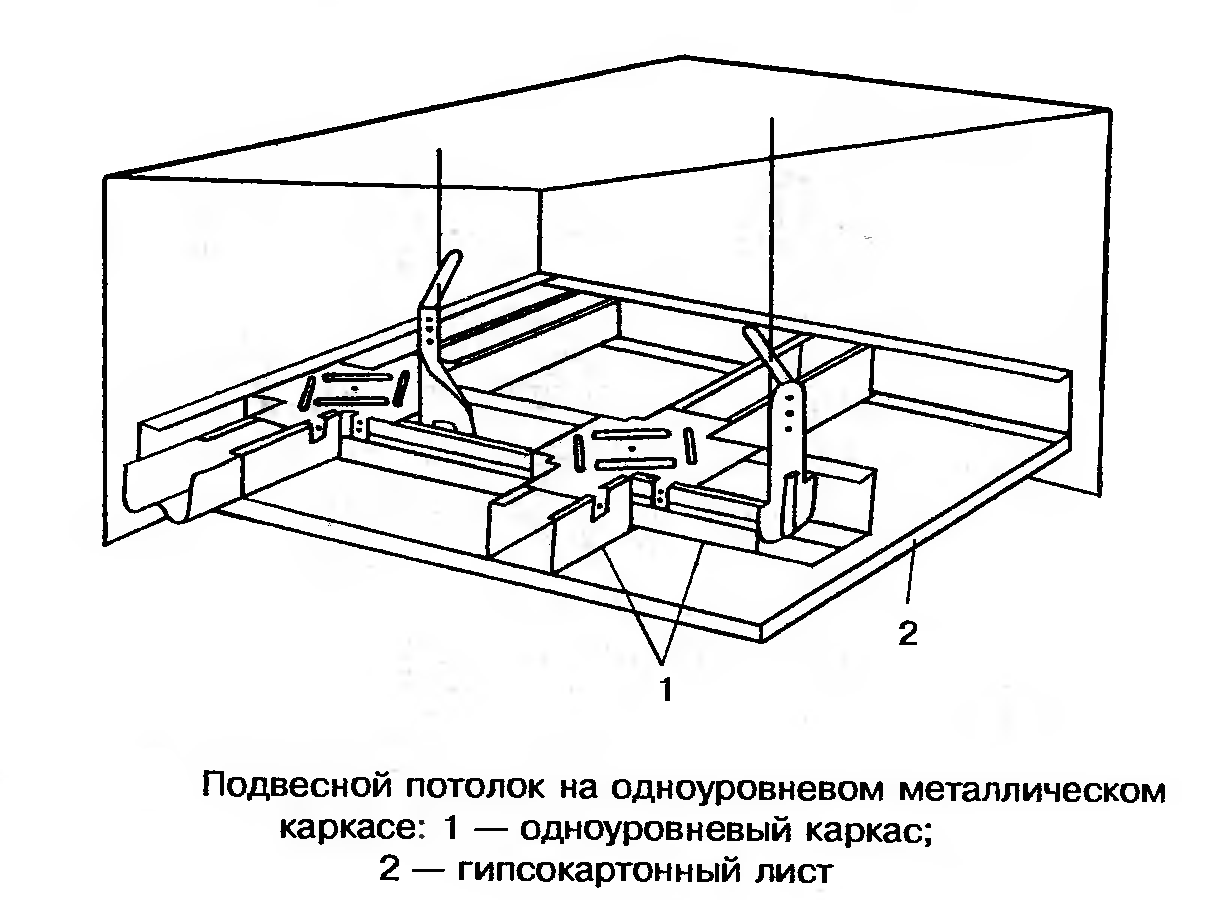 Scheme of the device of a single-level suspended ceiling on a metal frame. LED backlighting can be divided into two types:
- single-color;
- multicolor.
The color palette can be any.The colors can have a variety of tones. The backlight is controlled by a dimmer or a built-in RGB controller. Such network devices consume very little electricity, are completely fireproof, as they never heat up. The diode strip cannot be used as the main source of light, as its illumination level is very low. Such LED backlighting is relevant where it is necessary to have decorative lighting, to highlight interior details. In addition, it can serve as an excellent night light. These elements have a low cost and are highly practical. LEDs have high energy efficiency, twice as much as other lighting devices. Installation of such backlighting does not cause any difficulties. It is carried out with self-adhesive tape. In addition, the ceiling backlighting is switched on remotely using an additional control unit. Return to the table of contents</a>
Ceilings of plasterboard with their own hands
 Materials for installing plasterboard ceilings.At the first stage, the ceiling is marked out and the frame is assembled. It is made of a steel profile. The assembly must be performed in a certain sequence. 100 mm are retreated from the ceiling. The wall of the room is marked out with a thick line. It is drawn along the general perimeter of the room. This line becomes a beacon of the ceiling level. It must have a clearly verified horizontality, so the line is necessarily checked with a building level. According to the line, the first initial profile is fixed to the wall. Then, hangers are screwed to the ceiling for fixing the main frame profile. The assembled frame, which will hold the plasterboard ceiling, is screwed to the ceiling with screws and "crabs". Then the ceiling is covered with prepared plasterboard sheets. As a result, the do-it-yourself plasterboard ceiling, its first level, can be considered completely ready. A second level is made for mounting the contour lighting. For this purpose, the ceiling is marked out, taking into account the territory where the second level will be located. The width of the cornice is measured and 40 mm is set aside. The initial profile is fixed directly to the ceiling. The main profile parts are installed in it, maintaining a step of 50 cm.
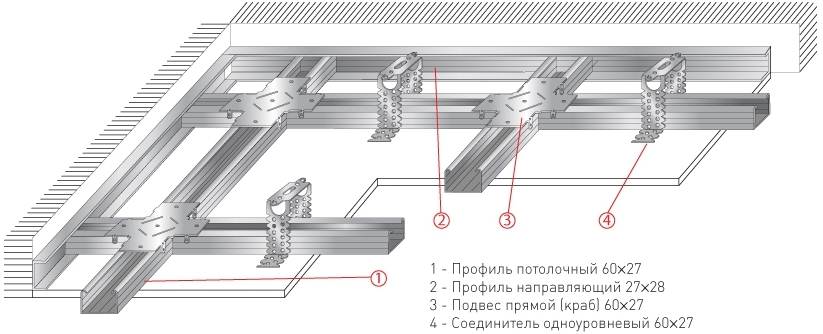 Profile diagram for plasterboard ceiling.The length of such an element is equal to the height of another ceiling level. Such original suspensions are attached with ordinary screws. The main ceiling profiles are inserted into the manufactured frame and then connected into a common system. Wires are pulled out into the side holes to connect the lighting. The fixed second frame is sheathed with sheets. When the installation of the lighting is completely finished, the resulting seams of the plasterboard sheets must be putty. Such work is quite accessible to a home craftsman, it does not require the help of professionals. With such work, the integrity of the ceiling is not violated. You can light the room with a variety of types of lamps. A pendant chandelier will look great in the middle of a large room. It should match a modern interior. Spotlights are installed in the ceiling according to the general perimeter of the room. LED strip is laid in niches. The installed light sources can be turned on simultaneously or one at a time. Everything depends on the individual requirements of the owner of the room and the selected mode. Return to contents</a>
Wiring, selection of fixtures
Today it has become fashionable to replace a hanging chandelier withceiling. Such replacement does not require installation of embedded parts for suspension mounting. Spotlights should not encounter steel profiles on their way. Scheme of a slatted plasterboard ceiling.If low-voltage lamps are to be used, it is necessary to agree in advance on the location where the step-down transformer will be installed. The latest pulse transformers are lightweight and small in size, so they can be covered with sheets. Do not equip plasterboard ceilings with incandescent lamps. They heat up strongly during operation, and these lamps require a lot of electricity. Today, LED lamps are widely used, and energy-saving lamps have become popular. When installing electrical wiring, each wire must be connected in easily accessible places. It is prohibited to use a cable in which the cores are made of different types of metal. The backlight cable must have double insulation and be in a special corrugated pipe. When fastening a steel profile, the screws must not touch the wiring. When installing a particularly complex design of lighting devices, it is necessary to install a separate circuit breaker to protect the room from fire. It is necessary to install wiring very carefully in rooms with high humidity. Wires pulled through the sleeve must be installed only inside the ceiling. Moreover, they are pulled through an additional sleeve that has special protective properties. The room will sparkle with bright colors when the ceiling lighting is turned on, it will become more cozy and comfortable. 12 W lighting will be optimal, it creates bright light and consumes very little electricity. If you strictly follow the technological operations described above, you can quickly and efficiently perform .


