Drywall was invented in the 19th century and since then allmore gaining prestige in the building materials market. Any fantasy can be embodied in its use. Suspended ceiling from plasterboard is one of perspective directions of application of this material.  Suspended ceilings from plasterboard have earnedpopularity due to the variety of shapes and colors. Nowadays, most people prefer a variety of shapes in the interior of their home. Everybody wants everything around to be cozy and refined. The ceiling is a great field for designers' experiments, and the ceiling structure of plasterboard is a good tool in their hands.
The construction of the ceiling from plasterboard
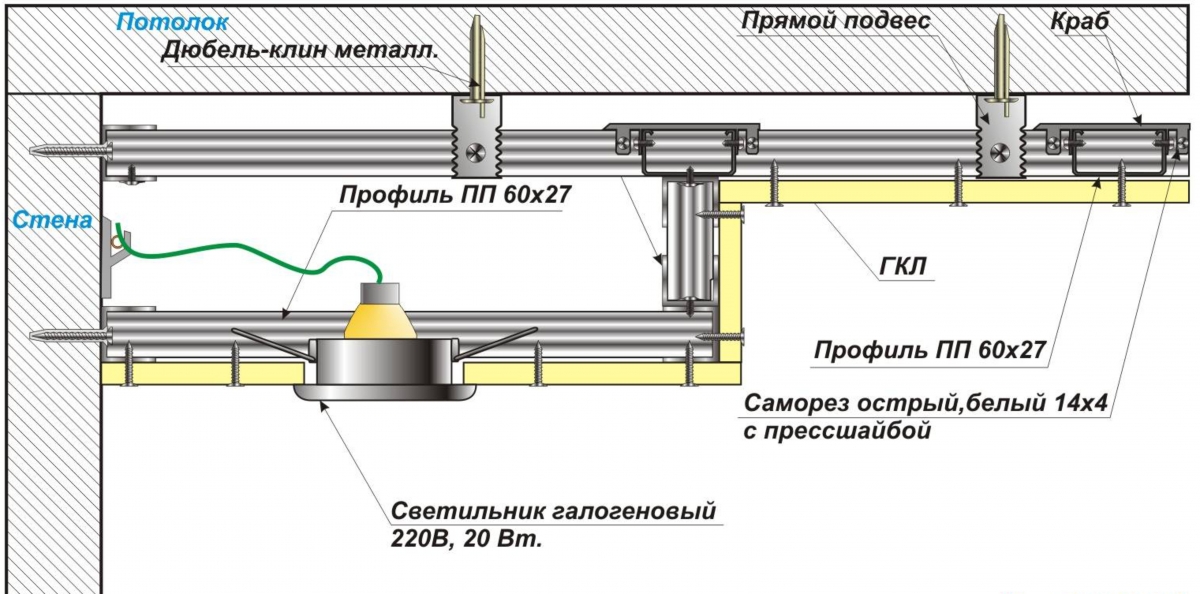
 To install a false ceiling, you need sheetsdrywall. Suspended ceiling is a single- or multi-level flat structure of plasterboard on the ceiling of any conceived form fixed at a certain distance from the ceiling ceiling inside the room. The plane of such a ceiling is made of sheets of plasterboard. Usually, sheets of drywall type GKL (conventional) with a width of 1.2 m, a length of 2.5 or 3 m, thickness of 6.9 or 12.5 mm are used. In rooms with high humidity (bathroom, toilet), it is recommended to use moisture-resistant gypsum plasterboard type GKLV. The sheets of gypsum cardboard are fixed on metal profiles. Mounting on the wall is provided by the guiding profiles (U-shaped) of PN28 / 27. To the ceiling, gypsum boards are suspended on ceiling profiles (C-shaped) of PP60x27 brand through suspension. The connection of the ceiling profiles to each other is done by fastening the crab, the device of which allows to fasten them in the form of a cross. Back to contents</a>
Marking for a suspended structure
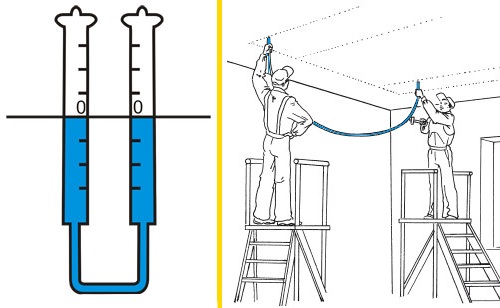 Layout of the ceiling with a water level. For the installation of a false ceiling, a detailed marking of the walls and ceiling is necessary. First, the walls for fixing the guide profiles are drawn. To do this, the real ceiling height is specified - almost always the height of the ceiling overlap is different at different points in the same room. Therefore, the height of the wall is determined using a tape measure at a minimum of three points (in the corners and in the center of the wall). The first mark is placed in the corner of the wall, where the height is the smallest. The mark is set at a distance of 8-10 cm from the ceiling surface, if built-in lighting or wiring of communications is provided, and at a distance of 5-6 cm, if they are not needed. A similar mark is made in another corner of the wall, but taking into account the true height of the ceiling. The suspended structure must be parallel to the floor after installation. Between the marks along the wall, a twine stretched, rubbed with a dye. With its help, the line between the marks is struck (beat off). In the same manner, all the walls are marked. The next stage of preparation is marking the ceiling surface for the installation of ceiling profiles. First, after stepping away from the far wall by 30-35 cm, make notes, with the help of a colored cord, a line on the ceiling, strictly parallel to the wall, fights off. The same is done from the opposite side of the room. Between these lines, parallel lines are drawn along the entire surface of the ceiling at a distance of 60-70 cm from each other. The distance between all lines must be the same over the entire surface. The same markup is made relative to the other two walls. As a result, a grid of lines (scheme) should be marked on the ceiling, which determines the direction of placement of the central line of the ceiling profiles. On the ceiling lines, marking points for the installation of ceiling mounts (pendants). For this purpose, points for the holes are marked on all the lines (along the entire length of the line) at a distance of 70-80 cm from each other. These points should not coincide with the crosshair of lines on the ceiling - it is recommended that the points are located no closer than 10 cm from the crosshair. Back to contents</a>
Mounting the skeleton of a false ceiling with your own hands
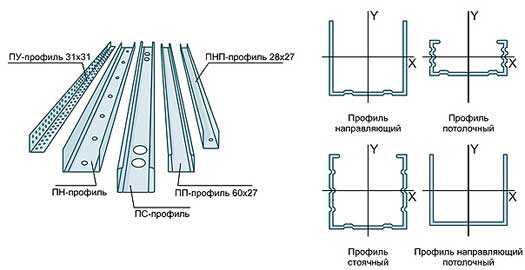 Profiles for drywall. The frame of the suspended ceiling from plasterboard is a bonded structure of profiles. First fix the guides. They should be installed along the line drawn on the wall. U-shaped profiles usually have holes for installation on their base. If there are no holes, then they must be drilled - the first one at a distance of 15-20 cm from the edge, then through 80-100 cm. The diameter of the hole is 6-7 mm. Profiles are alternately applied to the wall in the place of their installation, through the holes are made marks on the wall. At the marked points, a hole with a diameter of the order of 8 mm is made by a perforator or an electric drill. In the holes are installed plastic dowels. On the outer surface of the guide profiles, a sealing tape with an adhesive layer is adhered. The guides are mounted on the wall so that there is a sealing tape between the profile and the wall and fastened with self-tapping screws. Elements are installed around the perimeter of the room. When installing them, you must monitor the horizontal position. If necessary, the alignment is made by thin gaskets. Ceiling profiles are first mounted between two walls along a shorter wall. Their ends are fixed inside the U-shaped profile, while the base of the profile is turned downward. These profiles must be of the same length. If this length is not present, the profiles are built up to the desired size and firmly fastened with a metal bar. The location of the ceiling profiles is strictly controlled by the lines on the ceiling - the central line must coincide with the line on the ceiling. Profiles are placed in parallel along the entire length of the ceiling.
 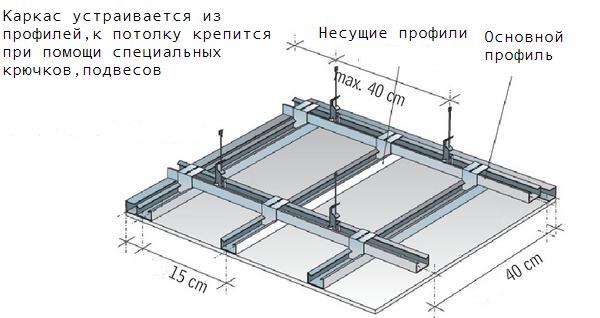 Scheme skeleton for a false ceiling. Ceiling profiles for transverse installation are cut into lengths measured between the wall and the first installed profile and between two adjacent ones. These segments are installed strictly on the markings on the ceiling. The first segments are fixed at one end inside the guide profile, and all the rest are fastened to the already established longitudinal profiles with the help of a cross-shaped crab attachment. The fastening allows you to securely fasten the connection in the form of a cross. The ceiling profiles are fixed to the ceiling using hangers. To do this, dowels are installed in the holes on the ceiling. The suspension brackets are bent as follows. The lateral parts of the strip with holes are bent from the solid part to an angle of 90 °, forming a U-shaped profile. The ends of the side rails bend at right angles to the sides. The height of the suspension bracket should strictly correspond to the distance between the ceiling profile and the surface of the ceiling. The upper platform of the suspension is fixed in the dowel with a screw. The legs of the suspension are fixed on the ceiling profile. Suspension is also fixed in all points of the marked attachment scheme. This completes the installation of the frame structure. Back to contents</a>
Preparation of plasterboard
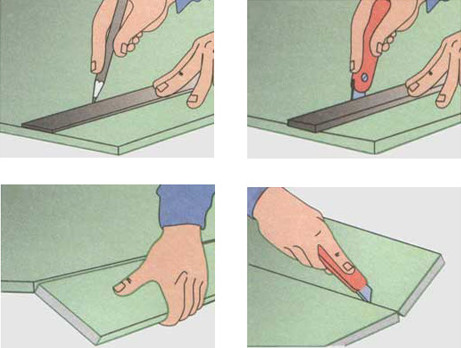 Scheme of cutting gypsum board with a knife. Preparation and cutting of drywall is done on the floor. For this, it is necessary to perform a full laying of the sheets and cut them. The first sheet is usually laid completely without cutting. Further laying requires the necessary cutting and cutting the sheets of the right size. The easiest way to cut gypsum board is with a knife. The sheet is laid on a horizontal flat surface, the line is drawn according to the layout. A knife cuts the cardboard along the line. The sheet is set so that the cut line is on the border of the table, and bends. Then the sheet is turned over and cut off with a knife along the bending line. All curved bends are cut with a hacksaw for metal. Holes inside the sheet (for example, for fixtures) are cut with a jig saw. On the ends of sheets of gypsum cardboard, the upper chamfer is removed with a knife or file. Back to contents</a>
Installation of plasterboard construction
 Scheme of suspended ceiling from plasterboard. Before assembling the entire structure of the suspended ceiling from gypsum board it is necessary to conduct all communications. First of all, the wiring is carried out. They gather in a bundle, which is placed in a corrugated hose. Wires are attached to the installation site of the built-in luminaires. The entire electrical circuit is neatly distributed over the frame and fixed. The gypsum board structure, assembled on the floor, is raised one by one and fixed on the profiles using self-tapping screws. At the fastening points in the plasterboard a hole is drilled for the screw. Fastening of the construction begins with a whole sheet, which is fixed in the corner part of the ceiling. The distance between the fasteners should be 10-15 cm. Screws must be screwed so that their hats do not protrude above the surface of the sheet. The gap between sheets of drywall should not exceed 2 mm. During installation, make sure that the chamfer at the ends is on the outer surface in the joint area of the sheets. Complete installation of suspended ceiling from gypsum board is completed with putty and surface grinding. First, a special shpatlevochnaya mixture is applied to the joints of the sheets so that it fills the space formed by the chamfer. A thin layer of putty is applied in places where screws are screwed. After the mixture dries, the surface is cleaned first. Then a thin layer of finishing filler mixture of liquid consistency is applied to the whole surface. The mixture dries for 1-2 days. After that, the entire surface of drywall is carefully rubbed and sanded with an emery cloth. Back to contents</a>
Required Tools
You will need the following tool: 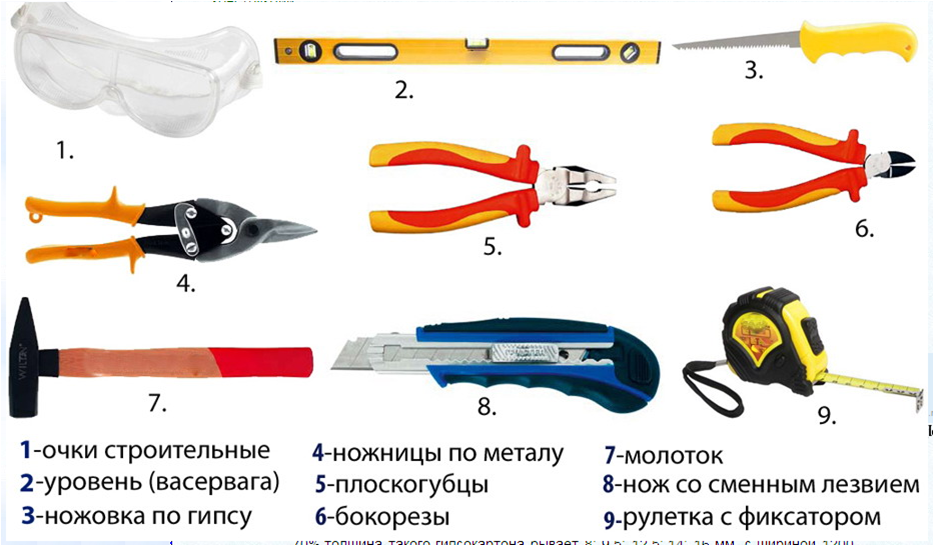 Tools for installing drywall on the ceiling.
- perforator;
- Bulgarian;
- electric drill;
- jig saw electric;
- Screwdriver;
- grinding machine;
- grid grinding;
- a hammer;
- chisel;
- pliers;
- knife;
- hacksaw for metal;
- scissors for metal;
- screwdriver;
- bit;
- level;
- plumb bob;
- roulette;
- line meter.
The use of drywall in the construction of suspendedthe ceiling allows you to provide the desired design of the apartment. The ease of handling the material means that the installation of a false ceiling can be carried out independently and at the lowest cost. With a little imagination, it's enough to just do it.


