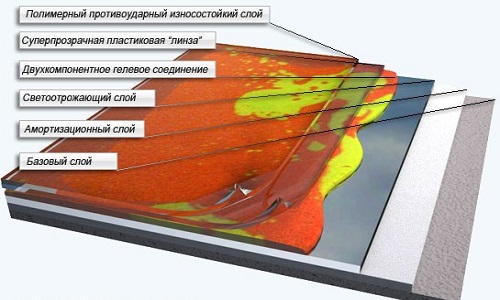
The device is becoming increasingly popularself-leveling floor with your own hands. This kind of flooring looks great in a modern apartment or in a large country house. Some qualities that make this type unique distinguish them well from other types of flooring. There is nothing complicated in making such floors with your own hands, and even a beginner can do this job. Self-leveling flooring can be installed even on top of a warm floor. To install it, you will need: Scheme of the device of a self-leveling decorative floor.
- loading floor;
- brush;
- container for breeding;
- drill for mixing;
- putty knife;
- leveler;
- grater trowel;
- aeration roller;
- level;
- construction beacons.
Preparing the surface for installation of the filler floor
 Scheme of the device for working withself-leveling bulk floor. The quality of installation and the bulk floor itself largely depends on the preparation of the surface, namely on the subfloor device. The main requirement is that the base is thoroughly cleaned. A vacuum cleaner and wet cleaning will not do. The surface is cleaned of grease and oil stains, glue, and old paint using abrasive materials. If the subfloor is a concrete screed, it must be smooth and durable, and there should be no cracks on it. If the coating crumbles, it must be cleaned to a solid base, and this area must be covered with putty and primer. Bulk floors can make the coating ideal if they are laid on a smooth base without external and internal defects. Self-pouring of the floor covering can only be done if the room temperature does not drop below +15°C. There should also be no drafts in the room when pouring the floor. Temperatures below the recommended ones have a negative effect on the finished mixture, depending on the composition, it either hardens too quickly or does not harden for a very long time. The overall quality of the coating will most likely not be worse, but the color may change and the strength of some areas may decrease. Installation of a self-leveling floor requires careful priming of the base before work. This stage of work closes the pores in the rough base and improves adhesion between the coatings. Closing the pores is a particularly important condition, since otherwise, when pouring, air will rise from them and remain in the self-leveling floor coating. This can affect the quality of the coating and lead to various defects. If the screed is cement, it can be covered with an ordinary primer, and for concrete, a special composition is required. Sometimes it is necessary to apply 2 or 3 layers of primer before starting work. Since this material is not too expensive, it is undesirable to save on it, because high-quality surface priming guarantees high quality of the coating. The more porous and drier the surface is primed, the more layers of primer will be needed. Return to Contents</a>Preparing the wood flooring
 Technology of applying epoxy self-leveling floor.Self-leveling flooring can be applied to any surface, if it is sufficiently even and well prepared. The evenness is checked using a level, and the preparation varies slightly depending on the type of surface. On a wooden surface, the baseboards are removed, old paint, varnish or glue are removed from the wood along with dirt, if any. For this, a grinding machine, scraper or spatula is used. The moisture content of the wood before applying the self-leveling floor should not exceed 10%, all cracks are sanded and filled. Dust and debris are removed using a construction vacuum cleaner, then the surface is degreased using any special cleaning powder. In general, professionals advise leaving a wooden base as a subfloor only in the rare case when there are no other options, and whenever possible, they try to replace it with concrete. Return to contents</a>
Step-by-step installation of the filling floor
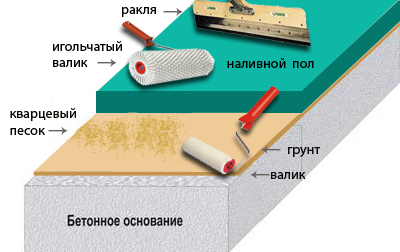
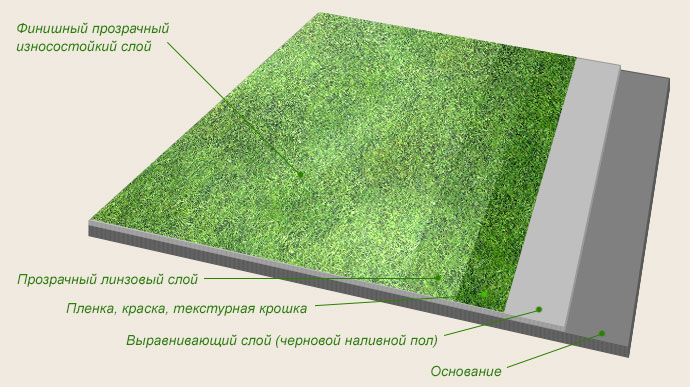
 Scheme of the device of a self-leveling floor with a three-dimensionaleffect. The coating is poured no earlier than the primer has completely dried. Before pouring the coating, you should carefully study the manufacturer's recommendations regarding the use of the mixture and adhere to them to the smallest detail. It is necessary to ensure that during the work the mixture has a uniform consistency in all cases of mixing. The finished mixture is suitable for use within 15-20 minutes, so beginners are not recommended to dilute the entire volume at once. It is better to start small and practice, pouring the floor in parts, dividing the common surface with partitions. If you dilute the mixture with hot water, the time for use will most likely be reduced, so it is advisable to use water at room temperature. First, pour the base layer, namely, the mixture diluted according to all recommendations is poured onto the subfloor, which must be well primed and dried. To ensure that the mixture is distributed evenly, use a special metal bar or squeegee. The squeegee is more convenient, since it has a height-adjustable bar on which the desired coating height is set, but this tool is not always at hand. The height is adjusted manually with a metal bar, which is a bit more complicated, but in most cases does not create any difficulties. Any complex protrusions, corners and hard-to-reach places are leveled with a spatula. When pouring large areas, it is immediately recommended to use special shoes for walking on the surface, which have a sole made of long spikes and are called paint shoes. You can also make them yourself by screwing several dozen screws into the boards to fit your feet and fastening them like beach flip-flops. Small holes from these shoes are quickly tightened, but it is advisable not to abuse this and leave the floor to harden. Another way out of the situation is to pour the mixture in parts, dividing the surface into sections. Immediately after pouring, air bubbles are removed from the mixture with a special roller. This roller has long spikes and is called an aeration roller, the length of the spikes is selected differently for each floor. It is advisable not to disturb the poured floor for several days and avoid drafts and direct sunlight in the room. The maximum hardening period of the composition is 4-5 weeks. When the base layer dries and hardens, you can start applying the finishing layer. The thickness of this coating is only a few mm, after drying it is necessary to cover it with polyurethane varnish. This preserves the appearance of the coating for a longer period and prolongs its service life. If you need to give the surface anti-slip properties, you can sprinkle the floor with fine clean sand immediately after pouring, distributing it evenly. You can achieve the same effect without going over the pour with an aeration roller, but there is always a risk of getting an unattractive appearance with large craters from air bubbles. Return to the table of contents</a>
Composition of the filler floor
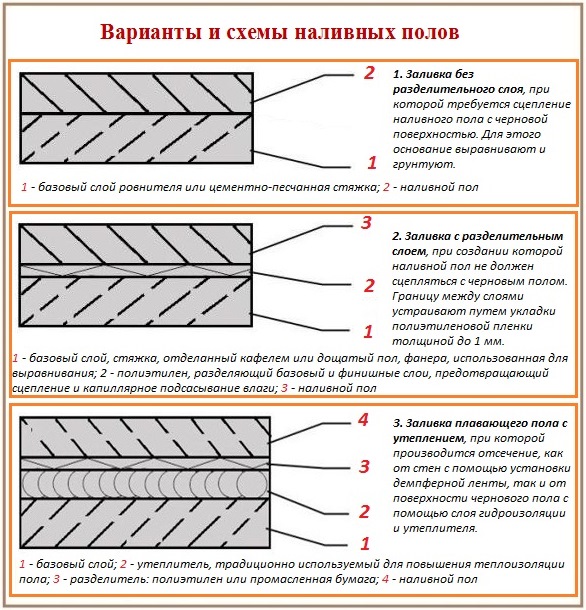
 Options for pouring self-leveling floors.Self-leveling floors are made of polymers, they owe their name to the method of installation, since they are actually poured onto a pre-prepared surface. The solidified self-leveling floor forms a smooth and shiny coating, reminiscent of linoleum, but at the same time it feels more like ceramic tiles. The components of the self-leveling floor are:
- polymer;
- hardener;
- dye;
- granite granite.
The distinctive features of the self-leveling floor are:its smooth surface without gaps and seams on it. They also have a high degree of wear resistance. The service life of this material reaches 40 years, and it is resistant to moisture and various chemicals, withstanding even sudden temperature changes. Such a coating is considered dust-repellent and microorganisms do not multiply on it. Another advantage is that the materials are non-flammable and do not emit active substances into the environment. Self-leveling floors are very easy to care for, they can be washed even without special means.


